

Table of Contents
Category: Brownies
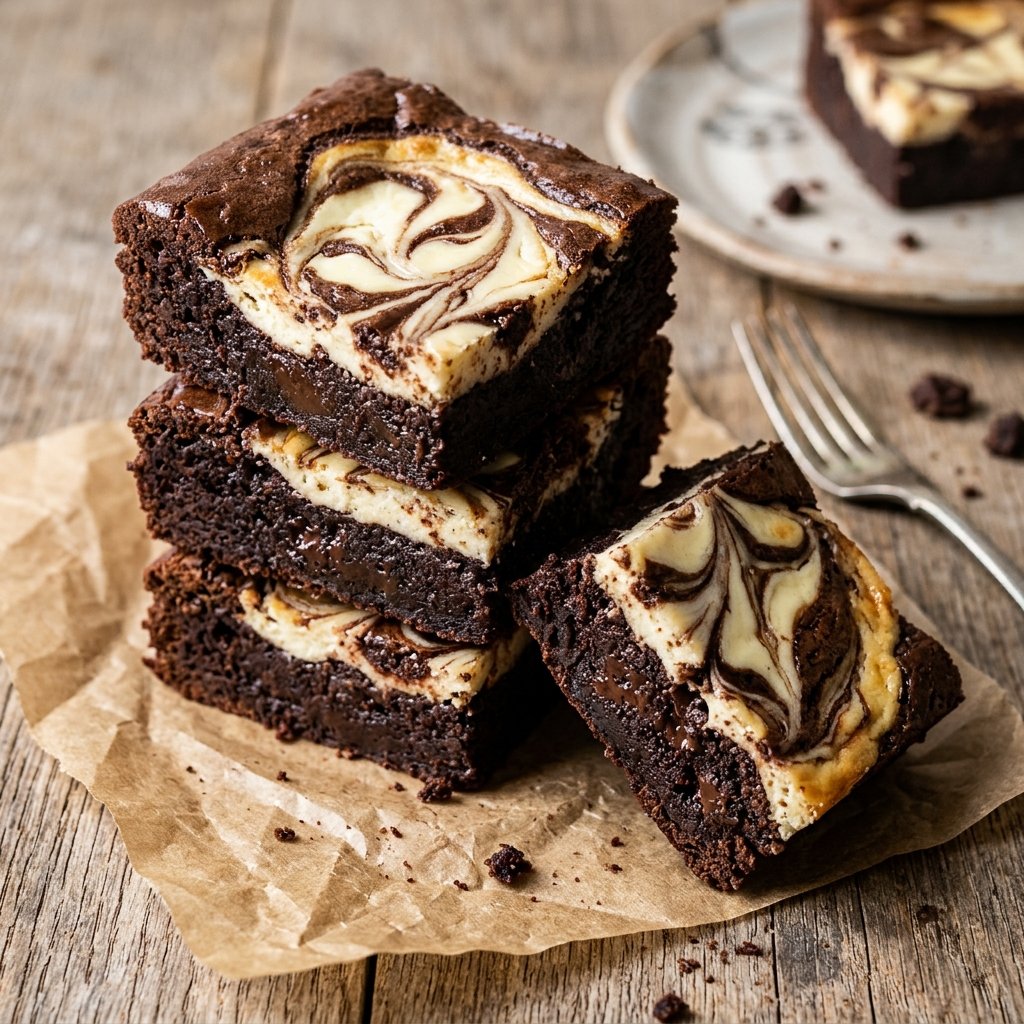
Image: cream-cheese-swirl-brownies.jpg
Meta title: Cream Cheese Swirl Brownies Recipe – Fudgy Cheesecake Brownies
Meta description: Bake bakery-quality cream cheese swirl brownies with this foolproof recipe. Featuring an ultra-fudgy dark chocolate base marbled with tangy, velvety cheesecake ribbons.
Keywords: cream cheese swirl brownies, cheesecake brownies, marbled brownies, fudgy cheesecake brownies, homemade brownies, chocolate cream cheese brownies
Prep time: 25 minutes | Bake time: 32 minutes | Cooling time: 90 minutes | Serves: 16 squares
Introduction
Few dessert combinations rival the sublime harmony of intense, bittersweet dark chocolate paired with tangy, velvety cream cheese. When crafted with precision, cream cheese swirl brownies—often celebrated as marbled cheesecake brownies—deliver the absolute best of two iconic dessert worlds. Each bite transitions effortlessly from an intensely fudgy, molten dark chocolate foundation into luxurious, melt-in-your-mouth ribbons of golden-kissed cheesecake. The pleasant lactic tang of cultured cream cheese cuts through the deep richness of 70% dark cocoa, creating an irresistible, multi-layered balance that never tastes cloying.
Yet, home bakers frequently struggle with marbled brownies. Too often, the cream cheese layer sinks like a stone to the bottom of the pan, hardens into rubbery patches, or renders the surrounding chocolate crumb waterlogged and gummy. Conversely, the chocolate batter might dry out before the cheese layer sets properly. These common pitfalls occur because cheesecake batter and brownie batter bake at fundamentally different rates and carry vastly different moisture and density profiles.
By applying core baking science to both components, this recipe eliminates the guesswork. You will learn the exact ratios needed to match batter densities, the optimal temperature for effortless marbling, and the resting protocol that ensures pristine, bakery-grade squares with razor-sharp edges. Whether you are baking for an upscale dinner party or a cozy weekend treat in your kitchen, these cheesecake brownies will immediately claim the crown as your signature bake.
Why You Will Love This Recipe
- Harmonious Flavor Equilibrium. The silky tang of cultured Philadelphia-style cream cheese perfectly balances the bittersweet richness of dark Dutch cocoa and melted chocolate.
- Ultra-Fudgy Base. Built on a high-fat, low-flour chocolate foundation that guarantees a dense, gooey interior and addictively chewy corners.
- Flawless Batter Suspension. Calibrated batter viscosities prevent the cheesecake ribbons from sinking to the pan floor or disappearing into the chocolate during baking.
- Stunning Marbled Presentation. An easy skewer-swirling technique creates an artistic, bakery-worthy tapestry of ivory and deep mahogany across every single square.
- Pristine Sliceability. With our specialized chilling technique, the dairy fats and cocoa butter firm up to yield immaculate, picture-perfect cuts without tearing or smearing.
- Versatile and Reliable. Can be prepared a day in advance, making it the ultimate stress-free dessert for holidays, bake sales, and celebrations.
Ingredients and Why They Matter
A stellar marbled brownie relies on two distinct batter systems: an emulsion of fat, melted chocolate, and whipped eggs for the brownie base, alongside an emulsion of softened cream cheese, egg, and sugar for the cheesecake swirl.
For the Fudgy Chocolate Brownie Base
- 7 oz (200 g) Bittersweet Dark Chocolate (60% to 70% cacao), finely chopped. Real couverture or baking chocolate bars provide essential cocoa butter that solidifies into a luxurious fudgy crumb. Avoid chocolate chips, which contain stabilizer additives that hinder smooth emulsification.
- 3/4 cup (170 g) Unsalted Butter, cubed. Melted alongside the dark chocolate, high-fat butter creates the rich, velvety base that tenderizes the gluten strands.
- 1/3 cup (35 g) Dutch-Processed Cocoa Powder, sifted. Alkalized cocoa deepens the mahogany color and provides earthy, rounded chocolate notes without residual acidity.
- 1 cup (200 g) Granulated White Sugar. Dissolved during the egg whip to produce a delicate, shiny crust and tender crumb structure.
- 1/3 cup (70 g) Light Brown Sugar, packed. Delivers subtle molasses undertones and natural hygroscopic moisture for chewiness.
- 3 Large Eggs, at room temperature. Room-temperature eggs whip readily, creating the airy matrix necessary to hold the dense batter together.
- 1 1/2 teaspoons Pure Vanilla Extract. Amplifies the aromatic depth of dark cocoa.
- 1/2 teaspoon Fine Sea Salt. Sharpens the chocolate and keeps the sweetness in check.
- 3/4 cup (95 g) All-Purpose Flour. A modest amount of flour ensures a weak gluten network, keeping the texture dense and fudgy rather than sponge-cake-like.
For the Tangy Cream Cheese Swirl
- 8 oz (225 g) Full-Fat Brick Cream Cheese, softened to room temperature. Always use standard brick-style cream cheese (such as Philadelphia). Tub spreads contain added water and air, which will cause the swirl to weep, separate, or curdle in the oven.
- 1/4 cup (50 g) Granulated White Sugar. Sweetens the cheese sufficiently while preserving its characteristic tart profile.
- 1 Large Egg Yolk, at room temperature. The yolk provides gentle emulsification and richness, setting the cheesecake layer into a creamy custard without making it puffy or rubbery like a whole egg white would.
- 1/2 teaspoon Pure Vanilla Extract. Complements the cultured dairy flavor.
- 1 tablespoon (8 g) All-Purpose Flour. A tiny touch of starch binds moisture in the cream cheese, ensuring the swirl holds its distinct marbled shape during the bake.
Equipment You Will Need
- 8-inch (20 cm) Square Metal Baking Pan. Metal heats rapidly and cools promptly, promoting crisp corners and a uniformly baked core. Avoid glass or ceramic dishes, which retain excessive heat and overbake the delicate cheesecake layer.
- Parchment Paper. Cut into two wide strips to create an interlocking parchment sling for clean, effortless removal.
- Heatproof Bowl & Saucepan (or Microwave). For melting the butter and dark chocolate smoothly.
- Medium Mixing Bowl & Hand Whisk. For preparing the brownie base.
- Electric Hand Mixer or Whisk. For beating the softened cream cheese until velvety and lump-free.
- Wooden Skewer or Butter Knife. For creating the elegant swirl pattern.
- Chef’s Knife & Tall Pitcher of Hot Water. For slicing clean, professional squares.
Step-by-Step Instructions
Follow these step-by-step instructions carefully to master the art of layered density and marbling.
Step 1: Prep the Oven and Pan
Position an oven rack in the center position and preheat your oven to 350°F (175°C). Lightly grease an 8-inch square metal baking pan with cooking spray or butter. Line the pan with two crisscrossing strips of parchment paper, leaving 2-inch overhangs on all four sides. Press the parchment firmly against the corners.
Step 2: Melt the Chocolate and Butter
In a heatproof bowl set over a saucepan of gently simmering water (bain-marie), combine the chopped dark chocolate and cubed unsalted butter. Stir periodically with a spatula until completely melted, smooth, and glossy. Remove from heat, sift in the Dutch cocoa powder, and whisk until fully incorporated. Allow the mixture to cool for 5 to 7 minutes until lukewarm (around 105°F / 40°C).
Step 3: Whip the Brownie Egg Mixture
In a medium mixing bowl, whisk together the 3 eggs, granulated sugar, brown sugar, vanilla extract, and fine sea salt vigorously for 3 to 4 minutes until pale, slightly thickened, and glossy. Pour the lukewarm melted chocolate mixture into the whipped eggs and whisk until smoothly emulsified and glossy.
Step 4: Fold in the Flour
Sift the 3/4 cup of all-purpose flour directly over the chocolate mixture. Using a flexible silicone spatula, fold the flour in with gentle, circular sweeps just until no dry white streaks remain. Do not overmix. The batter will be thick, luxurious, and decadent. Measure out and reserve 1/3 cup of this brownie batter in a small cup for final topping. Pour the remaining brownie batter into your prepared baking pan, spreading it into an even layer with an offset spatula.
Step 5: Make the Cream Cheese Swirl Batter
In a clean bowl, beat the room-temperature brick cream cheese with an electric hand mixer on medium speed for 1 to 2 minutes until completely smooth and free of lumps. Add the 1/4 cup granulated sugar, egg yolk, vanilla extract, and 1 tablespoon of flour. Beat on low speed for 60 seconds just until thoroughly combined, creamy, and satiny. Avoid whipping at high speed, which introduces excess air bubbles that cause cheesecake swirls to crack or puff erratically.
Step 6: Layer and Marble the Batters
Using a cookie scoop or tablespoon, dollop the cream cheese mixture evenly over the chocolate batter in the pan. Next, take the reserved 1/3 cup of brownie batter and drop small spoonfuls in between and over the cream cheese dollops.
Take a wooden skewer or the tip of a butter knife. Insert it about halfway into the batter (do not scrape the bottom parchment). Glide the skewer in a continuous “figure-8” or serpentine S-curve pattern across the surface, moving horizontally and then vertically. Make 4 to 6 gentle sweeps. Stop when you achieve an intricate, marbled pattern—over-swirling will blend the two batters into a murky taupe rather than crisp, contrasting ribbons.
Step 7: Bake to Custardy, Fudgy Perfection
Transfer the pan to the center rack of your preheated oven. Bake at 350°F (175°C) for 30 to 34 minutes.
Because of the cheesecake swirl, testing doneness requires care:
- The outer edges should look set, slightly puffed, and matte.
- The center cream cheese swirls should appear set and dry to the touch with barely perceptible golden tinges at the tips, but with a slight, gentle jiggle when the pan is nudged.
- Insert a toothpick into a pure chocolate section midway between the edge and center; it should emerge with moist, sticky crumbs (not wet runny batter).
Step 8: Cool and Chill for Immaculate Slices
Remove the pan and set it on a wire rack to cool completely to room temperature (about 1 hour). Do not slice yet!
Transfer the pan into the refrigerator for at least 1 1/2 to 2 hours (or overnight). Chilling sets the cream cheese custard and solidifies the cocoa butter, transforming the brownies into dense, sliceable confections.
Once chilled, use the parchment overhangs to lift the entire brownie block onto a cutting board. Warm a long chef’s knife in hot water, wipe it dry with a towel, and slice straight down in one decisive stroke. Wipe and warm the knife between every cut to keep the ivory cream cheese swirls pristine. Cut into 16 uniform squares.
The Science of Swirling Brownies
Understanding the physics of two contrasting batters ensures predictable bakery perfection:
- Specific Gravity and Batter Viscosity: Cream cheese batter is naturally denser than whipped cake batter, but lighter than heavy melted chocolate. By folding a touch of flour (1 tbsp) into the cream cheese and keeping the chocolate base rich and low-flour, both batters achieve matching specific gravities. This parity keeps the cheesecake swirls suspended near the surface rather than plunging to the bottom.
- Moisture Migration and Curdling Prevention: Cream cheese consists of roughly 55% water bound by dairy protein and fat. If exposed to intense, unbuffered heat, dairy proteins shrink, expelling water (syneresis) and making the swirl watery. Adding granulated sugar and egg yolk coats the milk proteins, raising their coagulation temperature and preserving a silky, custardy bite.
- Controlled Aeration: Unlike sponge cakes, neither batter contains chemical leaveners (baking powder or baking soda). Omitting leaveners prevents the cheesecake layer from puffing like a soufflé and collapsing into unsightly cracks upon cooling.
- Fat Solidification Dynamics: The magic of a cheesecake brownie’s texture occurs during the chilling stage. Cocoa butter in dark chocolate and butterfat in cream cheese both recrystallize into rigid crystalline matrices below 50°F (10°C). This dual fat solidification allows neat, razor-clean cuts that retain their shape at room temperature.
Pro Tips for the Best Cheesecake Brownies
- Use Brick Cream Cheese Exclusively: Tub cream cheese spreads contain added air, emulsifiers, and whey liquids designed for spreading on toast. They will cause your swirls to curdle and turn rubbery in the oven.
- Ensure Ingredients are Truly Room Temperature: Cold cream cheese will inevitably leave stubborn, white curd-like lumps that cannot be beaten out. Take cream cheese and eggs out of the fridge at least 90 minutes before baking.
- Do Not Over-Swirl: Limit yourself to 4 to 6 deliberate figure-8 strokes. Over-swirling muddles the distinct ivory and mahogany colors into an unappealing beige.
- Use Only the Egg Yolk in the Swirl: A whole egg white contains albumen that expands under oven heat, causing the cheesecake layer to puff, blister, and crack. The single yolk adds rich fat and lecithin without excess puff.
- Always Chill Before Slicing: Attempting to cut warm cheesecake brownies will smear the soft cream cheese into the molten chocolate. Patience in the refrigerator guarantees bakery-window presentation.
Common Mistakes and How to Fix Them
| Problem | Likely Cause | Solution |
|---|---|---|
| Cheesecake swirl sank to the bottom | Cream cheese batter was too heavy or chocolate batter was too warm/thin | Let melted chocolate cool to lukewarm before mixing; add 1 tbsp flour to the cheese mixture to match viscosity. |
| Cream cheese layer cracked and puffed | Too much air whipped into the cheese or baked at too high heat | Beat cream cheese on low speed just until combined; bake on center rack at 350°F (175°C) and avoid overbaking. |
| White lumps in the cheesecake swirl | Cream cheese was too cold when beaten | Soften brick cream cheese completely to room temperature (70°F / 21°C) before mixing. |
| Chocolate crumb is dry or cakey | Overmeasured flour or overbaked pan | Use a kitchen scale to measure 95g flour; pull pan when toothpick has moist sticky crumbs. |
| Muddy, messy cuts that smear | Sliced while warm or using a dirty knife | Chill brownies thoroughly in fridge for 2 hours; slice with a hot, clean knife wiped dry between every cut. |
| Swirl tastes sour or rubbery | Used fat-free or tub cream cheese | Always choose full-fat brick cream cheese with standard 33% milk fat content. |
Substitutions and Variations
- Raspberry Swirl Cheesecake Brownies: Spoon 2 to 3 tablespoons of seedless raspberry preserves alongside the cream cheese dollops before swirling. The bright berry acid cuts through the chocolate decadence.
- Espresso Cream Cheese Brownies: Whisk 1/2 teaspoon of fine instant espresso powder into the cream cheese batter for a subtle tiramisu-inspired flavor dimension.
- Peanut Butter Cheesecake Swirl: Replace 2 oz of the cream cheese with 2 tablespoons of smooth creamy peanut butter for a luscious nutty undertone.
- Salted Caramel Swirl: Drizzle 3 tablespoons of thick salted caramel over the marbled top right before sliding the pan into the oven.
- Gluten-Free Cheesecake Brownies: Substitute the all-purpose flour 1:1 with a high-quality 1-to-1 gluten-free baking flour blend containing xanthan gum. Because this recipe uses minimal flour, the fudgy texture remains virtually identical.
Make-Ahead, Storage, and Freezing
Make-Ahead Advantage: These brownies actually taste superior on Day 2! An overnight chill in the refrigerator allows the chocolate flavor to deepen and the cheesecake swirl to mature into a rich, velvety consistency.
Refrigerated Storage: Because of the fresh dairy in the cheesecake swirl, store sliced brownie squares in an airtight container in the refrigerator for up to 5 days. Separate stacked layers with parchment paper.
Freezing Instructions: Wrap individual chilled squares securely in plastic wrap, then pack them into a freezer-safe zip-top bag. Freeze for up to 2 months. Thaw individual brownies in the refrigerator for 2 hours or at room temperature for 30 minutes before serving.
Serving Suggestions and Pairings
- Afternoon Coffee Ritual: Pair a cold, dense square with a hot Americano, cappuccino, or dark-roast pour-over to highlight the bittersweet cacao and tangy cheese.
- Fresh Berry Garnish: Serve on a dessert plate accompanied by a cluster of fresh raspberries or sliced strawberries and a light dusting of cocoa powder.
- Warm Fudge Drizzle: For an ultra-luxurious dessert, gently warm a square for 10 seconds in the microwave and drizzle with a spoonful of warm dark chocolate ganache.
Nutrition Notes
Each square (1/16 of the batch) yields approximately 285 calories, 17 g total fat (10 g saturated fat), 31 g carbohydrates, 23 g sugars, 2 g dietary fiber, and 4 g protein. Thanks to the wholesome full-fat dairy and dark chocolate, each portion feels satisfying, decadent, and thoroughly indulgent.
Try Our Next Recipe!
Looking for another delicious dessert? Try our Strawberry Cream Cake Recipe and enjoy another sweet homemade treat!
Frequently Asked Questions
Can I use low-fat or tub cream cheese?
No. Tub cream cheese spreads contain excess moisture, gelatin, and air whipped into them to keep them spreadable. Low-fat varieties lack the butterfat necessary to create a rich custard and will turn watery, rubbery, or cracked in the oven. Stick strictly to full-fat brick cream cheese.
How do I prevent the cream cheese swirl from browning too much?
Bake on the center rack at 350°F (175°C). The swirl should stay pale ivory with only subtle golden blushes at the thinnest feathered edges. If your oven tends to run hot, tent a loose sheet of aluminum foil over the top during the final 8 minutes.
Why did my cheesecake swirl crack?
Cracking usually results from overbeating the cream cheese mixture on high speed (incorporating excess air that expands and collapses) or using a whole egg with whites. Using low speed and relying on a single egg yolk prevents structural cracking.
Do these brownies have to be refrigerated?
Yes. Due to the dairy cream cheese layer, these brownies should not sit at room temperature for more than 3 hours. Store them in an airtight container in the refrigerator.
Recipe Card Summary
| Prep time | 25 minutes |
| Bake time | 32 minutes |
| Cooling & chilling | 2 hours 30 minutes |
| Total time | About 3 hours 30 minutes |
| Yield / Servings | 16 squares |
| Difficulty | Intermediate |
| Storage | Airtight container in refrigerator up to 5 days, or freeze up to 2 months |
