

Table of Contents
Introduction Chocolate Raspberry Layer Cake
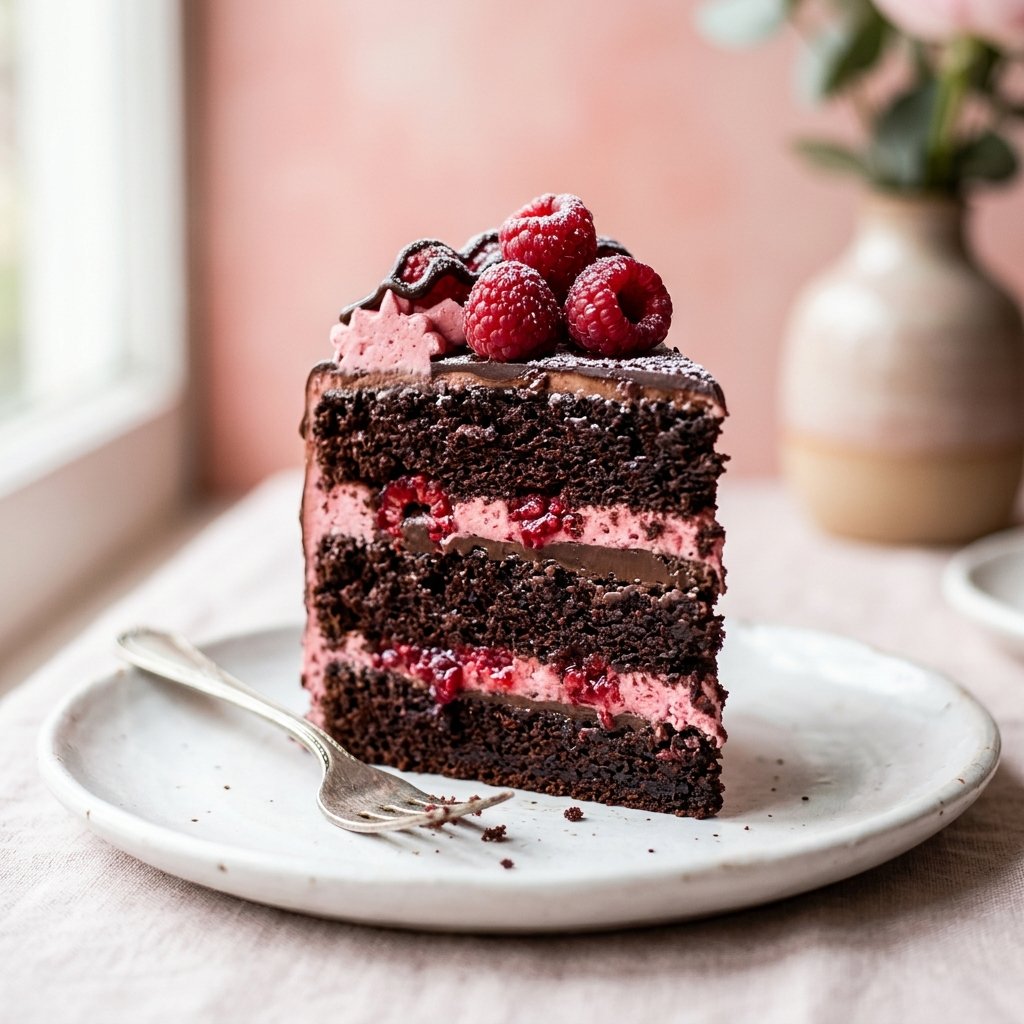
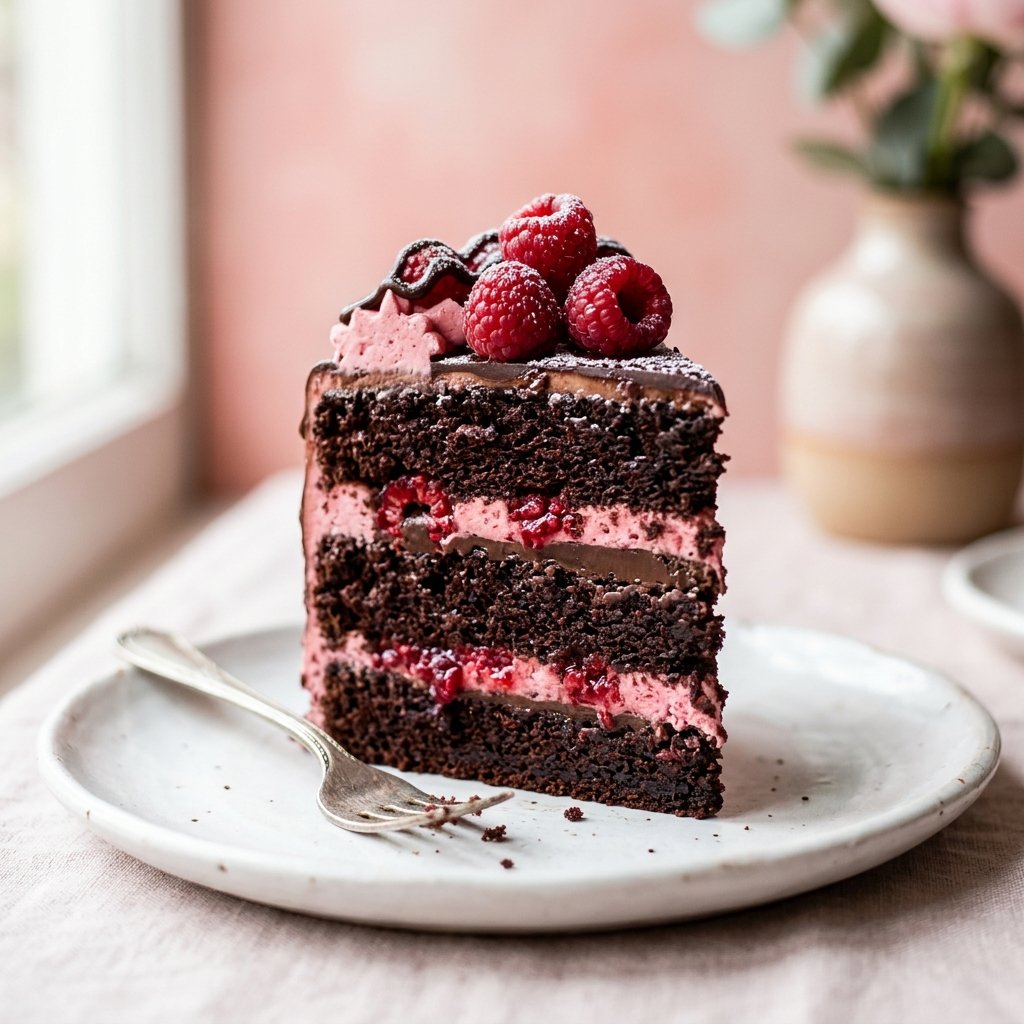
Some cakes are made for everyday snacking, and some are made to be the centerpiece of the table. This chocolate raspberry layer cake belongs firmly to the second group. It has deep, dark chocolate sponge layers that stay tender for days, a velvety dark chocolate ganache, a bright raspberry cream filling, and a crown of fresh berries on top.
The combination of chocolate and raspberry is a classic for a reason. Chocolate is rich, bitter and sweet all at once, while raspberries bring a sharp, fruity acidity that cuts through the richness and keeps every bite balanced. The result is a dessert that feels elegant but is surprisingly approachable, even for home bakers who have never made a layer cake before.
In this guide you will find everything you need: the ingredients and why each one matters, step-by-step instructions, assembly and decorating methods, troubleshooting, substitutions, make-ahead and storage advice, serving ideas, nutrition notes and answers to the most common questions. Read it once through before you start, and you will bake with confidence.
Why You Will Love This Chocolate Raspberry Layer Cake
- Incredibly moist. Hot coffee and oil in the batter keep the crumb soft for days.
- Deep chocolate flavor. Cocoa bloomed in hot liquid tastes richer and more intense.
- Balanced sweetness. Tart raspberries and bittersweet ganache keep it from being cloying.
- Beginner friendly. The batter is mixed in one bowl, with no mixer required for the sponge.
- Make-ahead friendly. Every component can be prepared in advance.
- Beautiful on any occasion. Perfect for birthdays, anniversaries, Mother’s Day, Valentine’s Day or holiday gatherings.
Ingredients and Why They Matter
For the Chocolate Cake Layers
- 2 cups (250 g) all-purpose flour. It gives structure without making the cake heavy. Spoon it into the cup and level it off; scooping directly packs in too much flour and dries the cake.
- 2 cups (400 g) granulated sugar. It sweetens, but it also holds moisture and helps create a tender crumb.
- 3/4 cup (75 g) unsweetened cocoa powder. Choose Dutch-process for a darker color and smoother flavor, or natural cocoa for a slightly fruitier, tangier taste. Both work in this recipe because it uses baking powder.
- 2 teaspoons baking powder and 1/2 teaspoon baking soda. Together they give a reliable, even rise.
- 1 teaspoon fine salt. Salt sharpens chocolate flavor, so do not skip it.
- 2 large eggs, at room temperature. Room temperature eggs blend smoothly and trap more air.
- 1 cup (240 ml) whole milk, at room temperature. Whole milk adds richness. Buttermilk also works and gives extra tenderness.
- 1/2 cup (120 ml) vegetable oil. Oil keeps cakes moister than butter for longer, which is ideal for layered cakes that are stored in the fridge.
- 2 teaspoons pure vanilla extract. It rounds out the flavor and supports the chocolate.
- 1 cup (240 ml) hot brewed coffee. The heat blooms the cocoa and the coffee deepens the chocolate flavor without tasting like coffee. Use hot water if you prefer.
For the Dark Chocolate Ganache
- 250 g (9 oz) good-quality dark chocolate (55–70% cacao), finely chopped.
- 1 cup (240 ml) heavy cream.
- 1 tablespoon unsalted butter for shine (optional).
- A pinch of salt.
For the Raspberry Cream Filling
- 1 1/2 cups (190 g) fresh or frozen raspberries.
- 2 tablespoons sugar.
- 1 teaspoon lemon juice.
- 1 1/2 cups (360 ml) cold heavy cream.
- 1/3 cup (40 g) powdered sugar.
- 1/2 teaspoon vanilla extract.
For Decorating
- Fresh raspberries, about 1 to 2 cups.
- Chocolate shavings or curls.
- A light dusting of powdered sugar, plus mint leaves if desired.
Equipment You Will Need
- Three 8-inch (20 cm) round cake pans, or two 9-inch (23 cm) pans.
- Parchment paper.
- Mixing bowls and a whisk.
- A stand or hand mixer for the cream.
- A small saucepan.
- An offset spatula and a bench scraper.
- A wire cooling rack.
- A serrated knife for leveling.
Step-by-Step Instructions
Step 1: Prepare the Pans and Oven
Heat the oven to 350°F (175°C). Grease the pans, line the bottoms with parchment circles and lightly dust the sides with cocoa powder. Using cocoa instead of flour prevents white streaks on a dark cake.
Step 2: Mix the Dry Ingredients
In a large bowl, whisk together the flour, sugar, cocoa, baking powder, baking soda and salt. Break up any cocoa lumps with the back of a spoon or sift everything through a fine sieve. A smooth dry mix means a smooth batter.
Step 3: Add the Wet Ingredients
Add the eggs, milk, oil and vanilla to the dry mixture. Whisk gently until the batter is just combined. It will look thick at this stage, and that is normal.
Step 4: Add the Hot Coffee
Slowly pour in the hot coffee while whisking. The batter will become very thin and glossy, which is exactly what you want. This thin batter is the secret to a super moist cake. Mix for no more than 30 seconds, until smooth.
Step 5: Bake
Divide the batter evenly among the pans. For accuracy, weigh each pan on a kitchen scale. Bake for 30 to 35 minutes, until a toothpick inserted into the center comes out with a few moist crumbs but no raw batter. Do not open the oven in the first 20 minutes, or the cakes may sink.
Step 6: Cool Completely
Let the cakes cool in the pans for 10 minutes, run a knife around the edges, and turn them out onto a wire rack. Peel off the parchment. Cool them fully, for at least 1 hour. Never assemble on warm cakes, because the fillings will melt.
Step 7: Make the Ganache
Place the chopped chocolate in a heatproof bowl. Heat the cream in a saucepan until it just begins to simmer around the edges. Pour it over the chocolate and let it sit for 2 minutes without stirring. Then whisk gently from the center outward until glossy and smooth. Stir in the butter and salt. Let the ganache cool at room temperature for 45 to 60 minutes, until it thickens to a spreadable, pudding-like consistency.
Step 8: Make the Raspberry Cream
Combine the raspberries, 2 tablespoons sugar and lemon juice in a small pan. Cook for 5 minutes, mashing until jammy. Press through a sieve to remove seeds if you like a smooth filling, then cool completely.
Whip the cold cream with the powdered sugar and vanilla until stiff peaks form. Gently fold in about 1/3 cup of the cooled raspberry purée for a pink, marbled cream, and keep the rest of the purée for drizzling between layers.
Step 9: Level and Assemble
Trim the domed tops of the cakes with a serrated knife so the layers are flat. Place the first layer on your serving plate or cake board. Pipe a ring of raspberry cream around the edge to act as a dam, then fill the center with a thin layer of ganache and a drizzle of purée. Add a layer of cream, then place the next cake layer on top. Repeat, and finish with the third layer upside down, so the flat bottom becomes a perfect top.
Step 10: Frost and Decorate
Apply a thin crumb coat of ganache, then chill the cake for 20 minutes. Cover with the remaining ganache using an offset spatula for a smooth or rustic swirled finish. Top with fresh raspberries, chocolate shavings and a light dusting of powdered sugar. Let the cake rest 20 minutes at room temperature before slicing.
Pro Tips for Bakery-Quality Results Chocolate Raspberry Layer Cake
- Weigh your ingredients. A kitchen scale is the most reliable way to avoid dry or dense cakes.
- Do not overmix. Stop as soon as the batter is smooth to avoid tough layers.
- Use room-temperature ingredients. They emulsify better and bake more evenly.
- Use bake-even strips. Wrapping the pans in damp strips gives flat layers with less trimming.
- Chill between steps. A cold crumb coat makes the final frosting far cleaner.
- Warm your knife. Dip the knife in hot water and wipe it dry between cuts for neat slices.
- Choose quality chocolate. The ganache is only as good as the chocolate you use.
- Wrap the layers. If baking ahead, wrap cooled layers tightly so they stay moist.
Common Mistakes and How to Fix Them
| Problem | Likely cause | Solution |
|---|---|---|
| Dry or crumbly cake | Too much flour or overbaking | Weigh flour and check doneness 5 minutes early |
| Sunken center | Opening the oven early or too much leavening | Keep the door closed and measure precisely |
| Dense layers | Overmixing | Mix until just combined |
| Runny ganache | Not cooled enough | Rest it longer, or chill and stir every 10 minutes |
| Grainy ganache | Cream too hot or chocolate overheated | Add a splash of warm cream and whisk gently |
| Cream filling oozing | Warm layers or soft cream | Cool cakes fully and whip to stiff peaks |
| Sliding layers | No dam or too much filling | Pipe a firm dam and chill before slicing |
Substitutions and Variations
- No coffee? Use hot water, or hot milk for extra richness.
- No buttermilk or milk? Mix plant-based milk with 1 tablespoon lemon juice.
- Dairy-free. Use almond or oat milk, dairy-free dark chocolate and coconut cream for the ganache and filling.
- Egg-free. Replace each egg with 1/4 cup unsweetened applesauce or a flax egg, though the texture will be slightly denser.
- Gluten-free. Use a 1:1 gluten-free flour blend with xanthan gum.
- Other fruit. Strawberries, cherries or blackberries all pair well with chocolate.
- Extra flavor. Add a tablespoon of raspberry liqueur to the purée, or a teaspoon of espresso powder to the batter.
- Cupcakes. Bake the same batter in cupcake liners for 18 to 22 minutes.
- Sheet cake. Bake in a 9×13-inch pan for 35 to 40 minutes for easy serving.
Make-Ahead, Storage and Freezing
Make ahead: The cake layers can be baked up to two days ahead, wrapped well and kept at room temperature. The ganache can be made a day earlier and covered in the fridge, then gently rewarmed to spreading consistency. The raspberry purée keeps in the fridge for up to four days.
Storing the finished cake: Because of the cream filling, store the cake in the refrigerator in an airtight container for up to four days. Remove it 30 to 45 minutes before serving so the flavors and texture are at their best.
Freezing: Unfrosted cake layers freeze beautifully for up to three months. Wrap each layer in plastic and foil, then thaw overnight in the fridge. You can also freeze individual slices for up to a month.
Serving Suggestions
- Serve slices with a spoonful of lightly sweetened whipped cream or vanilla ice cream.
- Pair with hot coffee, espresso or a cup of black tea.
- For a celebration, add candles, gold sprinkles or edible flowers.
- Offer a drizzle of warm raspberry sauce on the plate for a restaurant-style presentation.
- Cut with a hot, clean knife and serve at cool room temperature for the softest texture.
Nutrition Notes Chocolate Raspberry Layer Cake
A slice (1/12 of the cake) contains roughly 520 calories, 28 g fat, 65 g carbohydrates and 6 g protein. These are estimates and vary with the ingredients and portion size. For a lighter version, make smaller slices, use less ganache or replace some of the cream with Greek yogurt in the filling.
Decoration Ideas
- Naked cake style. Skip the outer frosting for a rustic, bakery look.
- Drip cake. Pour slightly warm ganache over chilled cake so it drips down the sides.
- Berry crown. Pile raspberries in a ring or a crescent on top.
- Chocolate curls. Scrape a bar of room-temperature chocolate with a vegetable peeler.
- Piped rosettes. Use leftover raspberry cream with a star tip around the edge.
Try Our Next Recipe!
Looking for another delicious dessert? Try our Strawberry Cream Cake Recipe and enjoy another sweet homemade treat!
Frequently Asked Questions Chocolate Raspberry Layer Cake
Can I use frozen raspberries?
Yes. Use them for the purée straight from the freezer. For decoration, fresh berries look best.
Can I make it in two pans instead of three?
Yes, use two 9-inch pans and bake for 30 to 35 minutes.
Why add coffee to a Chocolate Raspberry Layer Cake?
Coffee enhances the chocolate and does not make the cake taste like coffee.
Why is my batter so thin?
That is correct. A thin batter produces a very moist cake.
How far ahead can I assemble it?
Up to one day before serving, kept refrigerated.
Can I use milk chocolate for the ganache?
You can, but use a ratio of 3 parts chocolate to 2 parts cream so it sets firmly enough.
What if the ganache sets too hard?
Warm it gently in 5-second bursts in the microwave and stir until spreadable.
Is the cake suitable for stacking or tiers?
The sponge is sturdy enough for a three-layer cake, but for tall tiers add dowels and chill thoroughly.
Final Thoughts
This chocolate raspberry layer cake is proof that a show-stopping dessert does not need to be complicated. With a one-bowl sponge, a simple two-ingredient ganache and a fresh raspberry cream, you can create a cake that looks and tastes like it came from a professional bakery. Follow the tips, take your time with cooling and assembly, and you will be rewarded with a rich, moist and beautifully balanced cake.
If you make it, leave a comment and share how it turned out, and browse the rest of our Cakes collection for more ideas. Happy baking!
