
Table of Contents
Table of Contents
Sausage balls remind me of winter mornings at my grandmother’s cozy farmhouse kitchen, where the aroma of freshly baked savory bites would wake us up before the sun even rose. She’d always have a tray of these golden, cheese-packed delights waiting on the counter, still warm from the oven, ready to be devoured by eager grandchildren. Those memories of gathering around her wooden table, munching on these irresistible treats, are what inspired my lifelong love for this classic appetizer.
What makes sausage balls so special is their incredible simplicity and crowd-pleasing nature. With just a few basic ingredients, you can create a make-ahead appetizer that’s perfect for holiday gatherings, game day parties, or even busy weekday breakfasts. These bite-sized morsels combine savory pork sausage, sharp cheddar cheese, and Bisquick into golden-brown perfection that everyone loves.
The beauty of sausage balls lies in their versatility and convenience. You can prepare them ahead of time, freeze them for up to three months, and simply pop them in the oven whenever you need a quick, delicious snack. Whether you’re hosting a holiday brunch or need an easy homemade recipe for your next potluck, sausage balls never disappoint.
This family favorite recipe has been passed down through generations, and today I’m sharing all my secrets for making the absolute best sausage balls you’ve ever tasted. From selecting premium ingredients to avoiding common mistakes, you’ll learn everything you need to know to master this delicious dish.
Ingredients
Explanation of Key Ingredients and Their Role in the Recipe
The foundation of perfect sausage balls starts with three essential ingredients that work together to create magic. Ground pork sausage provides the savory, meaty flavor that makes these bites so irresistible. Choose between mild, medium, or spicy sausage depending on your heat preference and your guests’ tastes.
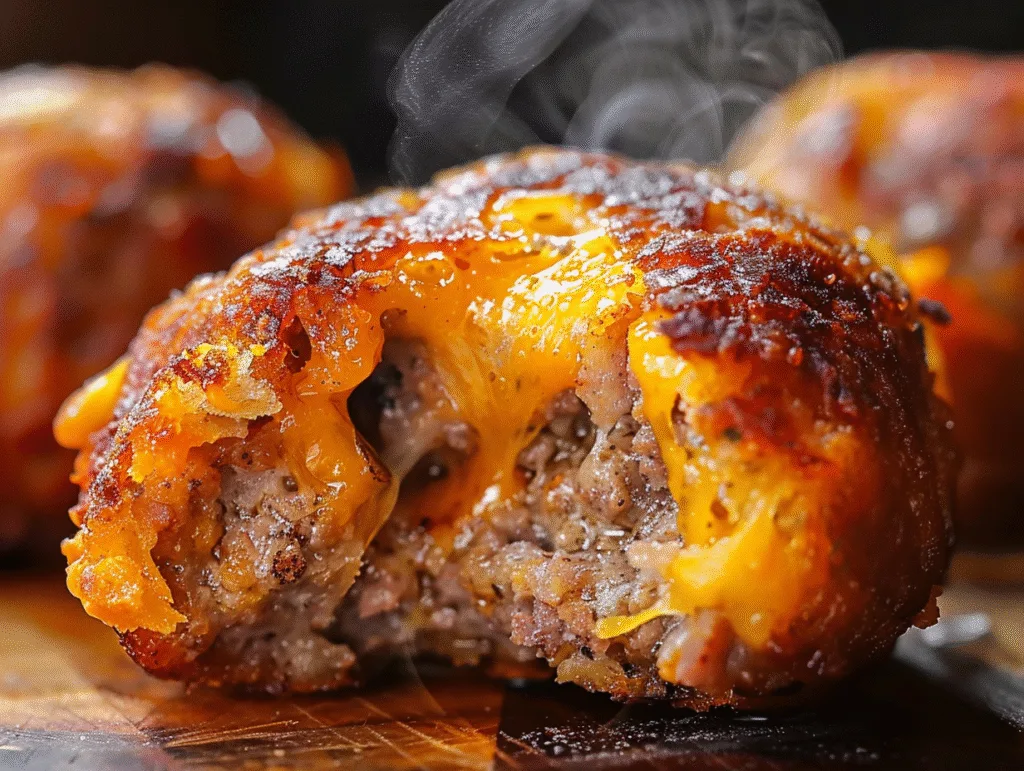
Sharp cheddar cheese is the second crucial component that adds tangy richness and helps bind the mixture together. The cheese melts beautifully during baking, creating pockets of gooey goodness throughout each sausage ball. Using freshly shredded cheese rather than pre-shredded varieties ensures better melting and superior texture.
Bisquick baking mix acts as the binder that holds everything together while creating a biscuit-like texture. This ingredient transforms the mixture from a simple meat-and-cheese combination into a cohesive, bakeable dough. The baking mix also adds a subtle, comforting flavor that complements the sausage and cheese perfectly.
Whole milk is often added to prevent dryness and create a more cohesive mixture. Just a splash helps the ingredients come together smoothly without making the dough too sticky. For extra flavor, consider adding dried parsley, garlic powder, or Italian seasoning to enhance the overall taste profile.
Tips for Selecting the Best Quality Ingredients
When shopping for ingredients, start by selecting high-quality pork sausage with good fat content. Jimmy Dean brand is a popular choice, but any fresh ground pork sausage from your local butcher will work wonderfully. Avoid pre-cooked sausage links, as raw sausage is essential for achieving the proper texture.
Choose extra sharp cheddar cheese for maximum flavor impact in your sausage balls. The sharper the cheese, the more pronounced and delicious the flavor will be. Purchase a block of cheese and shred it yourself using a box grater for the freshest, most flavorful results.
For the baking mix, Bisquick Original Pancake & Baking Mix is the traditional choice. However, any quality biscuit baking mix will work if Bisquick isn’t available in your area. Make sure all your ingredients are at room temperature before mixing, as this helps them combine more easily and creates a smoother texture.
Fresh seasonings always taste better than older, expired spices. If you’re adding optional ingredients like garlic powder, paprika, or fresh parsley, make sure they’re recently purchased for the most vibrant flavor.
Substitutions and Alternatives
If you can’t find Bisquick, you can easily make your own biscuit mix substitute. Combine 2 cups all-purpose flour, 3 teaspoons baking powder, and ½ teaspoon salt to replace the store-bought mix. For a gluten-free version, use gluten-free all-purpose flour with the same measurements.
Turkey sausage or chicken sausage can replace pork sausage for a leaner option. Mexican chorizo adds a spicy, flavorful twist if you’re feeling adventurous. For a breakfast version, try using maple-flavored breakfast sausage instead of Italian sausage.
Experiment with different cheese varieties to create unique flavor profiles in your sausage balls. Pepper jack adds heat, Gruyère brings sophistication, and Parmesan provides extra savory depth. You can even combine multiple cheeses for a more complex taste.
Cream cheese is a popular addition that makes sausage balls extra moist and tender. Add an 8-ounce block of softened cream cheese to the mixture for a richer, creamier texture. Scallions or chives can be mixed in for a fresh, oniony flavor that complements the savory elements.
Preparation Steps
Initial Prep and Cleaning Tips
Before you begin making sausage balls, preheat your oven to 350°F for traditional recipes or 400°F for quicker cooking. This ensures your oven reaches the proper temperature by the time your sausage balls are formed and ready to bake. Line two large baking sheets with parchment paper to prevent sticking and make cleanup easier.
Remove your sausage, cheese, and any dairy ingredients from the refrigerator about 30 minutes before starting. Room temperature ingredients mix together much more easily, creating a smoother, more uniform dough. This step is especially important for the sausage, which can be difficult to work with when cold.
Gather all your equipment before you start, including mixing bowls, a stand mixer or hand mixer, and a cookie scoop. Having everything ready makes the process smooth and efficient. Wash your hands thoroughly, as you’ll likely need to use them for mixing and shaping the sausage balls.
Set up a clean workspace with plenty of room for rolling and arranging your sausage balls. Keep paper towels nearby for cleaning your hands as you work with the raw meat mixture. Proper preparation makes the entire cooking process much more enjoyable and less stressful.

Step-by-Step Cooking Instructions with Secret Tips
Start by combining the shredded cheese, raw sausage, Bisquick, and any seasonings in a large mixing bowl. If using a stand mixer, attach the paddle attachment and mix on low speed for one minute. Gradually increase the speed and continue mixing for another 1-2 minutes until everything is well incorporated.
If mixing by hand, use clean hands to squeeze and knead the ingredients together until they form a cohesive dough. The mixture should hold together when shaped but not feel overly wet or sticky. If it seems too dry or crumbly, add milk one tablespoon at a time until the consistency improves.
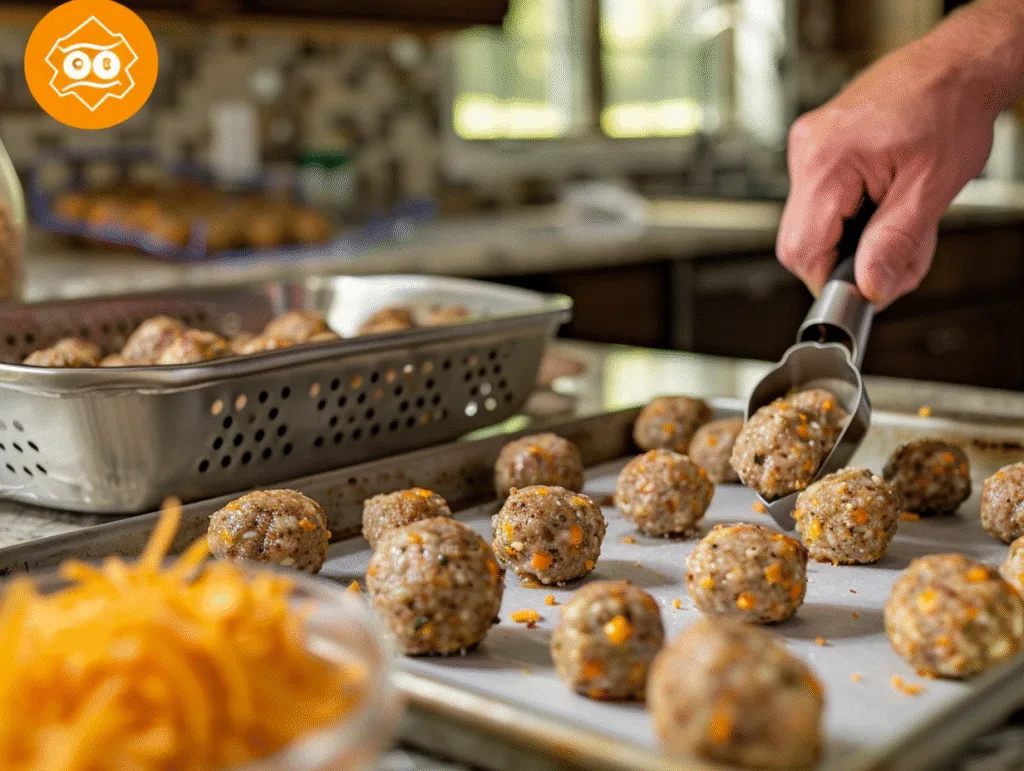
Use a cookie scoop or tablespoon to portion out equal-sized pieces of the mixture. Roll each portion between your palms to create smooth, round balls about 1 to 1½ inches in diameter. This size ensures even cooking and creates the perfect two-bite appetizer.
Place the formed sausage balls on your prepared baking sheets, spacing them about one inch apart. They don’t expand much during baking, but a little space allows air to circulate for even browning. Bake for 20-25 minutes, rotating the pan halfway through, until the sausage balls are golden brown.
Check the internal temperature of your sausage balls to ensure they’re fully cooked. They should reach an internal temperature of 160°F for food safety. The outside will be crispy and golden while the inside remains moist and flavorful.
Common Mistakes and How to Avoid Them
One of the most frequent mistakes is using pre-cooked sausage instead of raw ground sausage. Pre-cooked links won’t bind properly with the other ingredients and will result in dry, crumbly sausage balls. Always use fresh, raw ground sausage for the best results.
Another common error is using pre-shredded cheese, which contains anti-caking agents that prevent proper melting. Take the extra few minutes to shred your own cheese from a block for superior texture and flavor. The difference is truly noticeable in the final product.
Over-mixing the dough can make your sausage balls tough and dense. Mix just until the ingredients are combined and the mixture holds together when shaped. Stop as soon as you achieve a cohesive dough to maintain a tender texture.
Don’t skip the step of checking internal temperature, especially if baking from frozen. Sausage balls can look brown and done on the outside while still being raw inside. Use a meat thermometer to verify they’ve reached the safe temperature of 160°F.
Avoid overcrowding your baking sheet, as this can lead to uneven cooking. Give each sausage ball enough space for air to circulate and create that desirable golden-brown exterior. If necessary, use multiple baking sheets or bake in batches.

Classic Sausage Balls – The Best Make-Ahead Appetizer Ever”
Ingredients
Tried this recipe?
Let us know how it was!Serving & Final Touches
Creative Presentation Ideas
Serve your freshly baked sausage balls on a rustic wooden board or elegant serving platter for visual appeal. Arrange them in a circular pattern with small bowls of dipping sauce placed strategically around the board. This creates an inviting display that encourages guests to dig in.
Garnish your platter with fresh herbs like parsley or rosemary to add color and freshness. Sprinkle a light dusting of paprika or grated Parmesan over the top for an extra touch of elegance. These simple additions make your sausage balls look restaurant-quality without much extra effort.
For holiday parties, use festive toothpicks or small appetizer picks to make the sausage balls easier to grab. Choose picks that match your party theme or color scheme for a cohesive presentation. This also keeps guests’ hands cleaner and makes the appetizer more convenient to enjoy.
Keep your sausage balls warm throughout your party by placing them in a slow cooker set to the warm setting. Line the crockpot with paper towels if the sausage is particularly greasy. This ensures every guest gets to enjoy them at the perfect temperature.
Recommended Side Dishes or Pairings
Honey mustard is a classic dipping sauce that pairs beautifully with sausage balls. Mix together ½ cup mayonnaise, ¼ cup Dijon mustard, and 3 tablespoons honey for a sweet and tangy accompaniment. This easy homemade recipe takes just minutes to prepare and adds wonderful flavor contrast.
Sweet chili mayo is another crowd-pleasing option that adds a hint of heat. Combine 2 tablespoons mayonnaise with 2 tablespoons sweet chili sauce for a simple yet delicious dip. Add a squeeze of lime juice and a dash of Sriracha if you want extra zing.
Spicy ketchup sauce brings a tangy, slightly spicy element to your sausage balls. Mix ½ cup ketchup with Worcestershire sauce, prepared horseradish, brown sugar, cayenne pepper, and garlic salt to taste. This bold sauce is perfect for guests who enjoy more intense flavors.
Ranch dressing, marinara sauce, and even cheese sauce all make excellent pairings with sausage balls. Set out multiple dipping sauces in small bowls so guests can choose their favorites or try them all. This variety ensures everyone finds a combination they love.
Storage Tips and Reheating Advice
Store leftover cooked sausage balls in an airtight container in the refrigerator for up to 4 days. Make sure they’ve cooled completely before sealing the container to prevent condensation. Reheat them in a 350°F oven for about 10 minutes until warmed through.
To freeze cooked sausage balls, let them cool completely first, then arrange them on a parchment-lined baking sheet. Place the sheet in the freezer for 1-2 hours until the sausage balls are frozen solid. Transfer them to a freezer-safe bag or container and store for up to 3 months.
You can also freeze unbaked sausage balls using the same flash-freezing method. This allows you to bake them fresh whenever you need them without the hassle of preparing the mixture. Simply bake from frozen, adding a few extra minutes to the cooking time.
Reheat frozen sausage balls in a 350°F oven for about 30 minutes, keeping them covered to prevent drying out. For quicker reheating, use the microwave for 1-2 minutes, though the texture won’t be quite as crispy. Always ensure reheated sausage balls reach an internal temperature of 160°F for safety.
 DINNER
 LUNCH
LUNCH Desserts
 BREAKFAST
For more amazing recipes, be sure to check out our other sections to explore a variety of ideas that will enrich your cooking experience. Each section offers its own unique flavors to ensure a delightful culinary journey:
Easy and Quick Recipes: A collection of dishes that guarantee delicious meals with minimal effort and time.
Healthy Recipes: Discover healthy and delicious options that fit your lifestyle.
Desserts: A diverse selection of sweets that will add a special touch of sweetness to your table.
Lunch Recipes: Tasty lunch ideas that you can easily prepare to delight your family.
Dinner Recipes: Delicious and easy-to-make recipes that will make your dinner a memorable occasion.
Frequently Asked Questions
Can I make sausage balls ahead of time?
Yes, sausage balls are perfect for making ahead! You can prepare the mixture, shape the balls, and freeze them unbaked for up to 3 months. Alternatively, bake them fully, let them cool, and refrigerate for up to 4 days or freeze for longer storage. When you’re ready to serve, simply bake frozen unbaked balls directly from the freezer, adding a few extra minutes to the cooking time. This make-ahead capability makes sausage balls ideal for holiday entertaining and busy schedules.
Why are my sausage balls dry?
Dry sausage balls typically result from insufficient fat content in the sausage or over-baking. Choose pork sausage with adequate fat content rather than extra-lean varieties. Adding ½ cup of milk to the mixture helps prevent dryness by creating a moister texture. Some recipes include cream cheese, which adds richness and keeps the balls tender. Finally, avoid over-baking and remove the sausage balls from the oven as soon as they reach an internal temperature of 160°F.
Can I use a different type of cheese?
Absolutely! While sharp cheddar is traditional, you can experiment with various cheeses in sausage balls. Pepper jack adds spicy heat, mozzarella creates a milder flavor, and Gruyère brings sophisticated nuttiness. Parmesan cheese mixed with cheddar adds extra savory depth. You can even combine multiple cheese types for complex flavor profiles. Just make sure whatever cheese you choose melts well and complements the sausage.
What’s the best way to reheat sausage balls?
The oven method produces the best results when reheating sausage balls. Preheat your oven to 350°F and arrange the balls on a baking sheet. Cover them with foil to prevent drying and heat for 10-15 minutes until warmed through. For frozen sausage balls, allow about 30 minutes covered, then remove the foil for the last 5 minutes to crisp the exterior. While the microwave is faster (1-2 minutes), it can make the texture chewy rather than crispy.
Can I make sausage balls without Bisquick?
Yes, you can easily make sausage balls without Bisquick by creating your own baking mix substitute. Combine 2 cups all-purpose flour, 3 teaspoons baking powder, and ½ teaspoon salt to replace 2 cups of Bisquick. This homemade mixture works just as well as the boxed version and allows you to control the ingredients. For gluten-free sausage balls, use a gluten-free all-purpose flour blend with the same measurements.
Conclusion
These classic sausage balls truly deserve their reputation as the best make-ahead appetizer ever. With their irresistible combination of savory sausage, sharp cheddar cheese, and tender biscuit texture, they’re guaranteed to disappear quickly at any gathering. The ability to prepare them in advance and freeze for months makes them incredibly practical for busy hosts.
Whether you’re planning a holiday brunch, game day party, or simple family snack, sausage balls deliver crowd-pleasing flavor with minimal effort. The recipe is endlessly adaptable, allowing you to customize ingredients and seasonings to suit your preferences. From traditional versions to creative variations with cream cheese or different spices, there’s a sausage ball recipe for everyone.
I encourage you to try this easy homemade recipe and experience the joy of serving these delicious dishes to your loved ones. Make a double batch and freeze half for those moments when unexpected guests arrive or you need a quick, satisfying snack. Once you’ve mastered the basic recipe, experiment with different cheeses, sausages, and dipping sauces to create your own signature version.
Don’t forget to share your sausage ball success stories and any creative variations you discover along the way! These family favorite recipes are meant to be enjoyed and passed down through generations, just like my grandmother shared them with me. Happy cooking, and enjoy every golden, cheesy bite of these amazing sausage balls!