Table of Contents
Table of Contents
There’s something magical about the way food can transform an ordinary gathering into an unforgettable celebration. Last October, I was scrambling to prepare for my daughter’s Halloween party when I stumbled upon the idea of creating mini Halloween pizzas. What started as a desperate attempt to feed fifteen sugar-hyped kids turned into one of our most beloved family traditions. These adorable, spooky little pizzas became the star of the show, disappearing faster than candy from a trick-or-treat bag.
Mini Halloween pizzas have become a culinary sensation in the world of seasonal entertaining, and for good reason. They perfectly balance the comfort of familiar flavors with the excitement of Halloween creativity. Unlike traditional party foods that often sacrifice taste for appearance, these delicious dishes deliver on both fronts. They’re essentially your favorite pizza transformed into bite-sized works of art that capture the essence of Halloween while remaining absolutely delicious.
The beauty of this easy homemade recipe lies in its versatility and approachability. Whether you’re a seasoned cook or someone who considers opening a can of sauce an accomplishment, these mini Halloween pizzas will make you feel like a culinary wizard. They’re perfect for Halloween parties, family dinners, or any time you want to add a touch of spooky fun to your table. The recipe accommodates various dietary needs and preferences, making it a true family favorite recipe that brings everyone together.
Easy Mini Halloween Pizzas | Spooky Fun Party Recipe
Ingredients
Nutrition
Tried this recipe?
Let us know how it was!Ingredients
Key Ingredients and Their Spooky Roles
The foundation of exceptional mini Halloween pizzas begins with understanding how each ingredient contributes to both flavor and Halloween aesthetics. English muffins serve as our canvas – their nooks and crannies create the perfect texture for holding toppings while providing a sturdy base that won’t collapse under the weight of our spooky decorations. The slightly tangy flavor complements the richness of the cheese and sauce beautifully.
Pizza sauce acts as both flavor enhancer and artistic medium. Its vibrant red color immediately evokes thoughts of Halloween, resembling everything from vampire blood to autumn leaves. Choose a sauce with balanced acidity and herb notes that won’t overpower the other flavors. The consistency should be thick enough to spread easily without making the muffins soggy.
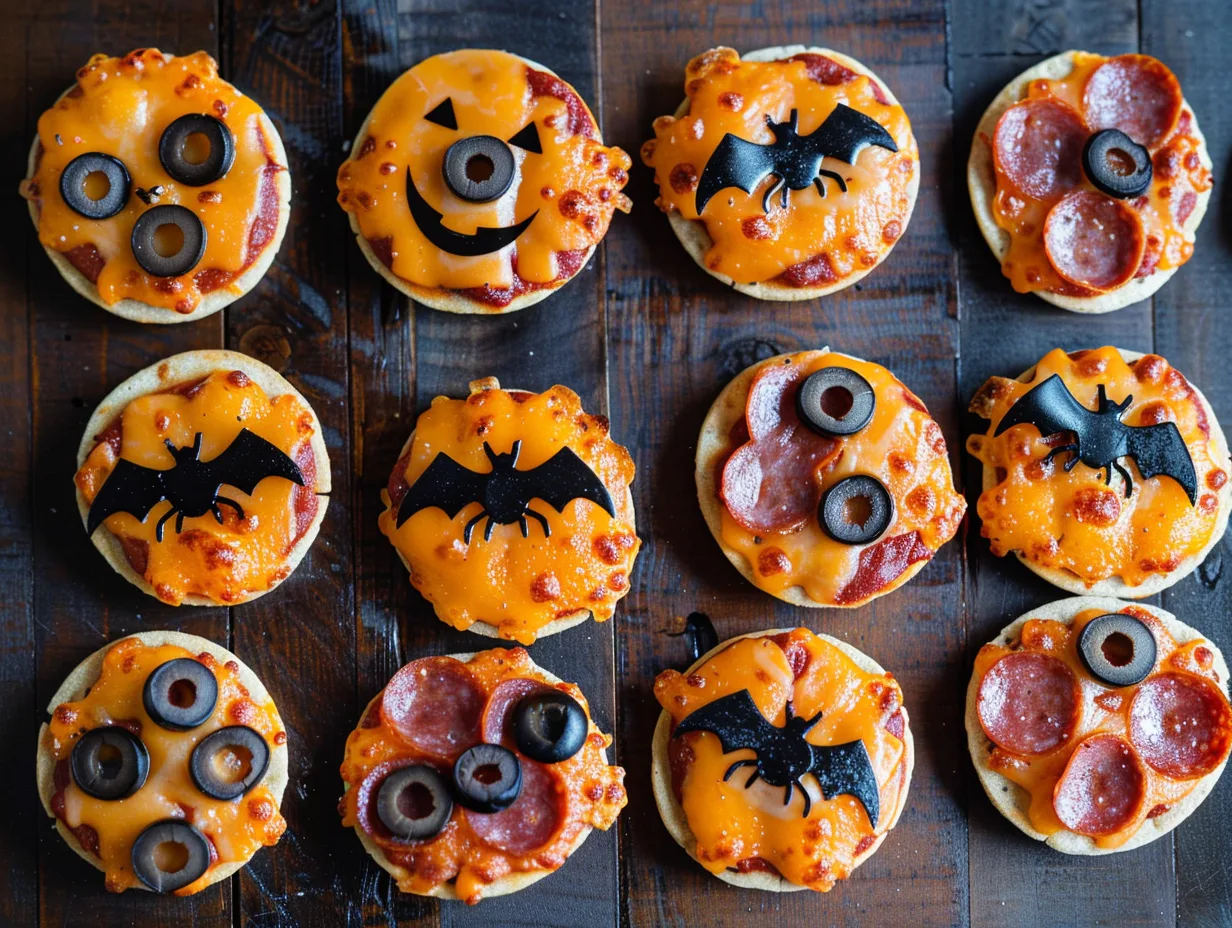
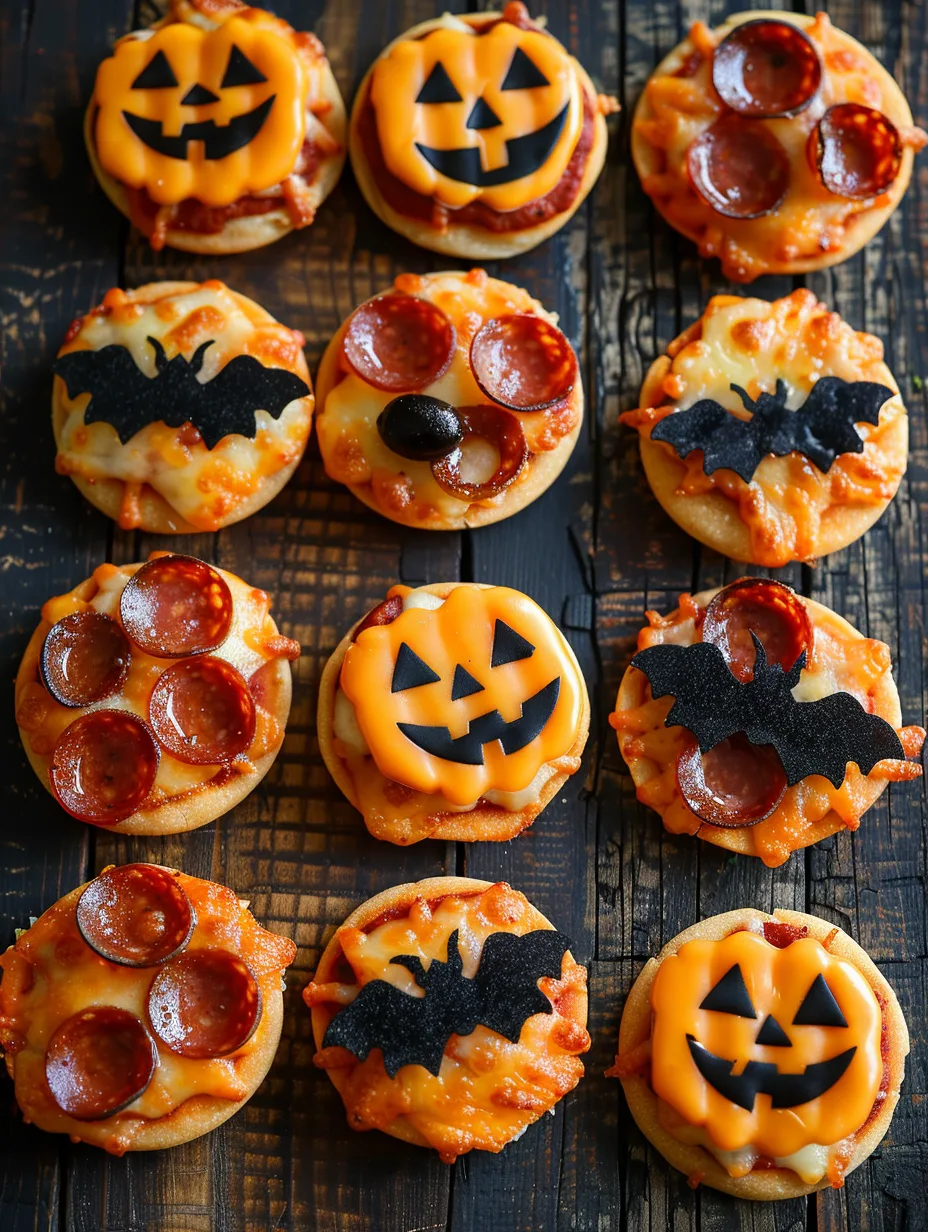
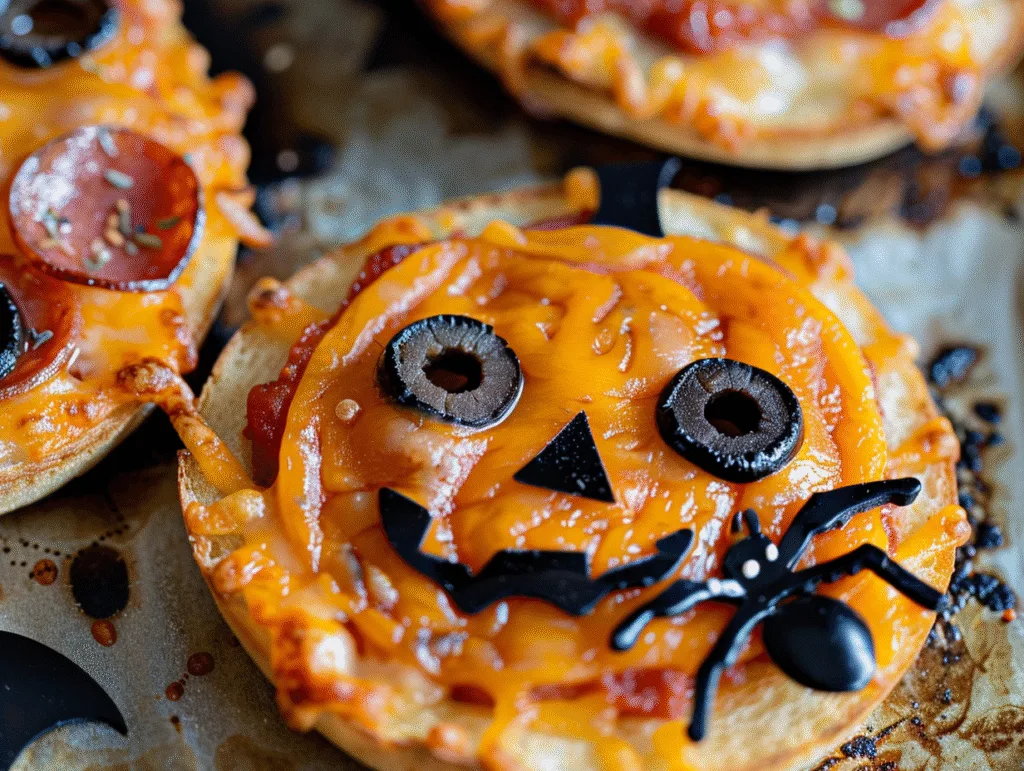
Mozzarella cheese is your primary building block, but the real magic happens with the addition of orange cheddar cheese. This creates that essential Halloween color palette while providing complexity of flavor. The orange cheese can be shaped into pumpkins, used as spider body parts, or simply scattered for autumn ambiance. Black olives become the stars of your mini Halloween pizzas, transforming into spider bodies, bat silhouettes, and spooky eyes with just a few strategic cuts.
Pepperoni serves multiple purposes in this recipe. Whole slices can be cut into pumpkin shapes, while strips can become spider legs or create intricate web patterns. The smoky, spicy flavor adds depth and appeals to both kids and adults. Green bell peppers, when cut into thin strips, become perfect pumpkin stems or can be arranged to create spooky grass or witch hair effects.
Tips for Selecting the Best Quality Ingredients
When shopping for your mini Halloween pizzas, ingredient quality directly impacts both taste and visual appeal. Choose English muffins with a firm texture and avoid overly soft varieties that might become mushy when heated. Look for muffins with deep nooks and crannies, as these will hold your toppings better and create more interesting visual texture.
For cheese selection, opt for blocks rather than pre-shredded varieties whenever possible. Block cheese melts more evenly and doesn’t contain anti-caking agents that can affect texture. When selecting orange cheddar, choose a variety with vibrant color – aged cheddars often provide the most striking Halloween orange appearance. The cheese should feel firm and have a fresh, slightly sharp aroma.
Pizza sauce quality varies dramatically between brands. Look for sauces with tomatoes as the first ingredient and minimal added sugars. Read labels carefully and choose options with herbs like oregano, basil, and garlic for more complex flavor profiles. Avoid sauces that appear watery or separate easily, as these won’t adhere well to your muffin base.
Fresh vegetables always trump frozen or canned when possible. Select black olives that are uniform in size for consistent decoration results. Green bell peppers should be crisp, glossy, and free from soft spots. For pepperoni, choose varieties with good spice balance and avoid overly greasy options that might make your mini Halloween pizzas soggy.
Substitutions and Alternatives for Every Diet
The versatility of mini Halloween pizzas makes them adaptable to virtually any dietary restriction or preference. For gluten-free versions, substitute the English muffins with gluten-free alternatives, or use portobello mushroom caps for a low-carb option that adds earthy flavor. Cauliflower rounds, when properly prepared, create an excellent base that’s both nutritious and delicious.
Dairy-free adaptations work beautifully with the growing variety of plant-based cheeses available. Nutritional yeast mixed with cashew cream creates a cheese-like sauce that browns nicely and provides umami depth. For the orange color traditionally provided by cheddar, try orange-tinted vegan cheese alternatives or create your own by mixing nutritional yeast with a small amount of turmeric.
Vegetarian and vegan versions of these mini Halloween pizzas open up creative possibilities. Replace pepperoni with roasted red pepper strips, sun-dried tomatoes, or even thinly sliced orange bell peppers. Mushrooms cut into fun shapes provide meaty texture, while various colored vegetables can create stunning Halloween scenes. Roasted butternut squash provides natural orange color and sweet flavor that complements the spooky theme.
For those avoiding nightshades, substitute the tomato-based pizza sauce with pesto, white sauce, or even butternut squash puree seasoned with herbs. This creates an entirely different flavor profile while maintaining the Halloween aesthetic. The key is maintaining the color palette and fun visual elements that make these pizzas special, regardless of the specific ingredients used.
Preparation Steps
Initial Prep and Cleaning Tips for Success
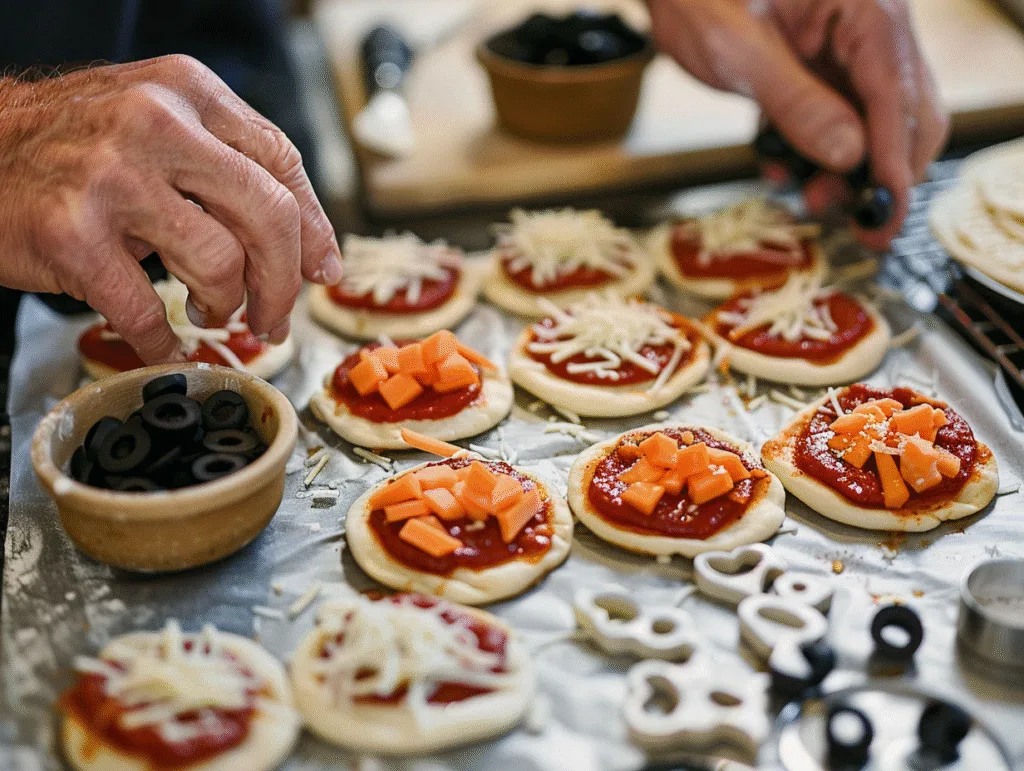
Success with mini Halloween pizzas begins long before you touch an ingredient. Start by organizing your workspace and gathering all necessary tools: sharp knives for precise cutting, small cookie cutters for shapes, and clean cutting boards dedicated to different ingredients. Mise en place – having everything in its place – becomes especially important when creating decorative foods that require precision and creativity.
Preheat your oven to 425°F and position racks in the center for even heating. Line baking sheets with parchment paper to prevent sticking and make cleanup easier. This is crucial when working with cheese, which can create stubborn messes when it melts and burns onto pan surfaces. Prepare multiple baking sheets if you’re making large quantities, as these mini Halloween pizzas are best baked in single layers for optimal results.
Clean and dry all vegetables thoroughly before beginning any cutting work. Even small amounts of moisture can affect how ingredients adhere to your pizza base and can cause cheese to slide off during baking. Set up separate prep areas for vegetables and meats to maintain food safety, and have small bowls ready for organizing cut ingredients by color and shape.
Create a logical workflow by grouping similar tasks together. Cut all your vegetables first, then move to shaping pepperoni and finally assembling your pizzas. This assembly-line approach ensures consistency across all your mini Halloween pizzas and prevents any ingredients from sitting out too long before baking. Keep perishable ingredients refrigerated until ready to use, especially in warm kitchen environments.
Step-by-Step Cooking Instructions with Secret Tips
Begin by splitting your English muffins and arranging them cut-side up on prepared baking sheets. Here’s a secret tip that transforms ordinary mini Halloween pizzas: lightly toast the muffin halves for 2-3 minutes before adding toppings. This creates a barrier that prevents sogginess and ensures a perfectly crispy base that holds up under all your creative toppings.
Spread pizza sauce evenly across each muffin half, leaving a small border around the edges to prevent overflow during baking. Use the back of a spoon to create smooth, even coverage. For professional-looking results, use approximately one tablespoon of sauce per muffin half – enough to provide flavor without overwhelming the base or making assembly difficult.
Now comes the creative magic that makes these mini Halloween pizzas special. Start with your base layer of mozzarella cheese, then begin creating your Halloween designs. For pumpkin pizzas, arrange orange cheddar in a circle and use thin green pepper strips for stems. Create spiders by placing black olive halves for bodies and cutting other olives into strips for legs – eight legs per spider, naturally!
The secret to perfect cheese melting lies in layering technique. Place harder cheeses like cheddar closer to the muffin base, with softer mozzarella on top. This ensures even melting and prevents the orange cheese from disappearing under the white cheese during baking. For intricate designs, add delicate elements like olive pieces after the initial cheese has begun to melt – this prevents them from burning while ensuring they adhere properly.
Bake your mini Halloween pizzas for 8-12 minutes, watching carefully during the final minutes. The cheese should be melted and lightly golden, with edges just beginning to bubble. Remove from oven when the muffin edges are golden brown and the cheese has achieved your desired level of browning. Let cool for 2-3 minutes before serving to prevent burns from molten cheese.
Common Mistakes and How to Avoid Them
One of the most frequent mistakes when making mini Halloween pizzas is overloading them with toppings. While enthusiasm for decoration is wonderful, too many ingredients create soggy pizzas that fall apart when eaten. Stick to 2-3 main decorative elements per pizza, and remember that less is often more when it comes to creating recognizable Halloween shapes.
Temperature control proves crucial for perfect results. Many home cooks use ovens that run hot or cold, leading to burned edges with cold centers or pale, undercooked results. Invest in an oven thermometer to ensure accuracy, and adjust cooking times based on your oven’s actual temperature rather than the display setting. If your mini Halloween pizzas are browning too quickly, reduce temperature by 25°F and extend cooking time accordingly.
Moisture management separates good pizzas from great ones. Wet ingredients like fresh tomatoes or inadequately drained vegetables will create steam that makes muffin bases soggy and causes toppings to slide off. Always pat vegetables dry with paper towels, and consider pre-cooking high-moisture ingredients like mushrooms or zucchini to remove excess water before assembly.
Timing mistakes often ruin otherwise perfect mini Halloween pizzas. Adding delicate decorations too early results in burned olive pieces or wilted vegetables, while adding them too late means they won’t heat through properly. Learn to read your oven and your ingredients – sturdy vegetables can go on from the beginning, while delicate herbs and fine decorations should be added halfway through cooking or even after baking for optimal results.
Serving & Final Touches
Creative Presentation Ideas for Maximum Spook Factor
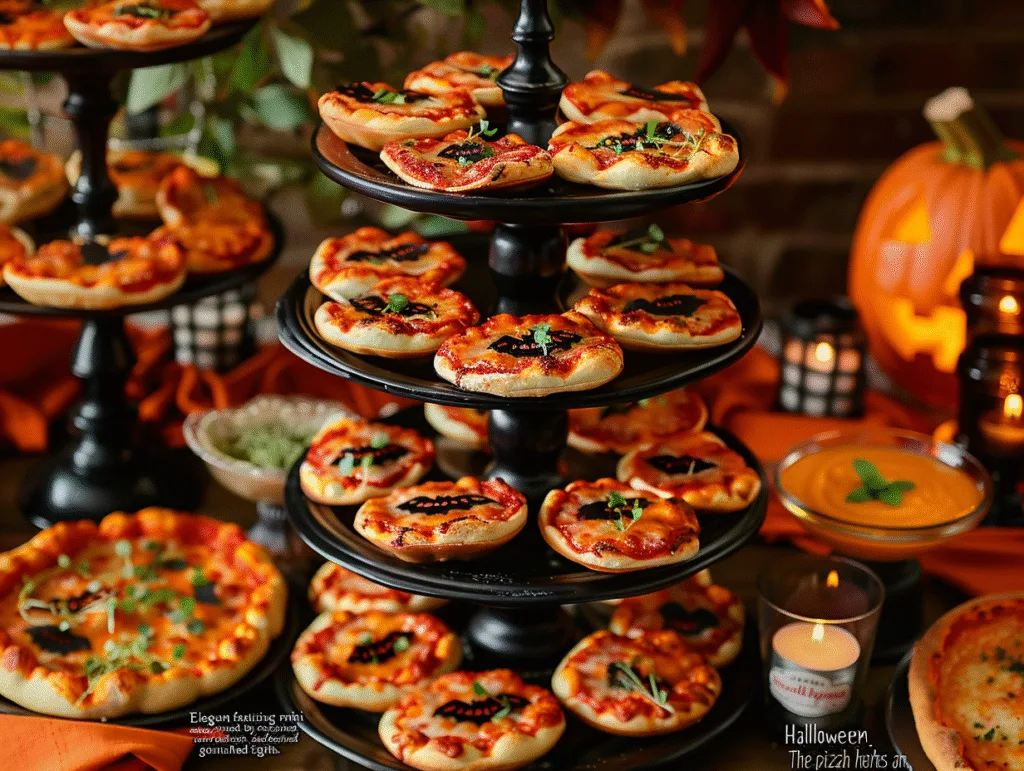
Transform your mini Halloween pizzas from simple snacks into conversation starters with thoughtful presentation techniques. Create a “graveyard” serving display by arranging pizzas on a large black serving platter and using pretzel stick “tombstones” labeled with spooky names. Dry ice (handled safely) adds dramatic fog effects, while battery-operated tea lights create an eerie glow that highlights your culinary creations.
Color coordination elevates the entire presentation beyond individual pizzas. Use orange and black napkins, plates, and serving utensils to reinforce the Halloween theme. Create height variation on your serving table by using cake stands and tiered serving trays – this creates visual interest and makes it easier for guests to see and access all your mini Halloween pizzas varieties.
Interactive presentation encourages guest engagement and creates memorable experiences. Set up a “build your own” station with pre-toasted muffin halves and bowls of Halloween-themed toppings, allowing guests to create their own spooky masterpieces. Provide small cards with decoration ideas and techniques, turning your party into an activity as well as a meal.
Photography-worthy presentations require attention to lighting and background details. Natural light showcases food colors best, but if serving in the evening, ensure adequate warm lighting that doesn’t cast harsh shadows. Use Halloween-themed props sparingly – a few plastic spiders or small pumpkins enhance the theme without overwhelming your delicious dishes. Remember that your beautifully crafted mini Halloween pizzas are the stars of the show.
Recommended Side Dishes and Perfect Pairings
Mini Halloween pizzas pair beautifully with complementary sides that enhance both flavor and theme. Roasted butternut squash soup served in small cups creates a warm, seasonal accompaniment that echoes the orange Halloween color palette. The soup’s creamy texture and subtle sweetness balance the savory, slightly spicy flavors of the pizzas perfectly.
Create a complete Halloween feast by incorporating other finger foods that maintain the spooky theme. “Mummy” wrapped jalapeño poppers (using bacon or pastry strips) provide spicy contrast, while “spider” deviled eggs (topped with black olive pieces) offer protein-rich balance. These combinations ensure your menu appeals to various taste preferences while maintaining visual cohesion.
For beverages, consider options that complement rather than compete with your mini Halloween pizzas. Apple cider, whether warm or cold, provides seasonal flavor that enhances the autumn atmosphere. For adult gatherings, sangria made with orange and red fruits creates a festive drink that matches the Halloween color scheme while cleansing the palate between different pizza flavors.
Fresh elements provide necessary contrast to the richness of cheese and bread. A simple arugula salad with orange segments and pumpkin seeds adds peppery bite and nutritional balance. The bitter greens and sweet citrus create palate contrast that makes each bite of pizza more satisfying, while the pumpkin seeds reinforce your Halloween theme through both flavor and visual elements.
Storage Tips and Reheating Advice for Later Enjoyment
Proper storage ensures your mini Halloween pizzas remain delicious for several days after preparation. Cool completely before storing to prevent condensation that creates soggy textures. Place cooled pizzas in airtight containers with parchment paper between layers to prevent sticking and preserve decorative elements. Properly stored pizzas maintain quality for up to three days in the refrigerator.
Freezing extends storage life for up to one month, though some texture changes are inevitable. Wrap individual pizzas in plastic wrap, then place in freezer bags with dates clearly marked. For best results when freezing, slightly undercook initially – the reheating process will complete the cooking while preventing overcooking that creates tough, rubbery textures.
Reheating technique significantly impacts final quality. Avoid microwaves, which create uneven heating and soggy bottoms. Instead, use a 350°F oven for 5-7 minutes for refrigerated pizzas or 8-10 minutes for frozen ones. Place pizzas on a preheated baking stone or inverted baking sheet to restore bottom crispiness – this technique recreates the original texture better than any other reheating method.
For optimal results, refresh vegetable garnishes after reheating. Delicate herbs and fresh vegetables often wilt during storage and reheating. Keep some fresh ingredients on hand to brighten reheated mini Halloween pizzas and restore their original visual appeal. A few fresh basil leaves or newly cut olive pieces can transform day-old pizzas into fresh-looking treats that rival their original presentation.
 DINNER
 LUNCH
LUNCH Desserts
 BREAKFAST
For more amazing recipes, be sure to check out our other sections to explore a variety of ideas that will enrich your cooking experience. Each section offers its own unique flavors to ensure a delightful culinary journey:
Easy and Quick Recipes: A collection of dishes that guarantee delicious meals with minimal effort and time.
Healthy Recipes: Discover healthy and delicious options that fit your lifestyle.
Desserts: A diverse selection of sweets that will add a special touch of sweetness to your table.
Lunch Recipes: Tasty lunch ideas that you can easily prepare to delight your family.
Dinner Recipes: Delicious and easy-to-make recipes that will make your dinner a memorable occasion.
Frequently Asked Questions
Q: Can I make mini Halloween pizzas ahead of time for a party? A: Absolutely! You can prepare mini Halloween pizzas up to 24 hours in advance. Assemble them completely but don’t bake, then cover tightly and refrigerate. Add 2-3 extra minutes to the baking time when cooking from cold. For best results, bring them to room temperature for 15 minutes before baking. You can also par-bake the muffin bases up to 2 days ahead and store them in airtight containers.
Q: What’s the best way to cut shapes from cheese and pepperoni? A: Small cookie cutters work perfectly for creating Halloween shapes in cheese and pepperoni. For intricate designs, use a sharp paring knife and work slowly. Chill cheese slightly before cutting to prevent crumbling, but don’t let it get too hard. For pepperoni, use kitchen shears for curved cuts and precise shapes. Practice on a few pieces first to get comfortable with the technique.
Q: How do I prevent my mini Halloween pizzas from getting soggy? A: Prevention is key for avoiding soggy mini Halloween pizzas. Always toast muffin halves lightly before adding toppings, use thick pizza sauce, and pat all vegetables dry. Don’t overload with toppings, and avoid high-moisture ingredients like fresh tomatoes. If using mushrooms or other wet vegetables, sauté them first to remove excess moisture.
Q: Can I use different types of bread instead of English muffins? A: Yes! Bagel halves, pita bread, naan, or even thick bread slices work well. Each creates a different texture – bagels provide chewier results, while pita creates crispier pizzas. Adjust cooking times based on bread thickness and density. Gluten-free bread options work too, though they may require slightly longer baking times to achieve proper crispiness.
Q: What are some creative Halloween decoration ideas for these pizzas? A: The possibilities are endless! Create pumpkin faces using orange cheese and black olive features. Make spiders with olive bodies and thin pepper strips for legs. Use pepperoni cut into bat shapes, or arrange ingredients to look like jack-o’-lanterns. Green peppers become perfect stems, while different colored cheeses can create autumn leaf patterns. Let your creativity guide you!
Conclusion: Embrace the Spooky Deliciousness
Creating mini Halloween pizzas transforms ordinary ingredients into extraordinary memories. These delightful treats prove that the best family favorite recipes combine simplicity with creativity, resulting in dishes that satisfy both stomach and soul. The joy on children’s faces when they see their food decorated as friendly spiders or grinning pumpkins is worth every minute spent arranging olive pieces and pepper strips.
The beauty of this easy homemade recipe lies not just in its delicious results, but in the bonding experience it creates. Whether you’re preparing for a Halloween party, looking for a fun family dinner activity, or simply want to add some seasonal magic to your kitchen, these mini Halloween pizzas deliver on every level. They’re forgiving enough for beginning cooks yet sophisticated enough to impress experienced entertainers.
As you embark on your own mini Halloween pizzas adventure, remember that perfection isn’t the goal – fun is. Embrace the wonky spider legs and asymmetrical pumpkin faces. These imperfections become part of the charm and create conversation starters that bring people together. Your guests will remember the laughter and creativity long after the last pizza disappears.
I encourage you to try this recipe and make it your own. Experiment with different decorations, adapt it to your family’s dietary needs, and most importantly, have fun with the process. Share your creations on social media, swap ideas with friends, and start your own Halloween pizza traditions. After all, the best recipes are those that create lasting memories and bring smiles to the faces of people we love.