
Table of Contents
Table of Contents
There’s something magical about the first bite of perfectly made matcha pan that transports you straight to a cozy Japanese bakery. I still remember my first encounter with this delicate green tea bread during a cherry blossom trip to Kyoto three years ago. The soft, pillowy texture combined with that distinctive earthy-sweet matcha flavor created a moment I’ll never forget. Since then, I’ve been perfecting this matcha pan recipe in my own kitchen, and today I’m thrilled to share it with you.
This isn’t just any ordinary bread – matcha pan represents the beautiful intersection of traditional Japanese flavors and modern baking techniques. What makes this recipe one of my absolute favorites is how it transforms simple ingredients into something extraordinary. The vibrant green color alone is enough to brighten any day, but it’s the complex flavor profile that keeps you coming back for more.
As someone who’s spent countless hours experimenting with different matcha recipes, I can confidently say that this matcha pan strikes the perfect balance between authentic Japanese taste and accessibility for home bakers. Whether you’re new to working with matcha or you’re a seasoned baker looking for your next challenge, this recipe will become a cherished addition to your collection of easy homemade recipes.
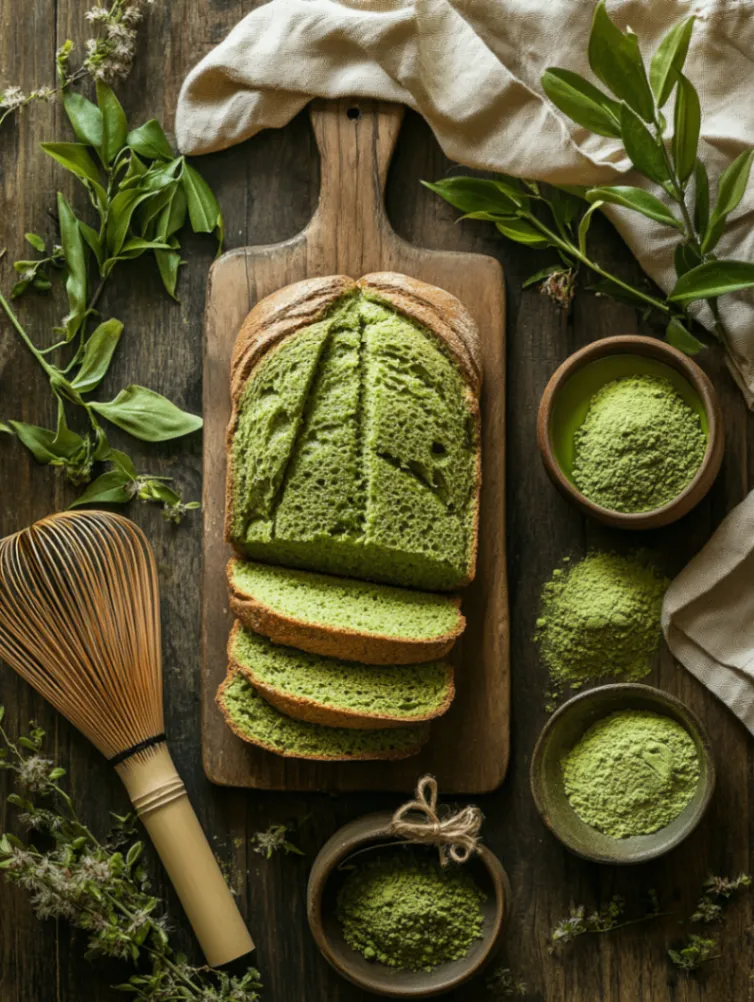
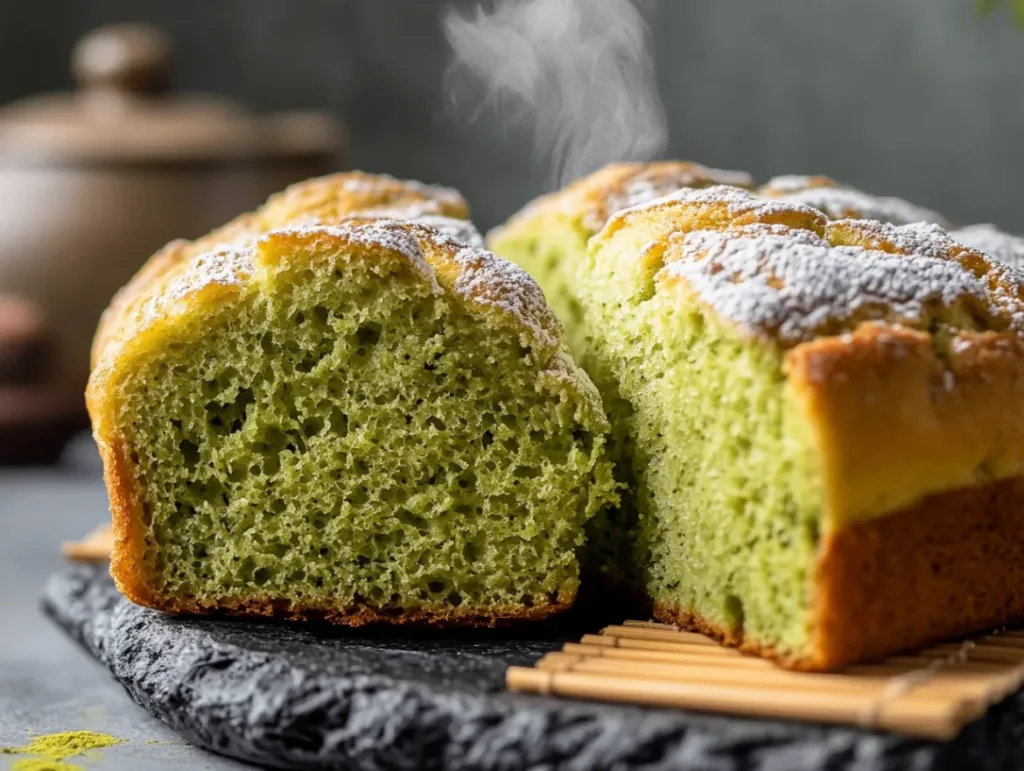
Matcha Pan – Soft & Fluffy Japanese Green Tea Bread
Ingredients
Nutrition
Tried this recipe?
Let us know how it was!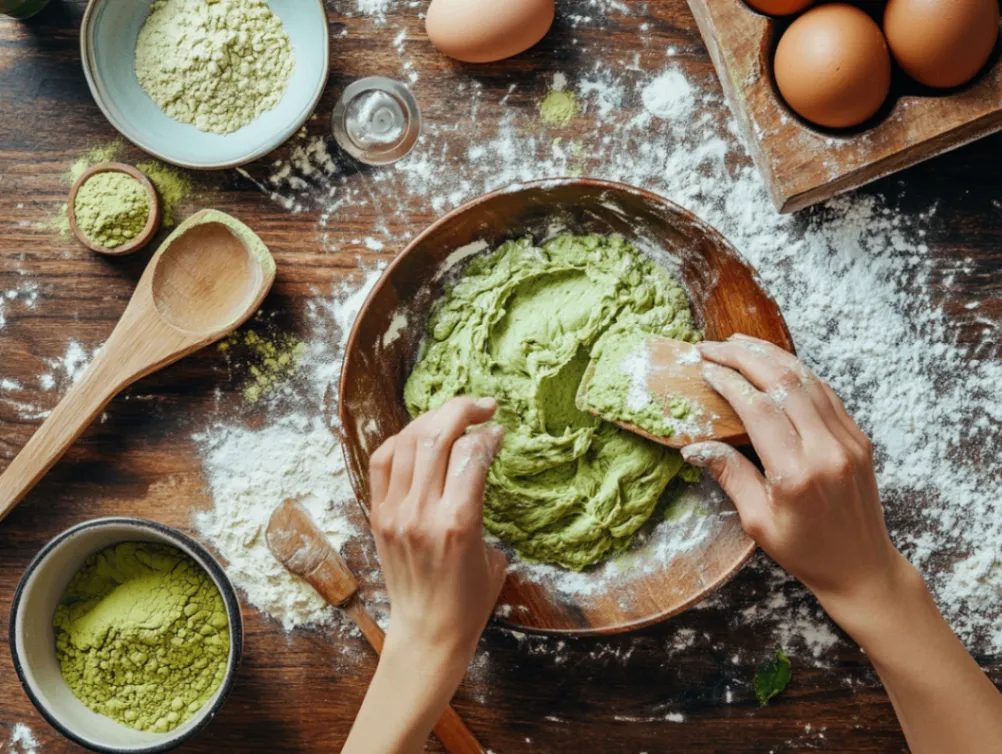
Essential Ingredients for Perfect Matcha Pan
Understanding Key Ingredients and Their Magical Roles
The beauty of matcha pan lies in its simplicity, but each ingredient plays a crucial role in creating that signature soft, fluffy texture we all crave. Let me walk you through the stars of this show, starting with the obvious hero – matcha powder.
High-quality matcha powder is the heart and soul of this matcha pan. Unlike regular green tea, matcha is made from shade-grown tea leaves that are stone-ground into a fine powder, giving it that vibrant green color and concentrated flavor. For baking, you’ll want to use culinary-grade matcha rather than ceremonial grade, as it provides the perfect balance of flavor and color without breaking the bank.
Bread flour is another non-negotiable ingredient that sets this matcha pan apart from regular quick breads. The higher protein content in bread flour develops the gluten structure necessary for that characteristic chewy-soft texture that makes Japanese bread so special. I’ve tried substituting with all-purpose flour, and while it works, you’ll notice the difference in texture – it’s like comparing a cloud to a pillow.
Fresh yeast or active dry yeast brings life to our matcha pan, creating those beautiful air pockets that make each slice so tender. The fermentation process also adds depth to the flavor, allowing the matcha to really shine. Eggs contribute richness and help bind everything together, while butter adds that subtle richness that makes this bread absolutely irresistible.
Expert Tips for Selecting the Best Quality Ingredients
When it comes to making exceptional matcha pan, ingredient quality can make or break your results. I’ve learned this the hard way through years of trial and error, and I want to save you from the same mistakes.
For matcha powder, look for a bright, vibrant green color – avoid anything that looks dull or yellowish, as this indicates older, lower-quality matcha. The powder should feel silky smooth between your fingers, not gritty. I personally recommend brands like Ippodo or DoMatcha for consistent results in your matcha pan.
Your bread flour should be unbleached and preferably from a reputable brand like King Arthur or Bob’s Red Mill. Fresh ingredients make a world of difference, so check expiration dates carefully. For yeast, I always keep both active dry and instant yeast on hand, as they can behave differently depending on your kitchen’s temperature and humidity.
Don’t underestimate the importance of using room temperature eggs and butter for your matcha pan. Cold ingredients don’t mix well and can lead to uneven texture. I take my eggs out of the fridge about an hour before baking, and I soften my butter by cutting it into small pieces and letting it sit at room temperature.
Smart Substitutions and Delicious Alternatives
Life happens, and sometimes you don’t have every ingredient on hand when that matcha pan craving strikes. The good news is that this recipe is quite forgiving with the right substitutions.
If you can’t find bread flour, you can create a substitute by adding one tablespoon of vital wheat gluten to each cup of all-purpose flour. This won’t give you exactly the same texture as true bread flour, but it’ll get you much closer than using all-purpose flour alone in your matcha pan.
For those avoiding dairy, you can substitute the butter with an equal amount of vegan butter or coconut oil (solid, not melted). The flavor will be slightly different, but the texture remains surprisingly similar. Egg substitutes like flax eggs or commercial egg replacers work well too, though you might notice a slightly denser texture in your finished matcha pan.
If you’re dealing with a matcha emergency (yes, that’s a real thing!), you can substitute with green tea powder, though you’ll need to use about 1.5 times the amount to achieve similar color and flavor intensity. The taste will be milder, but you’ll still get that beautiful green color that makes matcha pan so visually stunning.
Step-by-Step Preparation for Bakery-Quality Results
Initial Prep and Essential Cleaning Tips
Before we dive into the actual baking process, proper preparation is what separates good matcha pan from absolutely incredible matcha pan. I always start by organizing my workspace – trust me, you don’t want to be scrambling for ingredients when you’re in the middle of kneading dough.
First, bring all your ingredients to room temperature. This is crucial for matcha pan because temperature affects how the ingredients combine. Cold butter won’t cream properly, cold eggs can cause the mixture to curdle, and cold milk can shock the yeast. I like to set everything out about two hours before I plan to start baking.
Clean your mixing bowls thoroughly and make sure they’re completely dry. Any residual soap or water can interfere with the yeast activation and gluten development in your matcha pan. I always wipe my bowls with a clean, dry towel just to be extra sure.
Sift your matcha powder and flour together twice – this step is non-negotiable for smooth, lump-free matcha pan. Matcha powder tends to clump, and these lumps will create bitter spots in your finished bread. I use a fine-mesh sifter and take my time with this step because it makes such a difference in the final texture.
Step-by-Step Cooking Instructions with Secret Tips
Now for the fun part – actually making this incredible matcha pan! I’m going to share some secret tips I’ve discovered over years of perfecting this recipe.
Start by activating your yeast in warm milk (around 110°F) with a pinch of sugar. The mixture should become foamy within 5-10 minutes. If it doesn’t foam, your yeast is dead, and you need to start over. This step ensures your matcha pan will have that beautiful, airy texture we’re after.
In a large mixing bowl, cream together the softened butter and sugar until light and fluffy – this usually takes about 3-4 minutes with an electric mixer. Add your eggs one at a time, beating well after each addition. This gradual addition prevents the mixture from curdling and ensures a smooth base for your matcha pan.
Here’s my secret: when you add the sifted matcha and flour mixture, do it in three additions, alternating with the activated yeast mixture. Start and end with the flour mixture, and mix just until combined after each addition. Overmixing at this stage can lead to tough, dense matcha pan.
Knead the dough on a lightly floured surface for about 8-10 minutes until it’s smooth and elastic. The dough should be slightly tacky but not sticky. If it’s too sticky, add flour one tablespoon at a time. If it’s too dry, add water one teaspoon at a time.
Common Mistakes and How to Avoid Them
Even experienced bakers can run into trouble with matcha pan, so let me share the most common mistakes I see and how to avoid them.
The biggest mistake I see is using water that’s too hot for the yeast. Water over 115°F will kill the yeast, leaving you with dense, heavy matcha pan instead of the light, fluffy texture we want. I always test the water temperature with a thermometer or the inside of my wrist – it should feel barely warm, not hot.
Another common error is not kneading the dough long enough. Under-kneaded dough won’t develop proper gluten structure, resulting in matcha pan that doesn’t rise properly and has a dense, heavy texture. The dough should pass the “windowpane test” – when you stretch a small piece of dough, it should be thin enough to see through without tearing.
Many bakers also rush the rising process, but patience is key for exceptional matcha pan. The first rise should take about 1-2 hours in a warm, draft-free place until the dough doubles in size. Rushing this step by using too much heat or not allowing enough time results in bread with poor texture and flavor.
Serving Suggestions and Final Touches
Creative Presentation Ideas That Wow
The visual appeal of matcha pan is one of its greatest assets, and with a few simple presentation tricks, you can turn this homemade bread into something that looks like it came from a high-end Japanese bakery.
Slicing is crucial for showcasing the beautiful green color of your matcha pan. Use a sharp serrated knife and make clean, even cuts about 3/4 inch thick. I like to arrange the slices on a dark wooden board or white ceramic plate to make that gorgeous green color really pop. A light dusting of powdered sugar through a fine sieve adds an elegant touch that makes your matcha pan look absolutely professional.
For special occasions, try making matcha pan French toast – the combination of the crispy, golden exterior with the soft, green interior creates a stunning visual contrast. I also love making small tea sandwiches with thinly sliced matcha pan, cream cheese, and fresh strawberries for afternoon tea parties.
Consider serving your matcha pan alongside traditional Japanese sweets like mochi or dorayaki for an authentic experience. The different textures and complementary flavors create a delightful tasting experience that really showcases your baking skills.
Perfect Pairings and Recommended Side Dishes
The subtle, earthy flavor of matcha pan pairs beautifully with both sweet and savory accompaniments, making it incredibly versatile for any meal or occasion.
For breakfast, I love serving matcha pan with a simple spread of unsalted butter and a drizzle of honey. The sweetness of the honey enhances the natural flavor of the matcha without overpowering it. Cream cheese with a touch of vanilla also makes an excellent spread that complements the bread’s texture perfectly.
Tea pairing is essential when serving matcha pan. While it might seem obvious to serve it with matcha tea, I actually prefer pairing it with sencha or gyokuro – the different green tea varieties create an interesting flavor conversation. For non-tea drinkers, light roast coffee or even champagne for special occasions works wonderfully.
For a more substantial meal, matcha pan makes an excellent base for savory applications. Try it toasted with avocado and a sprinkle of sea salt, or use it for unique grilled cheese sandwiches with mild cheeses like fresh mozzarella or cream cheese. The key is to choose flavors that complement rather than compete with the delicate matcha taste.
Storage Tips and Reheating Advice for Maximum Freshness
Proper storage is crucial for maintaining the soft, fluffy texture that makes matcha pan so special. I’ve learned through experience that the right storage method can extend the life of your bread significantly.
Fresh matcha pan should be stored in an airtight container or wrapped tightly in plastic wrap at room temperature. It will stay fresh for up to 3 days this way. Avoid refrigerating unless absolutely necessary, as the cold temperature can make the bread stale faster.
For longer storage, matcha pan freezes beautifully. Slice the bread first, then wrap individual slices in plastic wrap and place them in a freezer bag. This way, you can remove just the amount you need without thawing the entire loaf. Frozen matcha pan stays fresh for up to 3 months.
When reheating, I prefer using a toaster oven or regular oven rather than a microwave, which can make the bread chewy. Toast slices lightly to restore some of the original texture, or warm whole slices in a 300°F oven for about 5 minutes wrapped in foil.
 DINNER
 LUNCH
LUNCH Desserts
 BREAKFAST
For more amazing recipes, be sure to check out our other sections to explore a variety of ideas that will enrich your cooking experience. Each section offers its own unique flavors to ensure a delightful culinary journey:
Easy and Quick Recipes: A collection of dishes that guarantee delicious meals with minimal effort and time.
Healthy Recipes: Discover healthy and delicious options that fit your lifestyle.
Desserts: A diverse selection of sweets that will add a special touch of sweetness to your table.
Lunch Recipes: Tasty lunch ideas that you can easily prepare to delight your family.
Dinner Recipes: Delicious and easy-to-make recipes that will make your dinner a memorable occasion.
Frequently Asked Questions About Matcha Pan
Q: Can I make matcha pan without a stand mixer? A: Absolutely! While a stand mixer makes the process easier, you can definitely make delicious matcha pan by hand. The key is to take your time with the kneading process – it will take about 12-15 minutes of hand kneading to develop the proper gluten structure. Your arm workout will be worth it when you taste the results!
Q: Why is my matcha pan not as green as I expected? A: The vibrancy of your matcha pan depends entirely on the quality and quantity of matcha powder you use. Culinary-grade matcha varies in color intensity, and some brands are naturally more vibrant than others. You can increase the matcha powder by up to 50% for a more intense color and flavor, but be aware that too much can make the bread slightly bitter.
Q: How do I know if my matcha powder is still good? A: Fresh matcha powder should be bright green and have a sweet, grassy aroma. If your matcha has turned yellowish or brown, or if it smells stale or has no aroma, it’s time to replace it. Old matcha will result in matcha pan with a dull color and lackluster flavor.
Q: Can I add other flavors to my matcha pan? A: Yes! Matcha pan is wonderfully versatile. White chocolate chips, red bean paste, or even a cream cheese swirl work beautifully. Just be careful not to add too much – you want to enhance the matcha flavor, not overpower it. I recommend adding no more than 1/2 cup of mix-ins to maintain the bread’s structure.
Q: What’s the difference between matcha pan and regular bread? A: Matcha pan has a slightly denser, more tender crumb than regular white bread due to the matcha powder and the specific flour-to-liquid ratio. The flavor is distinctly earthy and slightly sweet, with a beautiful green color that makes it visually striking. The texture is closer to brioche than regular sandwich bread.
Final Thoughts and Encouragement
Making matcha pan at home is more than just following a recipe – it’s about creating moments of joy and connection with loved ones. Every time I pull a loaf of this beautiful green bread from the oven, I’m reminded of why I fell in love with baking in the first place.
This matcha pan recipe has become one of my most requested family favorite recipes, and I’m confident it will become one of yours too. The combination of that distinctive matcha flavor with the incredibly soft, fluffy texture creates something truly special that you simply can’t buy in stores.
Don’t be discouraged if your first attempt isn’t perfect – like all great delicious dishes, matcha pan improves with practice. Each time you make it, you’ll understand the dough better and develop your own techniques for achieving that perfect texture and flavor.
I encourage you to make this recipe your own by experimenting with different presentations and pairings. Share your creations with friends and family, and don’t forget to tell me about your matcha pan adventures! There’s nothing that makes me happier than hearing about successful baking experiments and the joy they bring to people’s kitchens.
Remember, the best recipes are the ones that bring people together, and this matcha pan has a special way of doing just that. Happy baking!