Table of Contents
Table of Contents
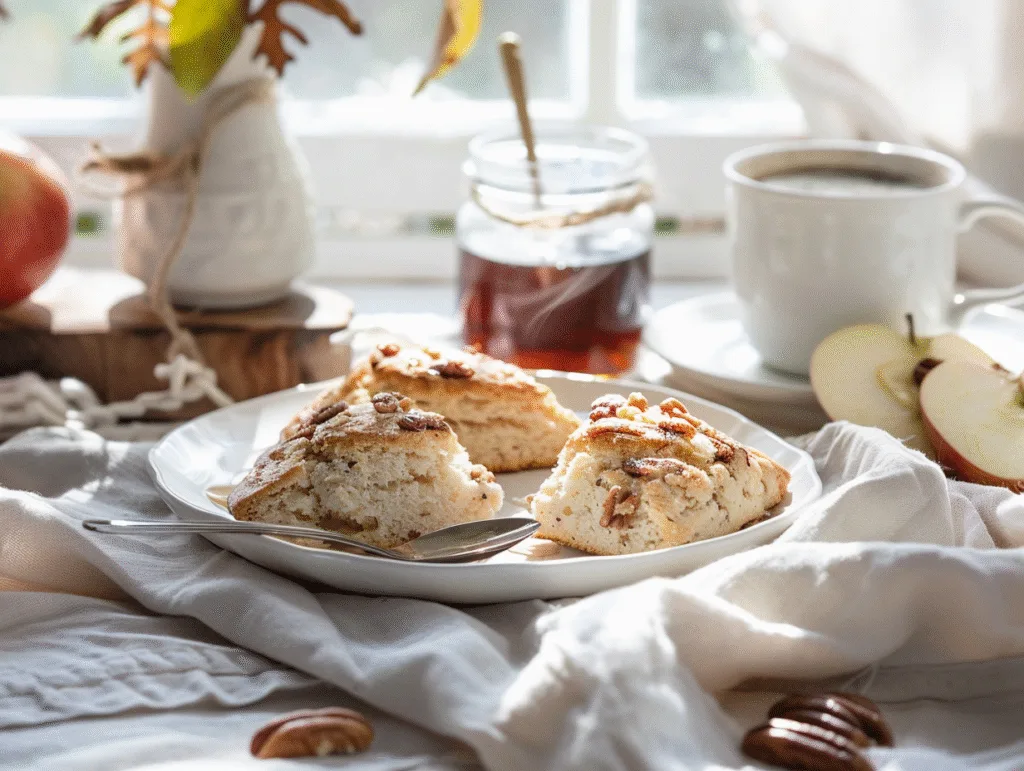
Maple Pecan Scones remind me of crisp October mornings spent in my grandmother’s cozy kitchen. She would wake before dawn, her apron already dusted with flour. The smell of toasted pecans and sweet maple syrup would drift through the house.
Those weekend mornings taught me that baking isn’t just about following a recipe. It’s about creating memories and bringing people together over something made with love.
Today, I’m sharing this treasured recipe for Maple Pecan Scones with you. These aren’t just ordinary scones—they’re tender, buttery, and packed with autumn flavors. Whether you’re a seasoned baker or trying your hand at homemade scones for the first time, this easy recipe will guide you to perfection.
Let’s dive into creating these delicious dishes that have become a family favorite recipe in my home. Once you learn how to make Maple Pecan Scones, they’ll become your go-to breakfast treat every fall season.
Ingredients
Understanding Key Ingredients and Their Role
The magic of Maple Pecan Scones starts with choosing the right ingredients. Each component plays a crucial role in creating that perfect texture and flavor.
All-purpose flour forms the foundation of these scones, providing structure while keeping them tender. You’ll need about 2 cups for the perfect consistency. The flour creates a framework that holds everything together.
Cold butter is absolutely essential for creating those beautiful flaky layers. Using 8 tablespoons of cold, cubed butter helps create pockets of steam during baking. Never use softened butter—the cold temperature is what makes the difference.
Heavy cream adds richness and moisture to Maple Pecan Scones, creating that melt-in-your-mouth texture. You’ll need about 1 cup, plus extra for brushing on top. Some recipes use buttermilk or sour cream for added tang.
Real maple syrup is non-negotiable for authentic flavor. About 1/4 cup in the dough provides natural sweetness and that distinctive maple taste. Imitation syrup simply won’t deliver the same depth of flavor.
Pecans bring nutty richness and delightful crunch to every bite. Toast them before adding to enhance their flavor dramatically. Roughly chopped pecans work best for even distribution.
Baking powder and baking soda work together as leavening agents. These create the light, fluffy texture that makes homemade scones irresistible.
Tips for Selecting the Best Quality Ingredients
Choosing quality ingredients makes a tremendous difference in your final Maple Pecan Scones. Let me share the secrets I’ve learned over years of perfecting this recipe.
For maple syrup, always select Grade A amber or dark amber varieties. These offer robust flavor that shines through in baked goods. Check the label—you want 100% pure maple syrup, not pancake syrup.
When buying pecans, look for halves rather than pieces when possible. Fresh pecans should smell sweet and nutty, never bitter or musty. Store them in the freezer to maintain freshness.
Select European-style butter with higher fat content (82% or more) if you can find it. This creates even flakier Maple Pecan Scones with richer flavor. The extra butterfat translates directly to better texture.
Heavy cream should have at least 36% fat content for the best results. Avoid ultra-pasteurized cream if possible. Regular pasteurized cream provides better flavor.
Fresh baking powder is critical—check the expiration date before using it. Old leavening agents won’t give your scones the rise they need. Test baking powder by adding a spoonful to hot water.
Substitutions and Alternatives
Life happens, and sometimes we need to improvise. Here are tested substitutions that maintain the quality of your Maple Pecan Scones.
For heavy cream, you can substitute with whole milk mixed with sour cream. Use 3/4 cup milk plus 1/4 cup sour cream. Buttermilk also works beautifully.
If you’re out of pecans, walnuts make an excellent substitute with their similar texture. Almonds work too, though they provide a slightly different taste. You can also make plain maple scones by omitting nuts entirely.
Brown sugar can replace some or all of the white sugar for deeper molasses notes. Use 1/4 cup brown sugar instead of white for extra richness. This pairs wonderfully with maple flavor.
For dairy-free Maple Pecan Scones, coconut cream substitutes well for heavy cream. Use cold coconut oil or vegan butter in place of dairy butter. The texture will be slightly different but still delicious.
Gluten-free flour blends can work with xanthan gum added. Expect a slightly denser texture compared to traditional scones. King Arthur’s Measure for Measure flour gives reliable results.
Preparation Steps
Initial Prep and Cleaning Tips
Proper preparation is half the battle when making perfect Maple Pecan Scones. Let’s set ourselves up for success before we even touch the ingredients.
Start by freezing your butter at least 30 minutes before you begin. Some bakers even freeze it overnight for easier grating. Frozen butter creates those coveted flaky layers.
Toast your pecans in a dry skillet over medium heat for 3-5 minutes until fragrant. This simple step transforms their flavor completely. Let them cool before chopping to prevent them from releasing oils.
Chill your mixing bowl in the freezer for 15 minutes if you have time. Cold equipment helps keep everything at the ideal temperature. This might seem fussy, but it truly makes a difference.
Line your baking sheet with parchment paper before you start mixing. Having everything ready prevents last-minute scrambling. Parchment ensures easy cleanup too.
Measure all ingredients precisely before beginning. Baking is science, and accuracy matters for consistent results. Use the spoon-and-level method for flour.
Step-by-Step Cooking Instructions with Secret Tips
Now comes the fun part—bringing your Maple Pecan Scones to life. Follow these detailed steps for bakery-quality results every single time.
Preheat your oven to 400°F (204°C). This high temperature creates the initial burst of steam that makes scones rise dramatically. An oven thermometer ensures accuracy if your oven tends to run hot or cool.
Whisk together dry ingredients in a large bowl: 2 cups flour, 1/4 cup sugar, 1 tablespoon baking powder, 1/2 teaspoon baking soda, and 1/2 teaspoon salt. Make sure everything is evenly distributed to ensure uniform rise.
Grate the frozen butter directly into the flour mixture using the large holes of a box grater. This technique distributes butter more evenly than cutting it in manually. Work quickly so the butter stays cold and doesn’t melt from your hands.
Toss the butter shreds gently with the flour until pieces are coated. Then use your fingertips to break some pieces down to pea-sized bits, but leave some larger chunks. These irregular sizes create the best flaky texture in Maple Pecan Scones.
Add the toasted, chopped pecans to the flour mixture and toss to combine. About 1 cup of pecans provides great flavor without overwhelming the dough.
Whisk together wet ingredients in a separate bowl: 3/4 cup heavy cream, 1/4 cup maple syrup, 1 egg, and 1 teaspoon vanilla extract. The maple syrup not only flavors these scones but also helps create tender crumb.
Pour the wet mixture into the dry ingredients all at once. Use a fork to stir gently, bringing the dough together with as few strokes as possible. The mixture will look shaggy and rough—that’s exactly what you want.
Turn the dough onto a lightly floured surface when it’s still slightly dry looking. Don’t panic if there are dry patches; they’ll come together. If the mixture seems too dry, add cream one tablespoon at a time.
Knead the dough just 4-5 times with floured hands. Overworking develops gluten, which makes tough, dense scones instead of tender ones. Less is truly more here.
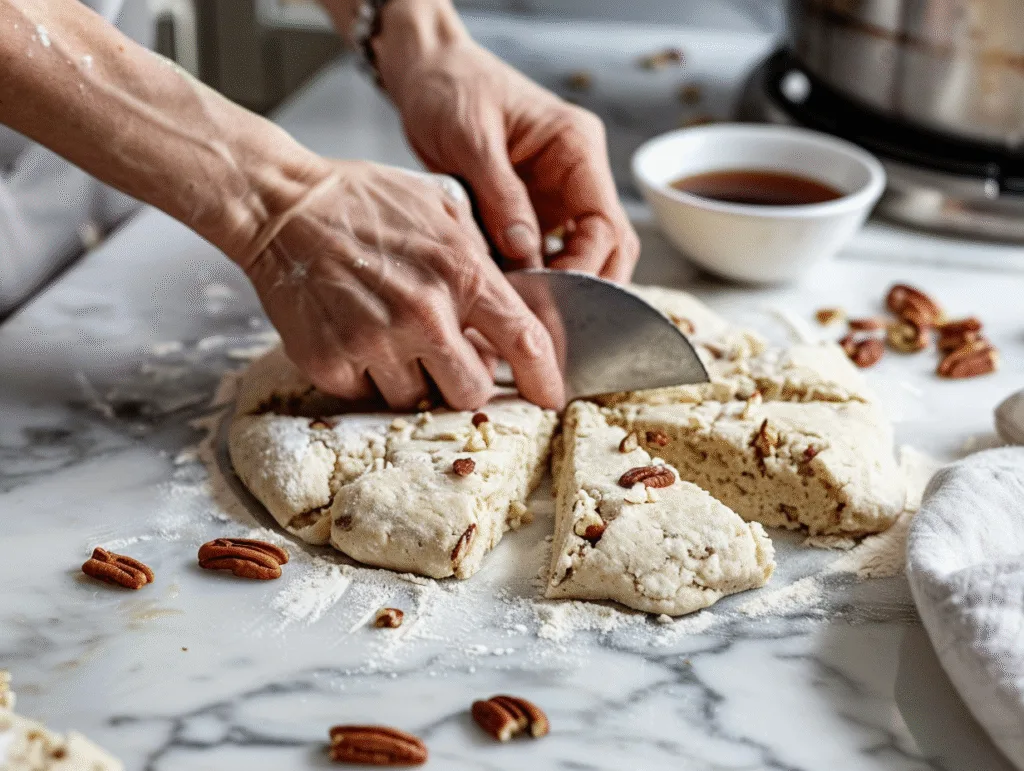
Pat the dough into an 8-inch circle about 1 to 1.5 inches thick. Use a bench scraper to keep edges straight and even—this helps scones rise uniformly. Don’t use a rolling pin, which can compress the layers.
Cut into 8 wedges using a sharp knife dipped in flour. Press straight down rather than sawing through the dough. Clean the knife between cuts for the cleanest edges.
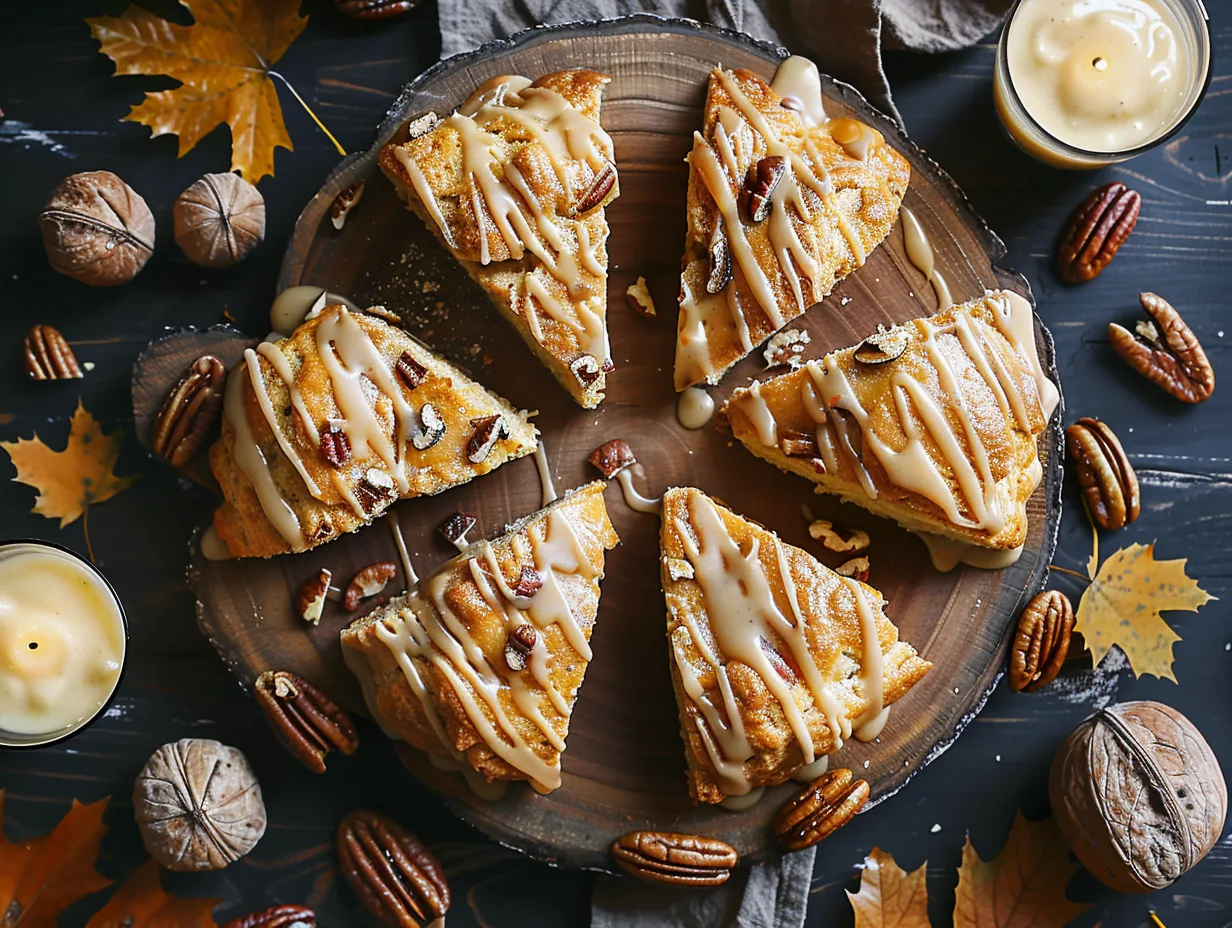
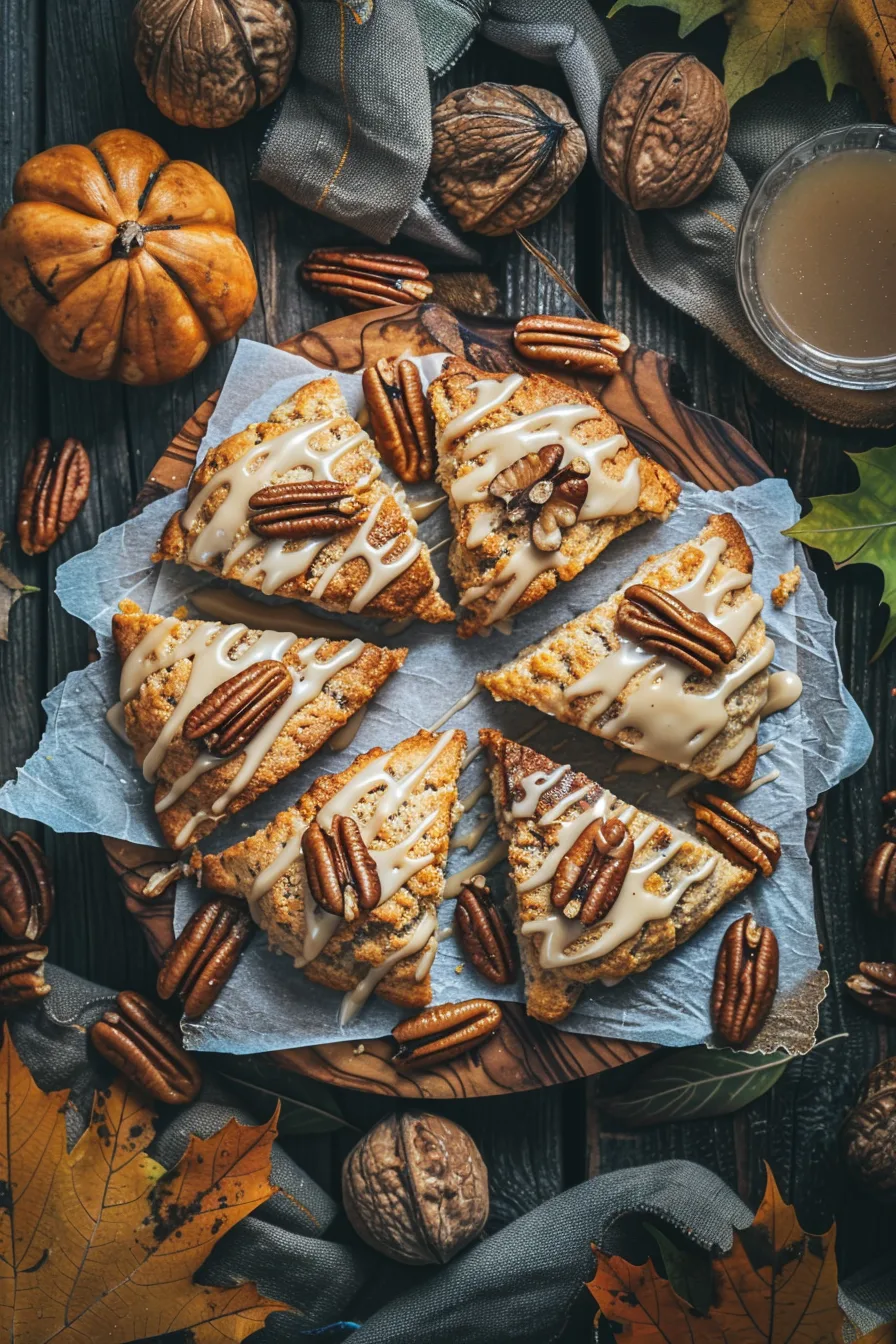
Place scones on your prepared baking sheet, spacing them 2-3 inches apart. They’ll expand as they bake, so give them room. For an extra-special touch, press a few whole pecan halves into the tops.
Brush tops with heavy cream and sprinkle with coarse sugar if desired. This creates a beautiful golden finish and adds textural contrast. Don’t skip this step—it makes your Maple Pecan Scones look professionally made.
Freeze the shaped scones for 15-30 minutes before baking. This crucial step helps them hold their shape and rise tall rather than spreading. Your freezer is your secret weapon for perfect scones.
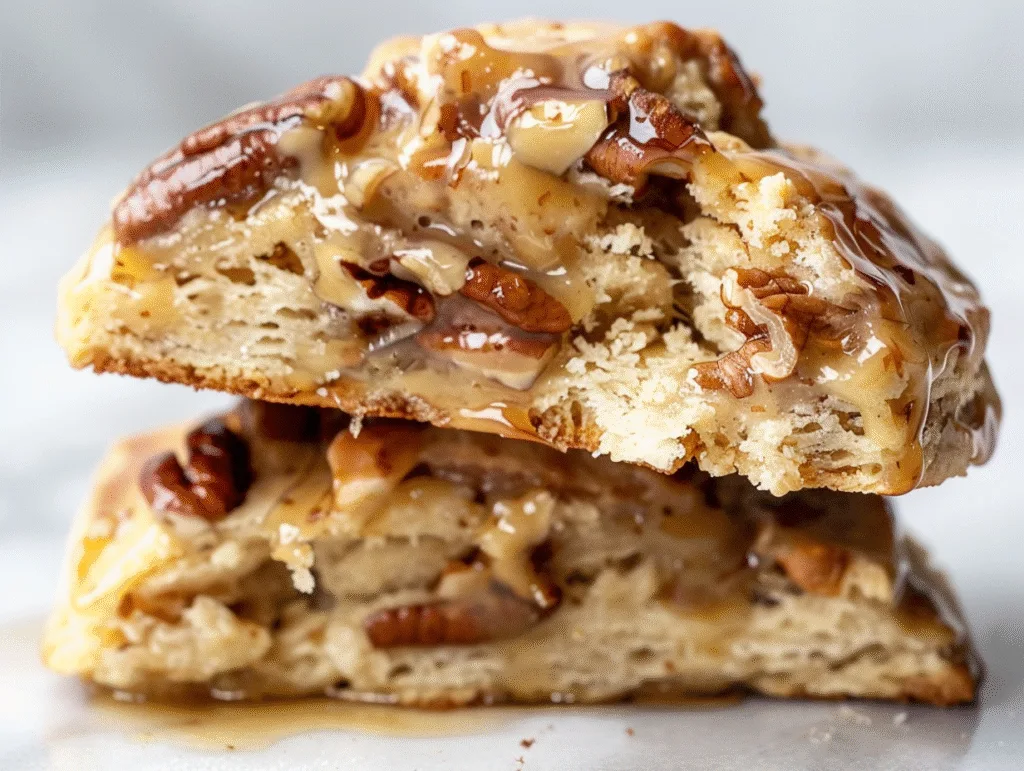
Bake for 18-25 minutes until golden brown on top and the internal temperature reaches 200°F. Larger scones need closer to 25 minutes, while smaller ones bake faster. The bottoms should be golden, not pale.
While scones bake, prepare the maple glaze by whisking together 1 cup powdered sugar, 3 tablespoons maple syrup, and 1-2 tablespoons water until smooth. Add liquid gradually until you reach drizzling consistency.
Cool the scones for 10-15 minutes before glazing. They should be warm but not piping hot, which prevents the glaze from melting off completely. Drizzle generously over each scone for that iconic maple finish.
Common Mistakes and How to Avoid Them
Even experienced bakers can stumble with scones. Let me help you sidestep the most common pitfalls when making Maple Pecan Scones.
Overmixing the dough is the number one mistake that leads to tough, dense scones. Mix just until ingredients come together, even if the dough looks rough. Those lumps and shaggy bits are actually good signs.
Using warm ingredients sabotages your Maple Pecan Scones before they even hit the oven. Butter must be ice-cold to create steam pockets that make scones flaky. If your kitchen is hot, work quickly or chill the dough between steps.
Twisting the cutter when cutting scones seals the edges and prevents rising. Always press straight down with your knife or cutter, then lift straight up. This keeps the layers intact so they can separate during baking.
Skipping the freezer step before baking results in scones that spread sideways instead of rising up. That 15-30 minute freeze makes an enormous difference in final height and texture.
Overbaking dries out scones and makes them crumbly rather than tender. Remove them when just golden and still slightly soft in the center. They’ll continue cooking slightly as they cool on the pan.
Using old leavening agents means flat, disappointing Maple Pecan Scones no matter what else you do right. Replace baking powder and baking soda every 6 months for best results.
Baking at the wrong temperature affects rise and texture. An oven thermometer helps you verify that 400°F is truly 400°F. Even 25-degree differences impact the final product significantly.
Easy Maple Pecan Scones: Perfect Autumn Treat
Ingredients
Tried this recipe?
Let us know how it was!Serving & Final Touches
Creative Presentation Ideas
Maple Pecan Scones deserve to be showcased beautifully. Here are simple ways to make these delicious dishes look as amazing as they taste.
Arrange scones on a rustic wooden board or cake stand for an inviting autumn display. Scatter a few whole pecans and sprigs of fresh thyme around them for natural elegance. This casual presentation feels warm and welcoming.
Drizzle the maple glaze in artistic patterns across each scone rather than just pouring it on. Use a fork or squeeze bottle for control and create zigzag or spiral designs. The visual appeal makes people eager to dig in.
Serve Maple Pecan Scones on individual small plates with a pat of butter shaped with a decorative butter curler. Add a tiny jar of extra maple syrup for drizzling at the table. These thoughtful touches elevate a simple breakfast into something special.
Dust lightly with powdered sugar just before serving for an elegant finish. The white powder contrasts beautifully with the golden-brown scones and creates an appetizing look. Keep it subtle so the maple glaze still shows through.
Stack two or three scones on a vintage plate for a charming breakfast-in-bed presentation. Tuck in a cloth napkin and add a single autumn flower in a small vase. This romantic styling works perfectly for weekend mornings.
Recommended Side Dishes or Pairings
Maple Pecan Scones shine on their own, but pairing them thoughtfully creates a complete breakfast or brunch experience.
Coffee is the classic companion for these scones, especially a medium-roast brew that won’t overpower the maple flavor. The slight bitterness of coffee balances the sweetness perfectly. Try a cinnamon-spiced latte for extra autumn vibes.
Hot tea offers a gentler pairing that lets the maple and pecan flavors take center stage. Earl Grey, English Breakfast, or chai all complement Maple Pecan Scones beautifully. Serve it with milk and honey for a cozy morning ritual.
Fresh fruit adds brightness and balances the richness of these scones. Sliced apples, pear wedges, or a handful of grapes refresh the palate between bites. Seasonal fruit makes the meal feel complete and adds nutritional value.
Whipped cream or clotted cream takes Maple Pecan Scones into indulgent territory. The light, airy texture contrasts wonderfully with the dense scone crumb. This traditional British-style serving never goes out of fashion.
Crispy bacon provides a savory contrast that many people love with sweet breakfast baked goods. The salty-sweet combination creates irresistible flavor harmony. A few strips alongside your scone makes for a satisfying meal.
Greek yogurt offers a healthier option that still provides creamy richness. Mix in a drizzle of maple syrup and chopped pecans to echo the scone flavors. This pairing works especially well for a lighter breakfast.
Storage Tips and Reheating Advice
Proper storage keeps your Maple Pecan Scones fresh and delicious long after baking. Follow these guidelines to extend their life without sacrificing quality.
Store at room temperature in an airtight container for up to 2 days. Place parchment paper between layers if stacking to prevent the glaze from sticking. Room temperature storage maintains the best texture for freshly baked scones.
Refrigerate for longer storage, up to 5 days in a sealed container. Let scones come to room temperature before eating, or warm them briefly. The cold keeps them fresh but can dry them out slightly.
Freeze unglazed scones for up to 3 months wrapped individually in plastic wrap, then placed in a freezer bag. Remove as many as needed and thaw at room temperature. This lets you enjoy fresh-tasting Maple Pecan Scones anytime.
Reheat in a 300°F oven for 5-8 minutes to restore that just-baked texture. Don’t use the microwave, which makes scones rubbery and tough. A brief oven warming brings back all their tender, flaky glory.
Freeze the unbaked, shaped dough for ultimate freshness. Cut and shape scones, freeze on a baking sheet until solid, then transfer to freezer bags. Bake from frozen, adding 5 extra minutes to the baking time.
Add glaze after reheating rather than before freezing or refrigerating. This keeps the glaze looking fresh and prevents it from absorbing into the scone. Make fresh glaze in minutes whenever you’re ready to serve.
Refresh day-old scones by brushing lightly with cream and warming in the oven. This simple trick revives them beautifully and makes them taste freshly baked. Your family will never know these Maple Pecan Scones aren’t straight from the oven.
 DINNER
 LUNCH
LUNCH Desserts
 BREAKFAST
For more amazing recipes, be sure to check out our other sections to explore a variety of ideas that will enrich your cooking experience. Each section offers its own unique flavors to ensure a delightful culinary journey:
Easy and Quick Recipes: A collection of dishes that guarantee delicious meals with minimal effort and time.
Healthy Recipes: Discover healthy and delicious options that fit your lifestyle.
Desserts: A diverse selection of sweets that will add a special touch of sweetness to your table.
Lunch Recipes: Tasty lunch ideas that you can easily prepare to delight your family.
Dinner Recipes: Delicious and easy-to-make recipes that will make your dinner a memorable occasion.
FAQ
How do I keep my Maple Pecan Scones from being too dry?
The secret to moist Maple Pecan Scones lies in not overbaking them and keeping the dough properly hydrated. Remove scones from the oven when they’re just golden brown and still feel slightly soft in the center—they’ll continue cooking as they cool. Make sure you’re measuring flour correctly using the spoon-and-level method rather than packing it into the cup, which adds too much flour. Add cream gradually when mixing the dough, stopping when the mixture just comes together but still looks slightly shaggy. The maple syrup in the recipe also helps keep them tender by adding moisture and natural sugars that retain water.
Can I make Maple Pecan Scones ahead of time?
Absolutely! Maple Pecan Scones are perfect for make-ahead breakfast or brunch planning. Shape the scones completely, place them on a baking sheet, and freeze until solid (about 2 hours). Transfer frozen scones to a freezer bag and store for up to 3 months. When ready to bake, place frozen scones on a prepared baking sheet and bake directly from frozen, adding 5-7 extra minutes to the baking time. You can also bake them completely, let them cool, then freeze unglazed scones wrapped individually. Thaw at room temperature for a couple hours, warm briefly in a 300°F oven, and add fresh glaze just before serving. This flexibility makes Maple Pecan Scones a stress-free option for entertaining.
Why didn’t my scones rise properly?
Several factors can prevent Maple Pecan Scones from achieving that beautiful tall rise. Most commonly, old or expired baking powder fails to provide adequate lift—always check expiration dates and test your leavening agents. Overworking the dough develops gluten, which makes scones dense and prevents rising. Mix just until combined, even if the dough looks rough. Using warm butter instead of cold butter eliminates the steam pockets that create rise and flaky layers. Twisting your cutter when cutting scones seals the edges and prevents layers from separating during baking—always press straight down. Finally, skipping the freezer step before baking allows scones to spread sideways rather than rising upward. Freeze shaped scones for at least 15 minutes before baking for best height.
What’s the best way to incorporate pecans into the dough?
For perfect pecan distribution in Maple Pecan Scones, toast them first to intensify their flavor and remove excess moisture. Let them cool completely, then chop them into roughly uniform pieces about the size of large peas. Add chopped pecans to the flour-butter mixture before adding any liquid ingredients. Toss gently to coat them with flour, which helps prevent them from sinking to the bottom during baking. When you fold and shape the dough, some pecans will get pressed into the surface—this creates beautiful visual appeal and ensures every bite has nutty flavor. You can also press a few whole pecan halves onto the tops of shaped scones before baking for an attractive, rustic presentation. Avoid adding too many nuts (more than 1 cup), as this can prevent the dough from holding together properly.
Can I reduce the sugar in this recipe?
Yes, you can adjust the sweetness in Maple Pecan Scones, though it will affect both flavor and texture. The sugar in the dough (typically 1/4 cup) can be reduced by half without dramatically changing the structure. Remember that the maple syrup also contributes sweetness, so these scones aren’t as sweet as they might seem from the sugar alone. If reducing sugar in the dough, you might want to skip the coarse sugar topping as well. The maple glaze is where most of the sweetness comes from, so that’s the easiest place to cut back. Make a thinner glaze using less powdered sugar, or skip it entirely and just brush the baked scones with warm maple syrup for subtle sweetness. Keep in mind that sugar isn’t just for sweetness—it helps create tender texture and golden-brown color. Reducing it too much may result in paler, tougher scones.
Conclusion
There’s something truly special about pulling a batch of golden Maple Pecan Scones from the oven. The way they fill your home with warmth and comfort is absolutely magical.
These easy homemade recipes prove that bakery-quality results are within reach for any home cook. You don’t need fancy equipment or professional training to create delicious dishes that’ll have everyone asking for seconds.
The beauty of this family favorite recipe lies in its simplicity and versatility. Whether you’re serving them for a weekend breakfast, holiday brunch, or afternoon tea, Maple Pecan Scones never disappoint.
Now it’s your turn to experience the joy of baking these incredible scones. Gather your ingredients, preheat that oven, and get ready to create something wonderful. Your kitchen is about to smell absolutely amazing.
Don’t forget to share your Maple Pecan Scones creations with friends and family. Snap a photo, leave a comment below, or tag us on social media—we love seeing how your scones turn out! Happy baking, and may your scones always rise perfectly tall and golden.