Table of Contents
Table of Contents
Introduction
There’s something truly magical about cream cheese mints that takes me back to my grandmother’s kitchen every single time. I remember being eight years old, standing on a wooden stool beside her, watching her transform a simple mixture of cream cheese and powdered sugar into the most elegant little candies I’d ever seen. She’d press them into delicate molds shaped like roses and leaves, dust them with colored sugar, and line them up on wax paper like tiny edible jewels. “These,” she’d whisper conspiratorially, “are what make a party special.”
Fast forward to today, and cream cheese mints have become one of the most beloved no-bake confections in American culinary tradition. These delightful little candies have graced wedding reception tables, baby showers, holiday gatherings, and tea parties for generations. What makes them truly special isn’t just their creamy, melt-in-your-mouth texture or their refreshing mint flavor—it’s their remarkable simplicity. With just four basic ingredients and no cooking required, anyone can create these impressive treats that look like they came from an expensive candy shop.
The beauty of cream cheese mints lies in their versatility and accessibility. Unlike complicated desserts that require precise temperatures and careful timing, these mints are forgiving, customizable, and absolutely foolproof. Whether you’re a seasoned baker or someone who’s never made candy before, you’ll find that creating these elegant confections is not only easy but genuinely enjoyable. They’re the perfect solution when you need something special but don’t have hours to spend in the kitchen. In this comprehensive guide, I’ll walk you through everything you need to know to master this classic recipe, from selecting the perfect ingredients to storing your finished mints so they stay fresh and delicious.
Easy Cream Cheese Mints | No-Bake Party Candy
Ingredients
Tried this recipe?
Let us know how it was!Ingredients for Perfect Cream Cheese Mints
Understanding the Essential Components and Their Roles
The magic of cream cheese mints starts with understanding what each ingredient brings to the table. At the heart of this recipe is cream cheese, which provides the rich, smooth base that gives these candies their distinctive creamy texture. Unlike other mint candies that can be hard or crystalline, cream cheese mints have a soft, almost velvety quality that melts instantly on your tongue. The cream cheese also adds a subtle tanginess that beautifully balances the sweetness of the other ingredients.
Powdered sugar (also called confectioners’ sugar) is the second crucial component in making cream cheese mints. This finely ground sugar not only sweetens the mixture but also provides the structure that allows you to shape the mints. The cornstarch typically found in powdered sugar helps absorb moisture from the cream cheese, creating a workable dough-like consistency. You’ll need a substantial amount—typically three to four cups for every three ounces of cream cheese—but this ratio is what transforms liquid cream cheese into shapeable candy.
Peppermint extract is what gives cream cheese mints their signature flavor. Unlike peppermint oil, which is incredibly concentrated, peppermint extract is diluted in alcohol, making it easier to measure and incorporate evenly throughout the mixture. Just a quarter to half teaspoon can infuse your entire batch with that refreshing mint taste that makes these candies so irresistible. Some recipes call for vanilla extract in addition to or instead of peppermint, creating a more subtle flavor profile that appeals to those who prefer a gentler mint taste.
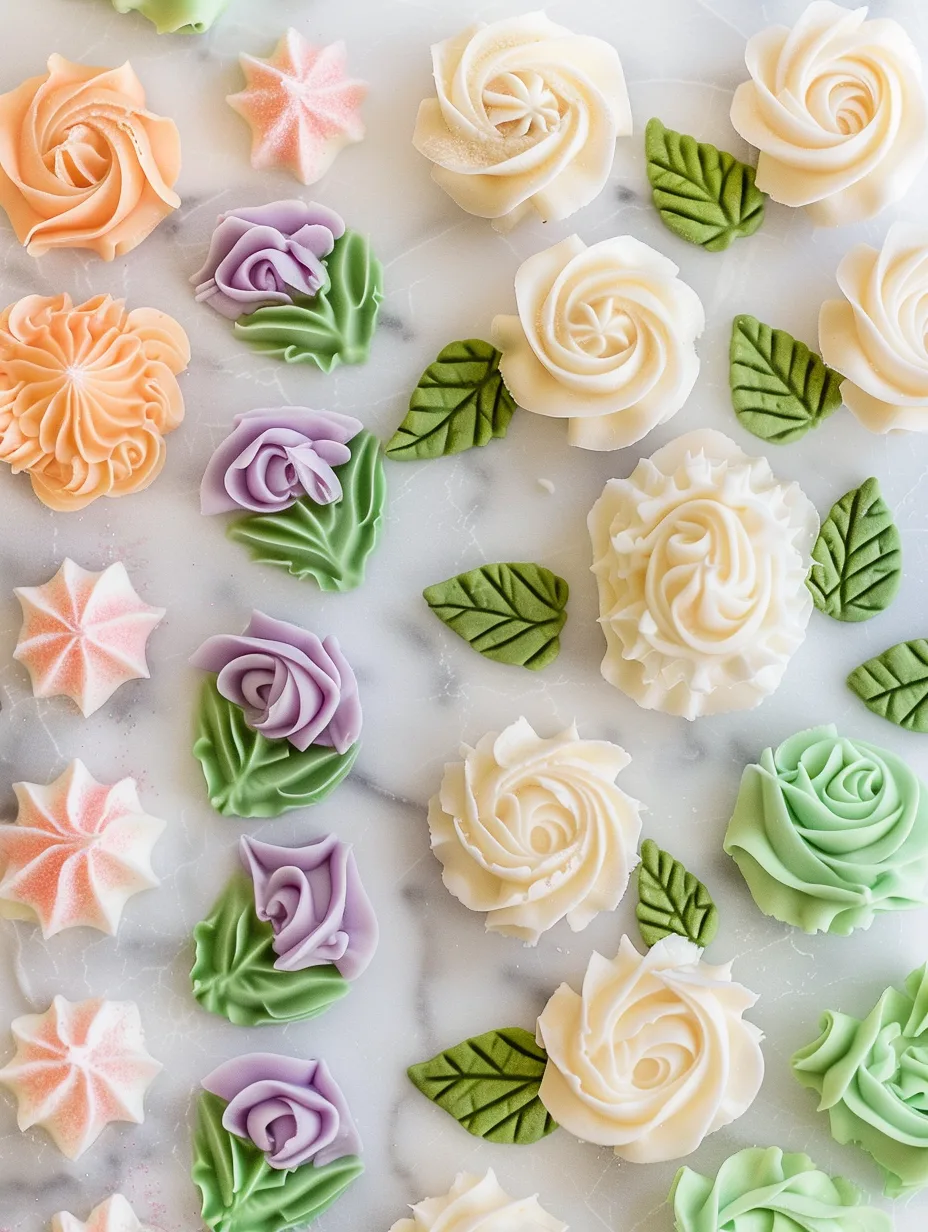
The final ingredient is completely optional but adds tremendous visual appeal: food coloring. Traditional cream cheese mints are often tinted in pastel shades—pink for baby showers, green for Christmas, lavender for spring celebrations, or left pure white for weddings. The food coloring doesn’t affect the taste or texture; it simply makes your cream cheese mints look even more special and allows you to coordinate them perfectly with your event’s color scheme.
Selecting the Best Quality Ingredients for Superior Results
When it comes to making exceptional cream cheese mints, ingredient quality matters more than you might think. For the cream cheese, always opt for full-fat brick-style cream cheese from trusted brands. The brick form has a firmer consistency than spreadable cream cheese, which often contains added stabilizers and extra moisture that can make your mixture too soft to shape properly. Bring your cream cheese to room temperature before beginning—this is absolutely crucial. Cold cream cheese will create lumps in your mixture, while overly soft cream cheese can make the dough too sticky. The ideal temperature is when the cream cheese feels slightly cool but presses easily with your finger.
The powdered sugar you choose should be fresh and free from lumps. Always sift your powdered sugar before using it, even if it looks smooth in the bag. This extra step removes any clumps and incorporates air, which makes mixing easier and results in a smoother final texture for your cream cheese mints. Store-brand powdered sugar works perfectly fine for this recipe—there’s no need to spend extra on premium brands since the cream cheese flavor will be dominant.
For the peppermint extract, quality truly shines through. Pure peppermint extract offers a cleaner, more refreshing flavor than imitation versions, which can sometimes taste artificial or leave a chemical aftertaste. Look for extracts from reputable spice companies, and check the expiration date—old extract loses its potency and aromatic qualities. If you’re fortunate enough to find peppermint oil at a specialty store, you can use it instead, but remember that it’s much more concentrated; you’ll only need 2-3 drops to replace a quarter teaspoon of extract.
When selecting food coloring for your cream cheese mints, gel food coloring produces more vibrant colors with less product than liquid varieties. Since liquid food coloring contains water, using too much can affect the consistency of your mixture, making it harder to achieve the perfect moldable texture. Gel colorings are concentrated, allowing you to create deep, beautiful hues with just a tiny amount. They’re available at craft stores, baking supply shops, and increasingly in regular grocery stores.
Smart Substitutions and Creative Alternatives
One of the wonderful things about cream cheese mints is how adaptable the recipe can be to accommodate different dietary needs, preferences, and pantry situations. If you need a dairy-free version, you can successfully substitute the regular cream cheese with vegan cream cheese alternatives made from cashews, almonds, or soy. These plant-based versions work remarkably well, though you may need to adjust the amount of powdered sugar slightly since different brands have varying moisture contents. The resulting mints won’t taste identical to traditional ones, but they’ll still be delicious and have that characteristic creamy texture.
For those watching their sugar intake, making cream cheese mints with powdered sugar substitutes is possible, though it requires some experimentation. Powdered erythritol or powdered allulose can replace some or all of the powdered sugar, creating a lower-calorie version. Keep in mind that these sweeteners don’t behave exactly like sugar—they may produce a slightly softer mint that’s more temperature-sensitive. Some people find that blending half sugar substitute with half regular powdered sugar provides the best balance of reduced sugar content while maintaining good texture and workability.
The flavoring possibilities for cream cheese mints extend far beyond traditional peppermint. Alternative extracts can transform these candies into entirely new treats. Try replacing peppermint with almond extract for a sophisticated flavor, lemon extract for a bright citrus version, or even rose water for an elegant floral twist. Vanilla extract creates a mild, sweet mint that children often prefer. You can also combine flavors—a touch of vanilla with peppermint creates a wonderfully balanced taste, while orange extract paired with a hint of vanilla mimics the flavor of Creamsicle candies.
If you’re out of cream cheese entirely, you might wonder if there’s a substitute that works. While nothing perfectly replicates the unique texture of cream cheese mints, you can make a similar candy using softened butter combined with cream or milk. Mix four tablespoons of very soft butter with two tablespoons of heavy cream, then gradually add powdered sugar until you reach a moldable consistency. The result won’t be quite the same—it’ll be slightly firmer and more butterscotch-like in flavor—but it’s a reasonable alternative in a pinch and still creates beautiful, tasty mints.
Preparation Steps for Making Cream Cheese Mints
Initial Preparation and Setup for Success
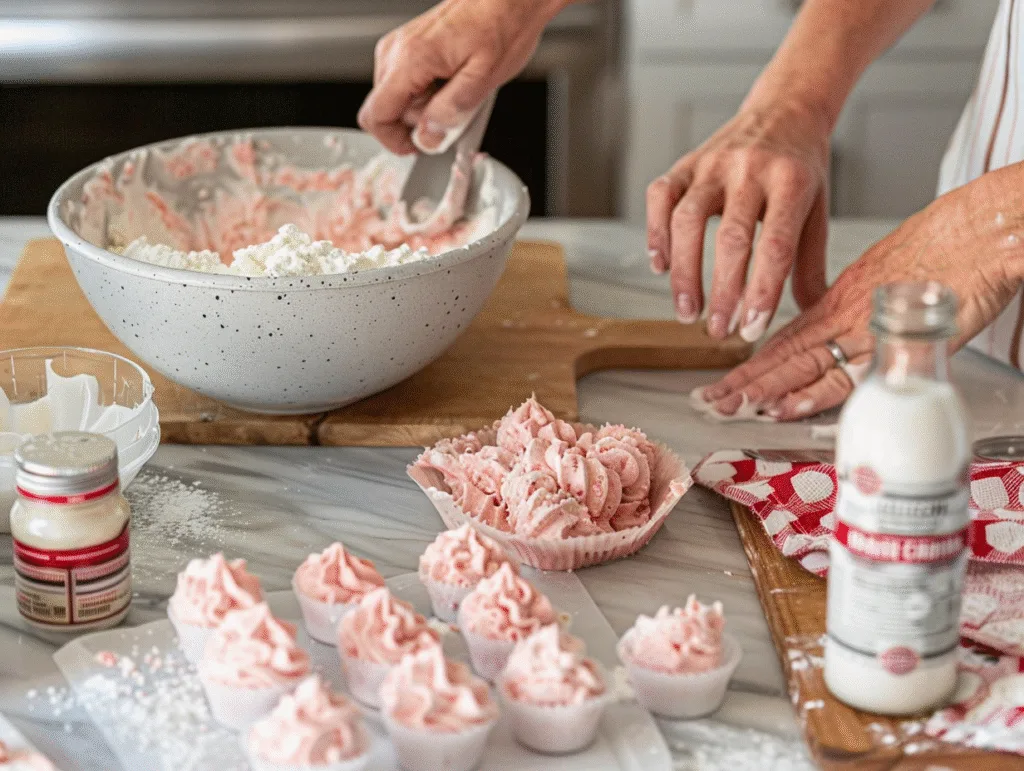
Before you begin mixing your cream cheese mints, proper preparation makes the entire process smoother and more enjoyable. Start by setting up your workspace with everything you’ll need within arm’s reach. Cover your work surface with parchment paper or wax paper—this prevents sticking and makes cleanup effortless. Have your measuring cups and spoons ready, along with a large mixing bowl (glass or stainless steel works best), a sturdy wooden spoon or silicone spatula, and whatever shaping tools you plan to use.
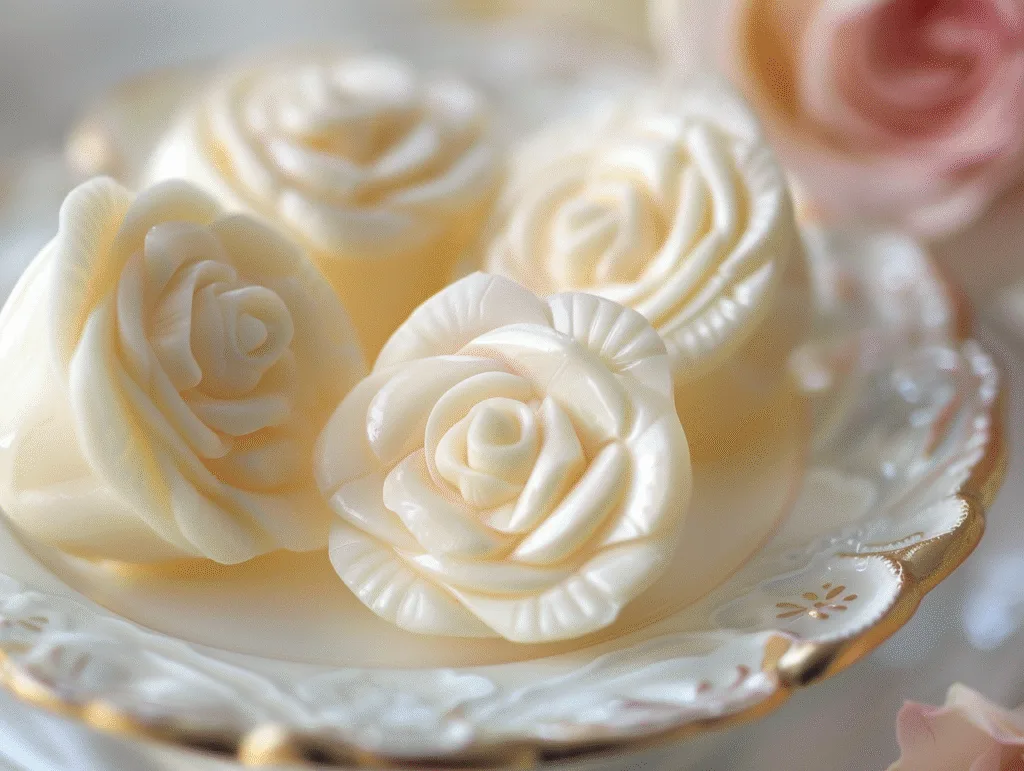
If you’re using candy molds for your cream cheese mints, now is the time to prepare them. Silicone molds are ideal because the finished mints pop out easily without any release agent. If you’re using plastic or metal molds, lightly dust them with powdered sugar or cornstarch to prevent sticking. Arrange your molds on a flat surface near your work area, and have baking sheets or large plates ready to hold the molds once they’re filled. Traditional mint molds come in shapes like roses, leaves, bells, and shells, but you can also use small cookie cutters if you prefer a different look.
The most critical preparation step is bringing your cream cheese to the proper temperature. Remove it from the refrigerator 30 to 45 minutes before you plan to start. The cream cheese should be soft enough to blend easily but not so warm that it becomes oily or separated. If you forgot to take it out early, you can carefully soften it in the microwave using 10-second intervals at 30% power, checking between each interval. Be extremely cautious with this method—overheated cream cheese becomes too liquid and won’t hold its shape when mixed with powdered sugar.
While your cream cheese is softening, this is also an excellent time to measure and sift your powdered sugar. Sifting eliminates lumps and makes incorporating the sugar into the cream cheese much easier. You’ll be adding the sugar gradually, so having it measured and ready speeds up the process considerably. If you’re planning to make multiple colors of cream cheese mints, divide your measured powdered sugar into separate bowls now so you can create different colored batches simultaneously.
H3 (2): Step-by-Step Mixing and Shaping Instructions
Now comes the fun part—actually making your cream cheese mints! Begin by placing your softened cream cheese in your mixing bowl. Using a wooden spoon or spatula (you can also use an electric mixer on low speed), beat the cream cheese until it’s completely smooth and creamy with no lumps remaining. This should take about 30 seconds if the cream cheese was properly softened. If you’re adding food coloring, add just a tiny amount now—you can always add more, but you can’t take it out. Start with a single drop of gel coloring or a few drops of liquid coloring, mixing thoroughly until the color is evenly distributed.
Next, add your peppermint extract to the cream cheese and stir well to incorporate it completely. The mixture will be quite thin at this point, which is perfectly normal. Now begins the process of adding powdered sugar. Add it one cup at a time, stirring thoroughly after each addition. Initially, the mixture will look impossibly wet and you might worry that it will never come together—trust the process! As you continue adding sugar, the mixture will gradually transform from a sticky paste to a smooth, pliable dough.
After adding three cups of powdered sugar, assess the consistency. The mixture should be firm enough to hold its shape when pinched but still soft enough to press into molds or roll into balls. If it’s still too sticky, add more powdered sugar a tablespoon at a time until you reach the right consistency. The exact amount you need can vary based on the moisture content of your cream cheese and even the humidity in your kitchen. On humid days, you might need an extra quarter to half cup of powdered sugar.
Once your cream cheese mint dough reaches the perfect consistency, it’s time to shape your mints. If using molds, take a small piece of dough (about a teaspoon), roll it into a ball between your palms, then press it firmly into the mold. Pack it down well to ensure the design transfers clearly, then carefully flex the mold to release the mint. Place shaped mints on parchment paper with space between each one. If you prefer simpler shapes, roll the dough into small balls about the size of marbles and flatten them slightly with a fork—the fork tines create an attractive pattern. Another classic approach is rolling the dough into logs about three-quarters of an inch in diameter, then slicing them into coins.
Avoiding Common Mistakes for Perfect Results
Even though cream cheese mints are one of the easiest candies you can make, there are several pitfalls that beginners often encounter. The most common problem is mixture that’s too soft to hold its shape. This usually happens when the cream cheese was too warm when you started, when insufficient powdered sugar was added, or when the mixture is worked in a warm kitchen. If your dough feels too soft, refrigerate it for 10-15 minutes to firm it up slightly. You can also work more powdered sugar into the mixture—don’t be afraid to add another quarter or half cup if needed.
The opposite problem—dough that’s too stiff and crumbly—occurs when too much powdered sugar has been added or when the cream cheese wasn’t sufficiently softened before mixing. If your cream cheese mints are cracking when you try to shape them, the mixture is too dry. Fix this by kneading in a tiny amount of softened cream cheese or a few drops of milk or cream. Work the additional moisture in thoroughly, adding just a little at a time until the texture becomes smooth and pliable again.
Another frequent issue is uneven coloring with streaks or spots of darker color throughout the mints. This happens when food coloring isn’t mixed in thoroughly before the powdered sugar is added. Once the dough becomes stiff with sugar, it’s nearly impossible to distribute color evenly. Always add coloring to the plain cream cheese first, mixing until completely uniform, before beginning to add any powdered sugar. If you end up with marbled mints, don’t worry—they can actually look quite pretty and artistic!
Some people find that their cream cheese mints stick stubbornly to molds, especially if using plastic or metal forms. The solution is dusting the molds with powdered sugar or cornstarch before filling them. Additionally, don’t press the dough so firmly that it gets compacted beyond what’s necessary to pick up the design. When removing mints from molds, flexibility is key—flex the mold gently but decisively, and the mint should pop right out. If it doesn’t release immediately, place the mold in the freezer for just two minutes to firm up the candy, then try again.
Temperature-related problems can also affect your cream cheese mints. If your kitchen is particularly warm (above 75°F), the mints may become soft and lose their shape even after they’re formed. Work in the coolest part of your kitchen, or make your mints early in the morning when temperatures are lower. Once shaped, refrigerate the mints for at least 30 minutes to set them properly. Conversely, if mints seem too hard or difficult to bite into after refrigeration, let them sit at room temperature for 5-10 minutes before serving—they’ll soften to the perfect creamy consistency.

Serving, Storing, and Enjoying Your Cream Cheese Mints
Beautiful Presentation Ideas for Every Occasion
The presentation of your cream cheese mints can elevate them from simple homemade candy to elegant party centerpieces. For wedding receptions, arrange your mints in crystal candy dishes or on silver trays lined with white doilies. Create visual interest by alternating white mints with very pale pastel shades, or coordinate the colors with the wedding palette. Mini cupcake liners make excellent individual serving cups—place 2-3 mints in each liner and arrange them in rows on a larger platter. This method also makes it easy for guests to take multiple mints without touching others.
Baby showers and bridal showers call for playful, charming presentations. Fill vintage teacups or small mason jars with cream cheese mints in coordinating colors, tied with ribbons that match the party theme. Create a “candy bar” station where these mints are displayed alongside other sweet treats in glass apothecary jars at varying heights. You can even make tiny favor bags filled with cream cheese mints as take-home gifts for guests—simply place 5-6 mints in small cellophane bags tied with curling ribbon and a personalized tag.
For holiday entertaining, presentation opportunities are endless. At Christmas, arrange green and white cream cheese mints on a festive platter garnished with fresh holly or pine sprigs (keeping the garnish away from the edible mints, of course). For Easter, create a nest presentation by arranging pastel-colored mints in a basket lined with shredded paper “grass.” Thanksgiving calls for autumn hues—make orange, yellow, and cream-colored mints shaped like leaves and arrange them on a wooden serving board surrounded by small pumpkins or gourds.
Don’t overlook the power of simple, elegant arrangements for everyday serving. A glass cake stand transforms cream cheese mints into an impressive dessert display. Layer them in slightly overlapping concentric circles, starting from the outside and working inward, creating a beautiful spiral pattern. For tea parties, arrange different colored mints in sections on a divided serving plate alongside cookies and petit fours. The contrast of textures and the pops of pastel color make for an Instagram-worthy spread that tastes as good as it looks.
Perfect Pairings and Complementary Treats
While cream cheese mints are delicious on their own, pairing them with complementary items creates a more complete dessert experience. These mints are a natural companion to coffee and tea, and they’re traditionally served at receptions and gatherings where hot beverages are offered. The cool mint flavor provides a refreshing contrast to rich coffee or smooths the tannins in black tea. For an especially elegant touch, serve cream cheese mints alongside espresso or small cups of cappuccino—the combination is sophisticated and satisfying.
Chocolate and cream cheese mints are a match made in heaven. The cool, creamy mint paired with rich chocolate creates a flavor combination that rivals any expensive candy shop confection. Serve your homemade cream cheese mints on a dessert plate with chocolate truffles, chocolate-covered strawberries, or brownies. You can even create a two-toned dessert by making half a batch of traditional mint-flavored cream cheese mints and half a batch with cocoa powder mixed in for chocolate-mint mints. The contrast is both visually appealing and delicious.
For afternoon tea services or garden parties, pair cream cheese mints with light, delicate treats that won’t overwhelm their subtle flavor. Lemon bars, sugar cookies, shortbread, and petit fours all work beautifully. Fresh fruit—especially strawberries, raspberries, and sliced peaches—provides a refreshing counterpoint and adds nutritional value to your dessert spread. Cheese and crackers might seem like an odd pairing, but a cheese course featuring mild, creamy varieties actually complements cream cheese mints nicely, especially when you include some fresh grapes or figs on the board.
These mints also excel as palate cleansers between courses or before dessert at formal dinners. Serve 1-2 cream cheese mints on a small plate after the main course as a light, refreshing transition before bringing out a heavier dessert. This old-fashioned custom has largely disappeared from modern dining, but it’s a lovely touch that guests remember. The mints prepare the palate for whatever comes next while providing a moment of sweetness without being too filling.
Storage Solutions and Shelf Life
Proper storage is essential for maintaining the quality and texture of your cream cheese mints. In the short term (up to one week), store your mints in an airtight container with sheets of parchment or wax paper between layers to prevent them from sticking together. Keep the container in the refrigerator—cream cheese mints must be stored cold because of their dairy content. Remove them from the refrigerator about 10-15 minutes before serving to allow them to come to the perfect serving temperature. Cold mints are too firm and don’t have that characteristic melt-in-your-mouth quality that makes them special.
For longer storage (up to three months), cream cheese mints freeze exceptionally well. Arrange them in a single layer on a baking sheet and freeze until solid—this takes about two hours. Once frozen, transfer the mints to freezer-safe containers or heavy-duty freezer bags, again using parchment paper between layers. Label the container with the date and flavor. When you’re ready to use them, transfer the desired amount to the refrigerator the night before you need them, allowing them to thaw slowly. Never thaw cream cheese mints at room temperature or in the microwave, as this can cause them to become mushy or separated.
It’s important to note that cream cheese mints don’t fare well in warm conditions. Never leave them at room temperature for extended periods, especially in summer months or warm climates. If you’re serving them at an outdoor event, keep the bulk of your supply in a cooler and replenish the serving dish in small batches. For buffet-style serving, consider placing your serving dish over a larger dish filled with ice to keep the mints chilled even while displayed. This might seem overly cautious, but cream cheese mints can soften significantly in just 30-60 minutes at room temperature.
When properly stored, cream cheese mints maintain their quality remarkably well, but there are signs of spoilage to watch for. If you notice any off odors, visible mold, or if the mints develop a slimy texture, discard them immediately. Cream cheese mints that have been frozen and thawed may have a slightly different texture than fresh ones—they might be a bit softer—but they should still taste delicious. If you’re making mints for a special event, consider making a test batch a week or two ahead to practice, then make your actual serving batch just 2-3 days before the event for optimal freshness and texture.
 DINNER
 LUNCH
LUNCH Desserts
 BREAKFAST
For more amazing recipes, be sure to check out our other sections to explore a variety of ideas that will enrich your cooking experience. Each section offers its own unique flavors to ensure a delightful culinary journey:
Easy and Quick Recipes: A collection of dishes that guarantee delicious meals with minimal effort and time.
Healthy Recipes: Discover healthy and delicious options that fit your lifestyle.
Desserts: A diverse selection of sweets that will add a special touch of sweetness to your table.
Lunch Recipes: Tasty lunch ideas that you can easily prepare to delight your family.
Dinner Recipes: Delicious and easy-to-make recipes that will make your dinner a memorable occasion.
Frequently Asked Questions About Cream Cheese Mints
Q1: Can I make cream cheese mints ahead of time, and if so, how far in advance?
Absolutely! Cream cheese mints are actually ideal make-ahead treats, which is one reason they’re so popular for parties and events. You can make them up to three months in advance if you freeze them properly. For best results when making them ahead, prepare your mints according to the recipe, freeze them on a baking sheet until solid, then transfer them to airtight containers with parchment paper between layers. When stored this way in the freezer, they maintain their texture and flavor beautifully. For events, you can make them 3-5 days ahead and keep them refrigerated, which many people find even easier than freezing. Just remember to remove them from the refrigerator 10-15 minutes before serving so they reach the ideal temperature and texture. Making them ahead also allows you to break up the work—you could make different colored batches on different days without feeling rushed.
Q2: Why are my cream cheese mints too soft and won’t hold their shape?
Soft, shapeless cream cheese mints are usually the result of too much moisture in the mixture or insufficient powdered sugar. This can happen if your cream cheese was too warm when you started (it should be cool room temperature, not warm), if you didn’t add enough powdered sugar, or if you made them on a particularly humid day. To fix soft mints, work in more powdered sugar a tablespoon at a time until the mixture firms up. You can also refrigerate the mixture for 10-15 minutes to firm it before shaping. Another common cause is using spreadable cream cheese instead of brick-style cream cheese—spreadable versions contain added moisture and stabilizers that prevent the mixture from firming up properly. Always use regular brick cream cheese for best results. If your shaped mints are softening after they’re made, make sure you’re storing them in the refrigerator and not leaving them at room temperature for extended periods.
Q3: Can I make cream cheese mints without peppermint flavoring?
Yes! While traditional cream cheese mints feature peppermint flavor, you can substitute virtually any extract you prefer to create different flavor profiles. Almond extract creates an elegant, sophisticated candy that’s perfect for weddings. Lemon or orange extract makes bright, citrusy mints that are especially refreshing in summer. Vanilla extract produces a mild, sweet version that children often prefer. Rose water or lavender extract (use sparingly—these are strong!) creates floral-flavored mints perfect for garden parties or tea services. You can even combine flavors—try vanilla with a hint of peppermint, or lemon with a touch of lavender. Just use the same amount of your chosen extract as the recipe calls for peppermint extract, keeping in mind that some extracts (especially almond and anise) are stronger than others, so you might want to start with slightly less and add more to taste.
Q4: How can I make my cream cheese mints less sweet?
Cream cheese mints are traditionally quite sweet since they’re primarily made of powdered sugar, but there are several ways to reduce the sweetness while maintaining the proper texture. First, you can replace up to half the powdered sugar with powdered erythritol or another powdered sugar substitute, though this will make the mints slightly softer and more temperature-sensitive. Second, use a slightly tart cream cheese—some brands are tangier than others, and this natural tartness helps balance the sweetness. Third, increase the amount of peppermint extract slightly; the stronger mint flavor can make the mints taste less cloying. Finally, consider adding a tiny pinch of salt to your mixture—it might seem counterintuitive, but salt enhances flavors and reduces perceived sweetness. Some people also find that shaping the mints smaller (making them bite-sized rather than larger pieces) makes them feel less sweet because you’re eating less at once, and the flavor is more concentrated.
Q5: What’s the best way to color cream cheese mints for matching event themes?
Achieving beautiful, even colors in your cream cheese mints requires adding the food coloring at the right stage and in the right amount. Always add coloring to the plain cream cheese before adding any powdered sugar—once the sugar is in, it becomes nearly impossible to distribute color evenly. Use gel food coloring rather than liquid for more vibrant colors without adding extra moisture. Start with just one small drop (gel coloring is very concentrated) and mix thoroughly. You can always add more to deepen the color, but you can’t remove it once it’s in. For pastel shades perfect for weddings and showers, use minimal coloring—just a toothpick dipped in gel coloring and swirled into the cream cheese often produces lovely pale tints. To create multiple coordinating colors, divide your cream cheese into separate bowls before adding coloring. For ombre effects, make several batches in gradually deepening shades of the same color. Remember that colors may deepen slightly as the mints chill, so make them slightly lighter than your target shade.
Conclusion
There’s something wonderfully empowering about creating elegant, impressive treats from just a handful of simple ingredients, and cream cheese mints exemplify this beautifully. These delightful little candies prove that you don’t need professional training, expensive equipment, or hours of your time to make something truly special. With just cream cheese, powdered sugar, peppermint extract, and optional food coloring, you can create confections that look like they came from an upscale candy boutique but cost a fraction of the price.
What I love most about this recipe is how it brings people together. Every time I make cream cheese mints, I’m transported back to my grandmother’s kitchen, but I’m also creating new memories with my own family and friends. These mints have been present at countless celebrations in my life—they’ve graced wedding reception tables, welcomed new babies, celebrated graduations, and brightened holiday gatherings. They’re more than just candy; they’re tiny edible tokens of care and celebration.
I encourage you to try making cream cheese mints for your next gathering, or simply as a special treat for your family. Don’t be intimidated if you’ve never made candy before—this recipe is truly foolproof when you follow the guidelines I’ve shared. Start with a simple batch in classic peppermint flavor and traditional colors, then let your creativity run wild with different flavors, colors, and shapes. Make them with your children or grandchildren to start your own tradition of mint-making memories.
Once you’ve made your cream cheese mints, I’d love to hear about your experience! Did you create a special color scheme for an event? Did you experiment with unique flavors? Did your family declare them the best mints they’ve ever tasted? Share your stories, photos, and any tips you discovered along the way. And if you’re looking for more easy homemade recipes and delicious dishes that are perfect for family gatherings, be sure to explore our collection of family favorite recipes. Happy mint-making, and here’s to creating sweet memories, one little mint at a time!