
Table of Contents
Table of Contents
There’s something magical about the way a perfectly crafted chicken chili can transform an ordinary evening into a cozy, memorable experience. As someone who’s spent countless hours perfecting comfort food recipes in my kitchen, I can confidently say that this Cream Cheese Chicken Chili holds a special place in my heart—and it will in yours too.
I’ll never forget the first time I made this recipe. It was during a particularly harsh winter storm when my family was snowed in, and I needed something hearty, warming, and satisfying to feed everyone. Traditional beef chili felt too heavy, but regular chicken soup seemed too light. That’s when inspiration struck: what if I could create a chicken chili that was creamy, rich, and absolutely soul-satisfying? After several attempts and tweaks, this Cream Cheese Chicken Chili was born, and it quickly became our family’s go-to recipe for cold nights, game day gatherings, and whenever we needed a bowl of pure comfort.
What makes this chicken chili truly special isn’t just its incredible taste—it’s how it brings people together. The creamy texture from the cream cheese creates a luxurious base that’s different from any traditional chili you’ve ever tried, while still maintaining all the robust flavors you crave. This easy homemade recipe has become one of my most requested family favorite recipes, and I’m thrilled to share every secret and tip with you today.
Cream Cheese Chicken Chili
Method
- 2 lbs chicken breast or thighs, cut into bite-sized pieces
- “8 oz cream cheese, cubed and at room temperature
- 1 large onion, diced
- 3 cloves garlic, minced
- 2 cans (15 oz each) white beans, drained and rinsed
- 1 can (14.5 oz) diced tomatoes
- 1 can (4 oz) diced green chilies
- 3 cups chicken broth
- 2 tsp ground cumin
- 1 tsp chili powder
- 1 tsp garlic powder
- 1 tsp dried oregano
- Salt and pepper to taste
- 2 tbsp olive oil
- Fresh cilantro for garnish
- Shredded cheese for serving
- Sour cream for serving
Nutrition
Tried this recipe?
Let us know how it was!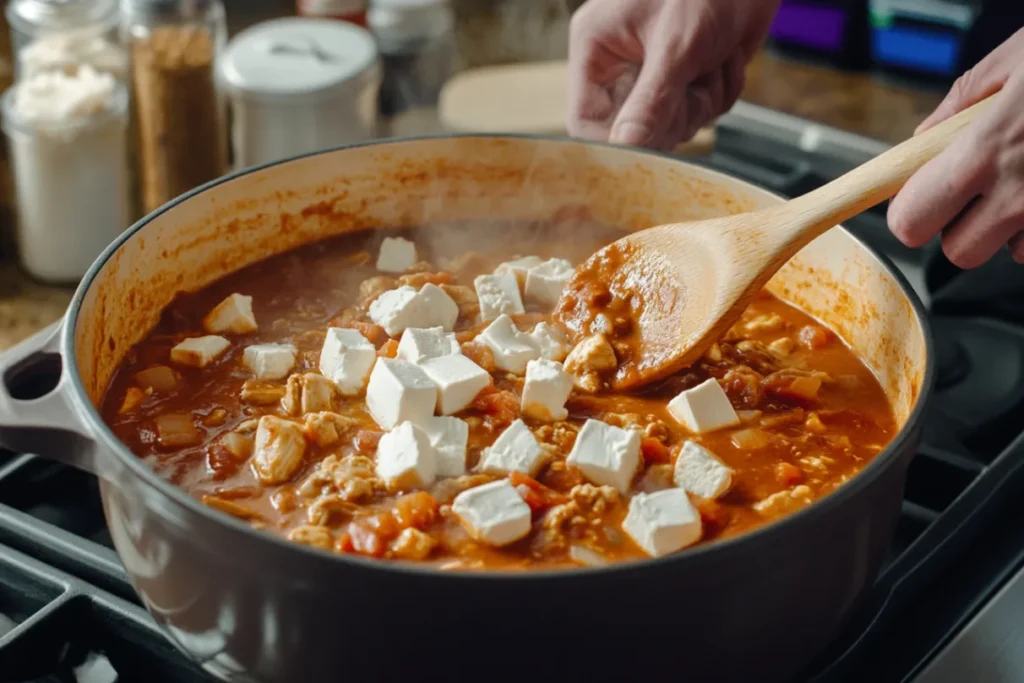
Ingredients: Building the Foundation of Perfect Chicken Chili
Understanding Key Ingredients and Their Essential Roles
The beauty of this Cream Cheese Chicken Chili lies in how each ingredient plays a crucial role in creating the perfect balance of flavors and textures. Let me walk you through the star players that make this delicious dish absolutely irresistible.
The foundation starts with high-quality chicken breast or thighs—I personally prefer thighs for their superior flavor and tenderness, but breast meat works beautifully too. The cream cheese is what sets this chicken chili apart from traditional recipes, creating that signature creamy texture that coats every spoonful with rich, velvety goodness.
White beans are essential for adding protein and substance while maintaining the lighter color profile that makes this chili unique. I use a combination of cannellini and great northern beans, which hold their shape well during cooking and absorb all those wonderful flavors. The diced tomatoes provide acidity to balance the richness, while green chilies add that perfect mild heat that won’t overwhelm sensitive palates.
The spice blend is where the magic really happens. Cumin provides earthy depth, chili powder brings warmth and complexity, and garlic powder ensures every bite is perfectly seasoned. Fresh garlic and onions create the aromatic base that makes your kitchen smell absolutely incredible while this chicken chili simmers away.
Expert Tips for Selecting the Best Quality Ingredients
When shopping for ingredients for your chicken chili, quality makes a noticeable difference in the final result. For chicken, look for organic or free-range options when possible—the flavor difference is remarkable. If using chicken breasts, choose ones that are plump and pale pink with no dark spots or strong odors.
For cream cheese, always opt for full-fat, brick-style cream cheese rather than the whipped variety. The brick cream cheese melts more smoothly and creates that perfect creamy consistency we’re after in this chicken chili. Philadelphia brand consistently delivers excellent results, but any high-quality, full-fat cream cheese will work beautifully.
When selecting beans, I strongly recommend using dry beans that you cook yourself, or if using canned, choose low-sodium varieties so you can control the salt content. Rinse canned beans thoroughly to remove excess sodium and that slightly metallic taste. For tomatoes, San Marzano or fire-roasted varieties add incredible depth to your homemade chicken chili.
Fresh ingredients make a tremendous difference too. Use fresh garlic cloves instead of pre-minced garlic, and choose onions that feel firm and heavy for their size. The aromatics are the soul of any great chili recipe, so investing in fresh, quality ingredients pays dividends in flavor.
Smart Substitutions and Creative Alternatives
One of the things I love most about this chicken chili recipe is how adaptable it is to different dietary needs and preferences. If you’re looking to reduce calories, you can substitute the cream cheese with Greek yogurt mixed with a little cornstarch—add it at the very end of cooking to prevent curdling.
For those following a dairy-free lifestyle, cashew cream makes an excellent substitute for cream cheese. Simply blend soaked cashews with a little chicken broth until smooth and creamy. The result is surprisingly similar in texture and adds a subtle nutty flavor that complements the other ingredients beautifully.
Turkey can easily replace chicken in this recipe—ground turkey works particularly well and creates a slightly different but equally delicious texture. If you prefer a vegetarian version, substitute the chicken with extra beans and add some diced mushrooms for umami depth. Use vegetable broth instead of chicken broth, and you’ll have a satisfying meat-free version.
Heat level is easily adjustable too. For those who love spice, add diced jalapeños, chipotle peppers in adobo sauce, or a dash of hot sauce. For milder palates, stick with mild green chilies and reduce the chili powder slightly. This flexibility makes it perfect for feeding families with varying heat preferences.
Preparation Steps: Mastering the Art of Chicken Chili
Initial Prep and Essential Cleaning Tips
Proper preparation is the secret to creating restaurant-quality chicken chili at home. Start by gathering all your ingredients and measuring everything out—this technique, called mise en place, ensures smooth cooking and prevents any missed ingredients or burned garlic disasters.
Begin by properly cleaning and preparing your chicken. Pat the chicken completely dry with paper towels, then cut into bite-sized, uniform pieces. This ensures even cooking and prevents some pieces from becoming overcooked while others remain underdone. Season the chicken pieces with salt and pepper at least 15 minutes before cooking—this simple step allows the seasoning to penetrate the meat for better flavor throughout.
Prepare your vegetables by dicing the onions uniformly—about ¼-inch pieces work perfectly. Mince your garlic finely, but don’t do this too far in advance as fresh garlic can become bitter when exposed to air for extended periods. Drain and rinse your beans thoroughly, and have your cream cheese at room temperature for easier melting.
Set up your cooking station with all ingredients within easy reach. Have a wooden spoon for stirring, a ladle for serving, and small bowls for your spices. This organization makes the cooking process smooth and enjoyable, allowing you to focus on technique rather than scrambling for ingredients.
Step-by-Step Cooking Instructions with Professional Secrets
Now comes the exciting part—transforming these simple ingredients into an extraordinary chicken chili. Heat a large, heavy-bottomed pot or Dutch oven over medium-high heat and add a tablespoon of olive oil. The key here is to let the oil get hot but not smoking.
Add your seasoned chicken pieces in a single layer, being careful not to overcrowd the pot. This is crucial—overcrowding steams the chicken instead of browning it, and you’ll miss out on those delicious caramelized flavors. Cook the chicken for 3-4 minutes per side until golden brown. You’re not cooking it completely through at this stage; just developing flavor through proper browning.
Remove the chicken and set aside, then add diced onions to the same pot. The leftover chicken fond (those brown bits) will add incredible depth to your chicken chili. Cook the onions for 4-5 minutes until softened and translucent, then add minced garlic and cook for another 30 seconds until fragrant.
Here’s where the magic happens: add your spices—cumin, chili powder, and a pinch of oregano—and cook for 30 seconds to bloom their flavors. This technique releases the essential oils in the spices and prevents them from tasting raw in the finished dish. Add the diced tomatoes, green chilies, and chicken broth, then return the browned chicken to the pot.
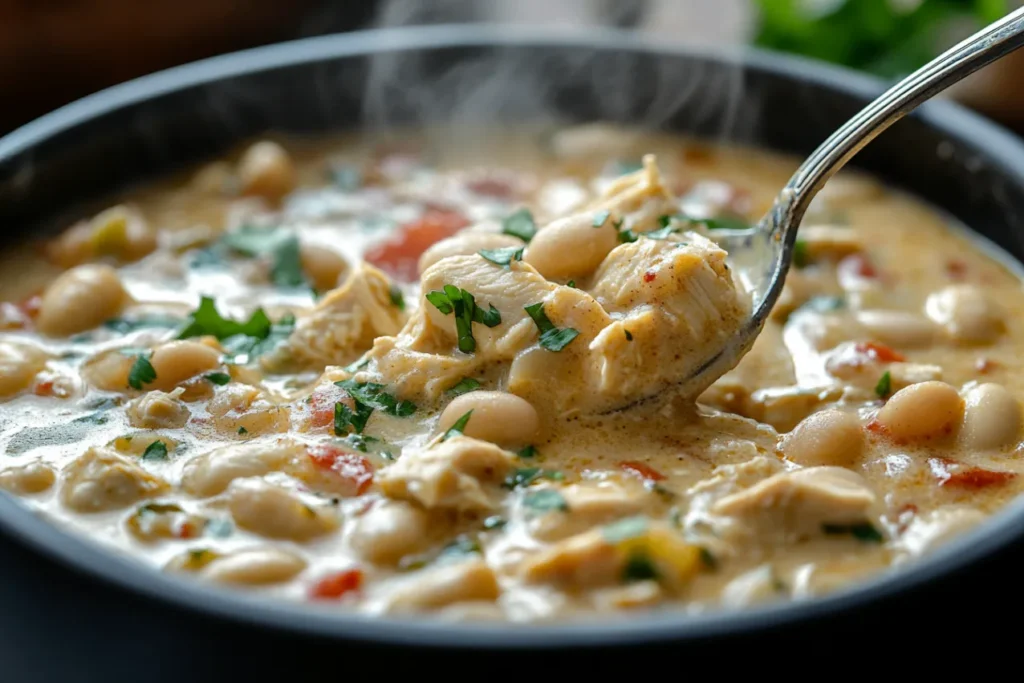
Bring the mixture to a gentle boil, then reduce heat to low and simmer for 15-20 minutes until the chicken is fully cooked and tender. Now for the cream cheese magic: cut the cream cheese into small cubes and add them one at a time, stirring gently until each cube is completely melted before adding the next. This prevents lumps and ensures silky smoothness.
Add the beans during the last 10 minutes of cooking to heat them through without making them mushy. Taste and adjust seasoning with salt, pepper, and additional spices as needed. The total cooking time should be about 30-35 minutes for perfect chicken chili.
Common Mistakes and How to Avoid Them
Even experienced cooks can encounter pitfalls when making chicken chili, but knowing what to watch for ensures success every time. The most common mistake is adding cream cheese to boiling liquid, which causes it to curdle and create an unappetizing, grainy texture. Always reduce the heat to low and add cream cheese gradually, stirring constantly.
Another frequent error is overcooking the chicken, resulting in dry, tough pieces that ruin the overall texture of your chicken chili. Remember, the chicken will continue cooking in the simmering liquid, so initial browning should focus on flavor development rather than complete cooking.
Underseasoning is perhaps the most disappointing mistake because it’s so easily avoided. Taste your chili multiple times during cooking and adjust seasonings accordingly. Salt enhances all the other flavors, so don’t be afraid to add it gradually until the flavors pop. Remember that beans absorb salt, so you may need more seasoning than you initially think.
Finally, resist the urge to rush the simmering process. Low, gentle heat allows all the flavors to meld beautifully and prevents the cream cheese from breaking. If you’re short on time, you can increase the heat slightly, but keep stirring regularly and watch carefully for any signs of curdling.
Serving & Final Touches: Elevating Your Chicken Chili Experience
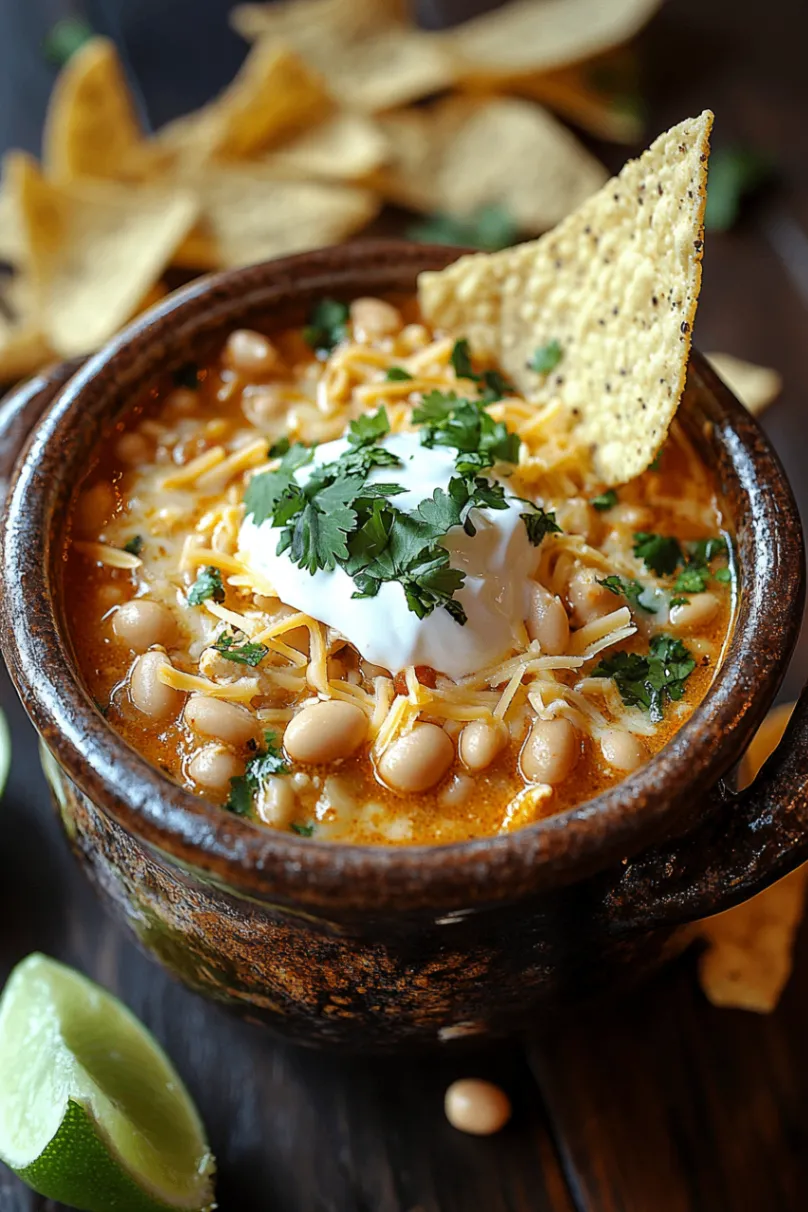
Creative Presentation Ideas That Wow
Presentation transforms a simple bowl of chicken chili into a restaurant-worthy experience that your family and guests will remember. Start with the right bowl—wide, shallow bowls work better than deep ones because they showcase the beautiful creamy texture and allow for better topping distribution.
Create a stunning garnish station with small bowls of toppings arranged attractively on a tray. Include shredded cheese (sharp cheddar and Monterey Jack work beautifully), fresh chopped cilantro, diced avocado, sour cream, and crispy tortilla strips. The variety of colors and textures makes the meal interactive and allows everyone to customize their bowl.
For special occasions, consider serving your chicken chili in bread bowls made from sourdough or crusty artisan bread. Hollow out the center, brush with garlic butter, and toast until golden. The bread becomes part of the meal and adds a delightful textural contrast to the creamy chili.
A dollop of lime crema (sour cream mixed with lime juice and zest) adds both visual appeal and bright flavor that cuts through the richness. Drizzle it artistically on top and garnish with a lime wedge and fresh cilantro sprig for a professional touch that elevates this family favorite recipe.
Perfect Pairings and Recommended Side Dishes
The beauty of chicken chili lies not just in its standalone deliciousness, but in how well it pairs with complementary sides that enhance the overall dining experience. Warm, buttery cornbread is the classic choice—its subtle sweetness and crumbly texture provide the perfect contrast to the creamy, savory chili.
For a healthier option, serve alongside a crisp green salad with lime vinaigrette. The acidic dressing and fresh greens provide a refreshing counterpoint to the rich cream cheese base. Add some sliced avocado, cherry tomatoes, and pepitas for extra texture and nutrition.
Rice makes another excellent pairing—either fluffy white rice, cilantro-lime rice, or even Spanish rice works beautifully. The grains help stretch the meal for larger families and absorb the delicious creamy sauce. For a fun twist, try serving over baked sweet potatoes or stuffed into warm flour tortillas for chicken chili tacos.
Don’t overlook beverages when planning your meal. Cold beer pairs wonderfully with chicken chili, particularly light lagers or wheat beers that won’t compete with the flavors. For non-alcoholic options, consider sparkling water with lime, sweet tea, or even a refreshing agua fresca.
Storage Tips and Reheating Advice for Maximum Enjoyment
Proper storage ensures you can enjoy this delicious chicken chili for days to come, and the flavors actually improve overnight as they continue to meld together. Allow the chili to cool completely before transferring to airtight containers—this prevents condensation and maintains the best texture.
Refrigerate your chicken chili for up to 4 days, or freeze for up to 3 months. When freezing, leave about an inch of space at the top of containers to allow for expansion. Label containers with the date and contents for easy identification later.
Reheating requires gentle care to maintain that perfect creamy texture. For refrigerated chili, reheat slowly over low heat on the stovetop, stirring frequently to prevent scorching. Add a splash of chicken broth if the consistency seems too thick. For frozen chili, thaw overnight in the refrigerator before reheating.
Microwave reheating works for individual portions—use 50% power and stir every minute to ensure even heating. The cream cheese may separate slightly during reheating, but gentle stirring usually brings it back together. If separation persists, whisk in a tablespoon of fresh cream or milk to restore smoothness.
 DINNER
 LUNCH
LUNCH Desserts
 BREAKFAST
For more amazing recipes, be sure to check out our other sections to explore a variety of ideas that will enrich your cooking experience. Each section offers its own unique flavors to ensure a delightful culinary journey:
Easy and Quick Recipes: A collection of dishes that guarantee delicious meals with minimal effort and time.
Healthy Recipes: Discover healthy and delicious options that fit your lifestyle.
Desserts: A diverse selection of sweets that will add a special touch of sweetness to your table.
Lunch Recipes: Tasty lunch ideas that you can easily prepare to delight your family.
Dinner Recipes: Delicious and easy-to-make recipes that will make your dinner a memorable occasion.

Frequently Asked Questions
Q: Can I make this chicken chili in a slow cooker? A: Absolutely! Brown the chicken and sauté the onions and garlic first for best flavor, then transfer everything except the cream cheese to your slow cooker. Cook on low for 4-6 hours, then stir in the cream cheese during the last 30 minutes. This method works wonderfully for busy weekdays.
Q: How can I make this chicken chili spicier without overpowering the creamy flavor? A: The best approach is to add heat gradually. Try diced jalapeños, a chipotle pepper in adobo sauce (which adds smoky heat), or a dash of cayenne pepper. Start with small amounts and taste as you go. Hot sauce can be added at the end for individual preference.
Q: What’s the best way to thicken chicken chili if it’s too thin? A: There are several effective methods. Mix 2 tablespoons of cornstarch with cold water to create a slurry, then stir it into the simmering chili. Alternatively, mash some of the beans against the side of the pot, or simmer uncovered for 10-15 minutes to reduce excess liquid naturally.
Q: Can I substitute the cream cheese with something healthier? A: Yes! Greek yogurt mixed with a little cornstarch works well—add it at the very end to prevent curdling. Cashew cream is another excellent dairy-free option that provides similar richness. Light cream cheese also works, though the texture will be slightly less rich.
Q: How long does homemade chicken chili last, and can I meal prep it? A: This chicken chili is perfect for meal prep! It keeps in the refrigerator for up to 4 days and actually tastes better the next day as flavors develop. Freeze portions in individual containers for up to 3 months. It’s an ideal make-ahead meal for busy families.
Conclusion
There’s something deeply satisfying about creating a pot of homemade Cream Cheese Chicken Chili that brings comfort, warmth, and joy to everyone who tastes it. This recipe represents more than just a meal—it’s about creating memories, bringing families together, and mastering a delicious dish that will become a treasured part of your culinary repertoire.
The beauty of this easy homemade recipe lies in its perfect balance of simplicity and sophistication. While the ingredients are accessible and the techniques straightforward, the result is a restaurant-quality chicken chili that will have everyone asking for seconds and begging for the recipe.
I encourage you to make this recipe your own by experimenting with the suggested substitutions and adjustments. Maybe add some corn for sweetness, try different bean varieties, or experiment with spice levels to suit your family’s preferences. The foundation is solid, but the variations are endless.
Don’t forget to share your experience! Cooking is meant to be shared, and I’d love to hear how your Cream Cheese Chicken Chili turned out. Whether you follow the recipe exactly or make it uniquely yours, I’m confident this will quickly become one of your most beloved family favorite recipes.
So gather your ingredients, warm up that Dutch oven, and get ready to create something truly special. Your kitchen will smell amazing, your family will be impressed, and you’ll have a new go-to recipe for any occasion that calls for comfort food at its finest.