Table of Contents
Table of Contents
There’s something almost magical about a perfectly baked cheesecake. I still remember the first time I successfully made one—it was for my grandmother’s 80th birthday, and I was terrified. Would it crack? Would it be too dense? But when I pulled that golden, smooth beauty from the oven and watched my family’s faces light up with each creamy bite, I knew I’d discovered something special. That moment transformed cheesecake from an intimidating dessert into a beloved tradition in my kitchen.
Cheesecake recipes have earned their place as one of the most celebrated desserts in culinary history, and for good reason. From the ancient Greeks who served honey-sweetened cheese cakes to Olympic athletes, to the New York-style masterpieces we know today, cheesecake has evolved into countless variations that satisfy every palate. Whether you’re craving a classic vanilla cheesecake, a decadent chocolate version, or a fruity summer creation, mastering these cheesecake recipes will give you a dessert repertoire that impresses at every gathering.
What makes cheesecake recipes so special is their versatility. You can dress them up for elegant dinner parties or keep them simple for a comforting family dessert. They’re surprisingly forgiving once you understand the fundamentals, and the reward—that silky, rich texture combined with a buttery crust—is absolutely worth every step. In this comprehensive guide, I’ll walk you through everything you need to know to create cheesecake recipes that you’ll turn to again and again, sharing the secrets I’ve learned through years of baking (and yes, a few cracked cheesecakes along the way).
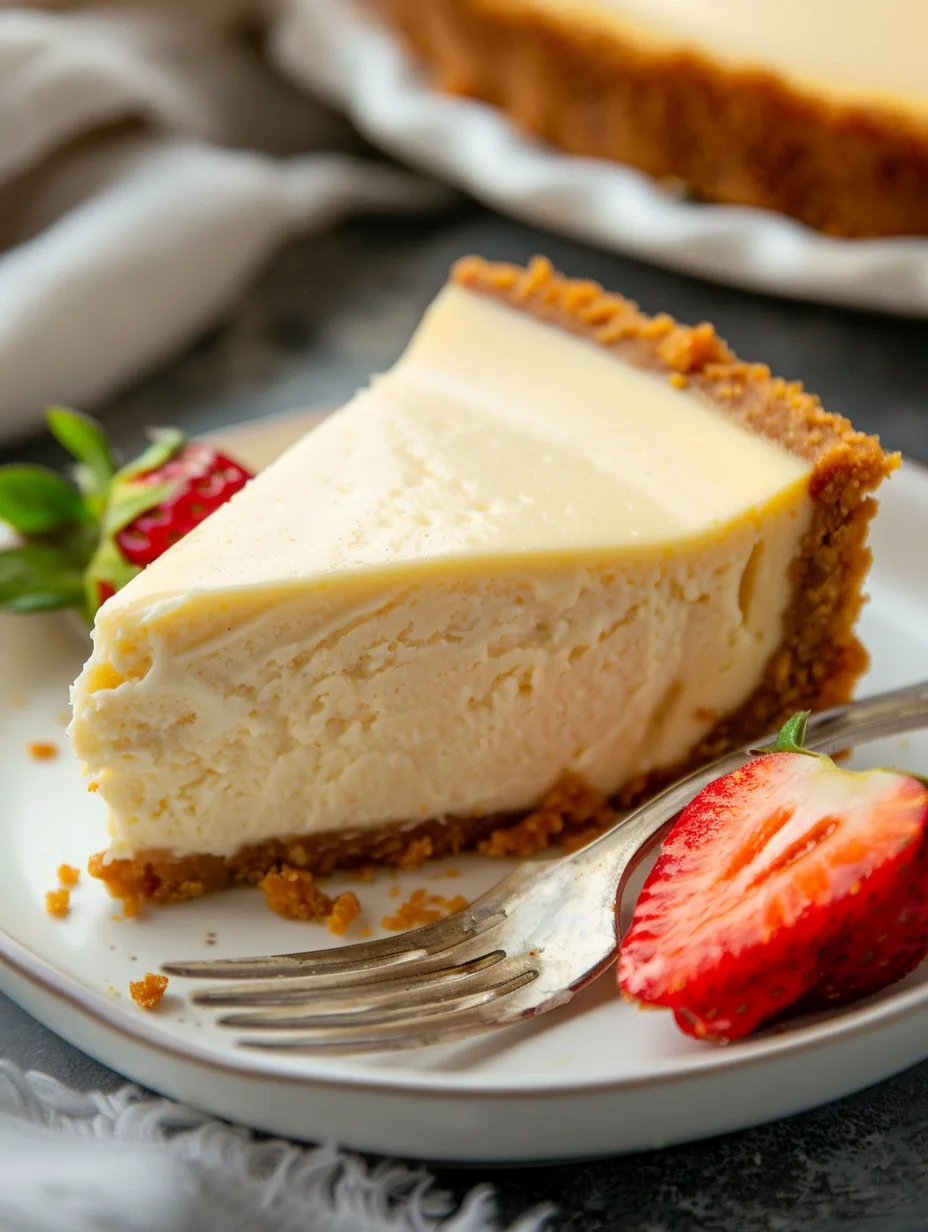
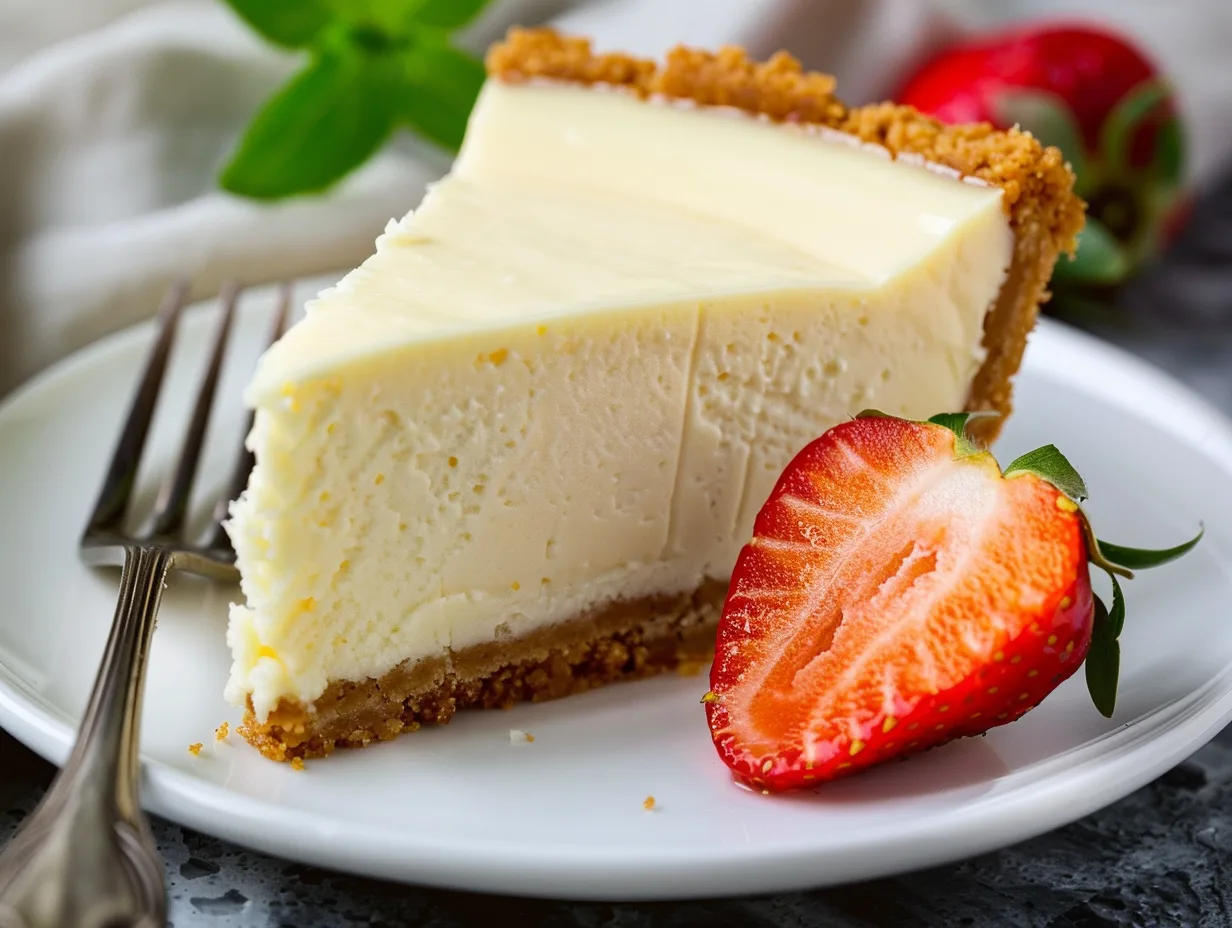
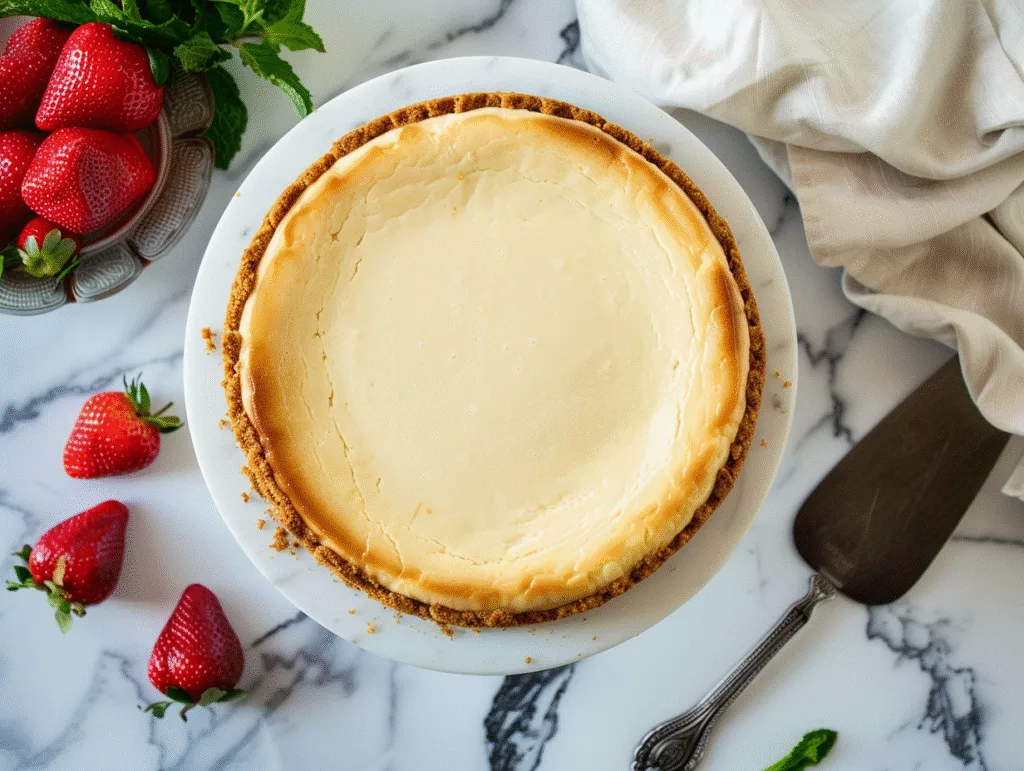
Classic New York Style Cheesecake
Ingredients
Tried this recipe?
Let us know how it was!Ingredients: Building Blocks of Perfect Cheesecake Recipes
Understanding Key Ingredients and Their Role
The beauty of cheesecake recipes lies in their simplicity—just a handful of core ingredients create that luxurious texture we all crave. Let’s break down each component and understand why it matters.
Cream cheese is the star of the show in most cheesecake recipes. This is what gives your cheesecake that signature tangy richness and velvety smooth texture. Full-fat cream cheese is non-negotiable here; low-fat versions contain more water and less fat, which can result in a grainy, less stable cheesecake. For a standard 9-inch cheesecake, you’ll typically need between 24 to 32 ounces (three to four 8-ounce blocks). The cream cheese should always be at room temperature—this is crucial. Cold cream cheese creates lumps that are nearly impossible to smooth out, no matter how long you beat the mixture.
Sugar does more than just sweeten your cheesecake recipes. It helps create structure and affects the final texture. Granulated white sugar is the standard choice, usually about 1 to 1½ cups depending on your sweetness preference. The sugar dissolves into the cream cheese mixture, creating a smooth, pourable batter that bakes evenly.
Eggs are the binding agent that holds your cheesecake together. Most cheesecake recipes call for 3 to 4 large eggs, and sometimes an extra egg yolk for added richness. Eggs provide structure as they coagulate during baking, transforming your batter from liquid to that perfect, sliceable consistency. Room temperature eggs incorporate more smoothly into your batter, preventing overmixing.
Sour cream or heavy cream adds extra tanginess and moisture to cheesecake recipes. About ½ to 1 cup of sour cream creates an incredibly creamy texture and balances the richness of the cream cheese. Some recipes use heavy cream instead for a milder, more delicate flavor.
Vanilla extract is a subtle but essential flavor enhancer. Use pure vanilla extract rather than imitation—the quality difference is noticeable in a dessert as pure and simple as cheesecake. Typically, 1 to 2 teaspoons is perfect.
For the crust, most cheesecake recipes rely on graham crackers (about 1½ to 2 cups of crumbs), combined with melted butter (5 to 6 tablespoons) and a touch of sugar (¼ cup). This creates that crispy, sweet foundation that contrasts beautifully with the creamy filling. Some recipes also add a pinch of salt to enhance the flavors and a dash of cinnamon for warmth.
Tips for Selecting the Best Quality Ingredients
Quality ingredients make a noticeable difference in cheesecake recipes, so here’s how to choose wisely.
When shopping for cream cheese, always select full-fat Philadelphia brand or a comparable quality option. Check the expiration date and choose the freshest blocks available. Avoid cream cheese spreads or whipped versions—these contain additives and air that don’t work in baking. If you’re making multiple cheesecakes or planning ahead, cream cheese freezes well for up to two months, but always thaw it completely in the refrigerator before using.
For eggs, opt for large, fresh eggs from a reliable source. Farm-fresh or organic eggs often have richer, more vibrant yolks that contribute to a beautiful golden color in your cheesecake. Before using, do the float test—fresh eggs sink in water, while older eggs float. Fresh eggs create a more stable structure in your cheesecake recipes.
Sour cream should be full-fat and as fresh as possible. Look for products with minimal ingredients—cultured cream and milk are all you need. Avoid sour cream with added thickeners or stabilizers, as these can affect the texture of your cheesecake.
When selecting vanilla extract, invest in a good-quality pure vanilla. Madagascar vanilla offers a classic, creamy flavor that works beautifully in traditional cheesecake recipes, while Tahitian vanilla provides a more floral note perfect for fruit-topped versions. The bottle should list vanilla bean extractives and alcohol as the only ingredients.
For the graham cracker crust, use fresh graham crackers that aren’t stale or soft. You can buy graham cracker crumbs, but I prefer crushing whole crackers myself—the texture is better, and you can control the fineness. Store-bought crumbs sometimes contain preservatives that can affect flavor.
Butter for the crust should be unsalted, allowing you to control the salt level in your cheesecake recipes. European-style butter with higher fat content (82% versus the standard 80%) creates an even richer, more flavorful crust.
Substitutions and Alternatives for Various Cheesecake Recipes
One of the wonderful aspects of cheesecake recipes is their adaptability to dietary needs and preferences without sacrificing too much in terms of taste and texture.
For the filling, if you can’t find cream cheese or want to try something different, you can substitute mascarpone cheese for a lighter, slightly sweeter cheesecake. Use it in a 1:1 ratio, though note that mascarpone is softer, so your cheesecake may be a bit more delicate. Ricotta cheese can create an Italian-style cheesecake with a slightly grainier texture—blend it until very smooth before using, and consider mixing it half-and-half with cream cheese for better structure.
Greek yogurt can replace up to half of the sour cream in your cheesecake recipes for a tangier, slightly healthier version. Make sure to use full-fat, strained Greek yogurt for the best results. Some bakers use cottage cheese blended until completely smooth—it creates a lighter, protein-rich cheesecake, though the flavor will be more subtle.
For sugar alternatives, you can use honey or maple syrup, though these liquid sweeteners will slightly alter the texture—reduce other liquids by 2 tablespoons for every ½ cup of liquid sweetener used. Coconut sugar works in a 1:1 ratio and adds a subtle caramel flavor. For low-sugar or diabetic-friendly cheesecake recipes, erythritol or monk fruit sweetener can replace sugar, though the texture may be slightly different.
Egg substitutes are trickier in cheesecake recipes since eggs provide crucial structure. However, for those with allergies, you can try using a combination of cornstarch (2 tablespoons) and extra sour cream (¼ cup) for each egg, though the texture will be denser and more pudding-like. Silken tofu can also work in vegan cheesecake recipes when combined with vegan cream cheese alternatives.
For dairy-free cheesecake recipes, several brands now make excellent cashew-based or coconut-based cream cheese alternatives. Kite Hill and Tofutti are popular options. Coconut cream (the thick part from a can of full-fat coconut milk) adds richness, and cashew cream (soaked cashews blended with water) creates surprisingly authentic results.
For the crust, those avoiding gluten can substitute gluten-free graham crackers, almond flour mixed with melted butter and sugar, or crushed gluten-free cookies like Maria biscuits. For a nut-free option, try crushed cornflakes or rice cereal mixed with butter and sugar. Vegan cheesecake recipes can use vegan butter or coconut oil in place of regular butter for the crust.
Flavor variations are endless. Replace vanilla extract with almond extract, lemon zest, espresso powder, or peppermint extract. Fold in melted chocolate, fruit purees, or cookie pieces. The basic structure of cheesecake recipes remains the same—it’s a perfect canvas for creativity.
Preparation Steps: Mastering the Art of Cheesecake Recipes
Initial Prep and Essential Cleaning Tips
Success with cheesecake recipes starts long before you mix your first ingredient—proper preparation sets the foundation for a flawless result.
Bringing ingredients to room temperature is perhaps the most critical prep step that many beginners overlook. Take your cream cheese, eggs, and sour cream out of the refrigerator at least 1 to 2 hours before you plan to bake. Room temperature ingredients blend together smoothly without requiring excessive mixing, which can incorporate too much air and lead to cracks. If you’re in a hurry, you can soften cream cheese by cutting it into small cubes and letting it sit for 30 minutes, or placing the unwrapped blocks on a plate and microwaving in 10-second bursts until just softened (not melted!). For eggs, place them in a bowl of warm (not hot) water for about 10 minutes.
Preparing your springform pan properly prevents leaks and ensures easy release. Most cheesecake recipes call for a 9-inch or 10-inch springform pan. First, check that your springform pan doesn’t leak by filling it with water and letting it sit over the sink for a few minutes. If you see drips, wrap the outside bottom and sides with two layers of heavy-duty aluminum foil—this is especially important if you’re using a water bath. Grease the bottom and sides of the pan with butter or non-stick spray, even if you’re using parchment paper. Cut a circle of parchment paper to fit the bottom of the pan perfectly—this ensures your cheesecake will release cleanly.
Setting up your water bath (also called a bain-marie) is optional but highly recommended for the creamiest cheesecake recipes. The steam from the water bath creates a humid environment that prevents the top of your cheesecake from drying out and cracking. Choose a roasting pan large enough to hold your springform pan with at least an inch of space around it. You’ll add hot water to the roasting pan once both pans are in the oven, filling it about halfway up the sides of the springform pan. The aluminum foil wrap around your springform pan prevents water from seeping into your crust.
Preheating your oven is crucial for even baking. Set your oven to 325°F (163°C) for most cheesecake recipes—this low, gentle temperature prevents the edges from overcooking while the center sets. Place the oven rack in the lower third of your oven to prevent the top from browning too quickly. If you’re using a water bath, have a kettle of water coming to a boil while you prepare your cheesecake so it’s ready when you need it.
Organizing your workspace makes the process smoother. Set out all your ingredients and equipment before you start: mixing bowls, electric mixer (stand mixer or hand mixer), rubber spatula, measuring cups and spoons, food processor or zip-top bag and rolling pin for crushing graham crackers. Having everything within reach prevents those panic moments when you realize you’re missing something mid-recipe.
Cleaning considerations are important to mention with cheesecake recipes. Clean your mixing bowl and beaters thoroughly with hot, soapy water to remove any grease residue, which can prevent eggs from whipping properly if you’re making a mousse-style cheesecake. Wipe them dry completely before using.
Step-by-Step Cooking Instructions with Secret Tips
Now let’s walk through creating a classic cheesecake recipe that serves as the foundation for countless variations. These techniques apply to virtually all cheesecake recipes you’ll encounter.
Step 1: Making the crust (15 minutes)
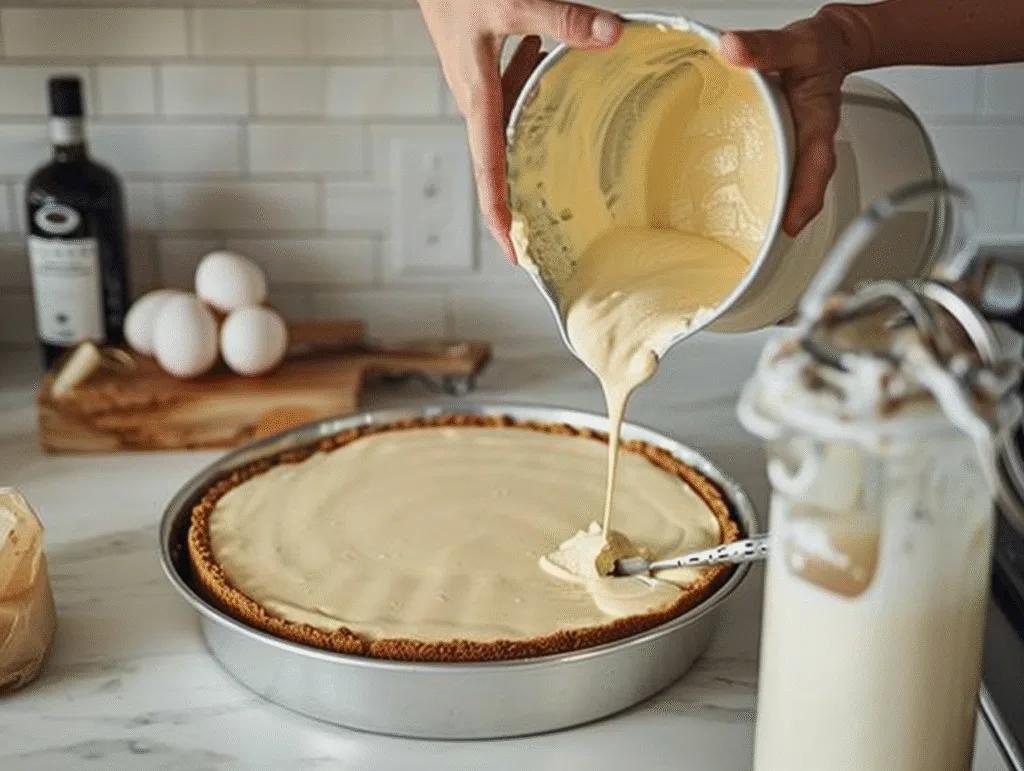
Crush 1½ cups of graham crackers into fine crumbs using a food processor or by placing them in a zip-top bag and crushing with a rolling pin. You want uniform, fine crumbs—not dust, but no large pieces either. Transfer the crumbs to a bowl and mix in ¼ cup of sugar and 6 tablespoons of melted butter until the mixture resembles wet sand. When you squeeze a handful, it should hold together.
Press this mixture firmly into the bottom of your prepared springform pan. Use the bottom of a measuring cup or glass to pack it down evenly—this prevents a crumbly crust that falls apart when sliced. You can press the crumbs slightly up the sides of the pan (about 1 inch) if desired. Pre-bake the crust at 325°F for 10 minutes to set it, then let it cool while you prepare the filling. This step prevents a soggy crust.
Secret tip: Add a tablespoon of melted chocolate to your graham cracker crust for an extra dimension of flavor that pairs beautifully with any cheesecake recipe.
Step 2: Preparing the filling (15 minutes)
In your stand mixer fitted with the paddle attachment (or using a large bowl and hand mixer), beat 32 ounces (four 8-ounce blocks) of room temperature cream cheese on medium-low speed for about 2 to 3 minutes until completely smooth and creamy. Stop and scrape down the bowl frequently—this is essential for a lump-free filling.
Add 1¼ cups of sugar and beat for another 2 minutes until well combined. Again, scrape down the bowl. Add 1 cup of sour cream, 2 teaspoons of vanilla extract, and a pinch of salt, beating just until incorporated.
Secret tip: Mix on low speed at this stage. Overmixing incorporates too much air, which expands during baking and can cause cracks.
Now add your eggs one at a time, beating on low speed for about 30 seconds after each addition—just until the yellow yolk disappears into the batter. With the final egg, mix only until you see a few streaks of yolk remaining, then stop the mixer and fold the last few streaks in by hand with a rubber spatula. This prevents overmixing, which is one of the biggest culprits behind cracked cheesecake recipes.
Secret tip: For an ultra-smooth filling, pass your batter through a fine-mesh sieve into another bowl before pouring into the pan. This catches any remaining lumps.
Step 3: Baking your cheesecake (60-75 minutes)
Pour the filling into your cooled crust, smoothing the top with an offset spatula. Tap the pan gently on the counter a few times to release any air bubbles.
If using a water bath, place your foil-wrapped springform pan into the roasting pan, then carefully place both in the preheated oven. Pour hot water into the roasting pan until it comes about halfway up the sides of the springform pan. Close the oven door gently.
Bake at 325°F for 60 to 75 minutes. The exact time varies based on your oven and pan size. You’re looking for a cheesecake that’s set around the edges but still slightly jiggly in the center—about a 2 to 3-inch circle in the middle should wobble like Jell-O when you gently shake the pan. The internal temperature should reach 150°F when measured with an instant-read thermometer inserted into the center.
Secret tip: Underbaking slightly is better than overbaking. The cheesecake will continue cooking as it cools due to residual heat, and the center will firm up completely when chilled.
Step 4: The crucial cooling process (Several hours)
This step is where many cheesecake recipes fail, so pay close attention. When your cheesecake is done, turn off the oven and crack the oven door open about 1 inch. Let the cheesecake sit in the cooling oven for 1 hour. This gradual temperature change prevents the dramatic contraction that causes cracks.
After an hour, remove the cheesecake from the oven (and from the water bath if you used one). Remove the aluminum foil wrapping. Run a thin knife around the edge of the cheesecake to loosen it from the pan—this prevents it from cracking as it shrinks while cooling. Let it cool at room temperature on a wire rack for another hour.
Secret tip: If you do see cracks forming, don’t panic! You can cover them with whipped cream, fruit topping, or chocolate ganache. A cracked cheesecake still tastes delicious.
Once cooled to room temperature, cover loosely with plastic wrap or aluminum foil and refrigerate for at least 4 hours, but preferably overnight. This chilling time is essential—cheesecake recipes absolutely need this time for the texture to set properly and flavors to develop fully.
Step 5: Releasing from the pan
When you’re ready to serve, remove the sides of the springform pan. If the cheesecake is sticking, wrap a warm, damp towel around the sides of the pan for a minute to loosen it. For the cleanest slices, warm your knife under hot water, wipe it dry, then make your cut. Clean and warm the knife between each slice.
Secret tip: For professional-looking slices, use unflavored dental floss or fishing line. Hold it taut and press straight down through the cheesecake, then pull it out from one side.
Common Mistakes and How to Avoid Them
Even experienced bakers can stumble with cheesecake recipes. Here are the most common pitfalls and how to sidestep them.
Mistake #1: Lumpy filling This happens when cream cheese is too cold or when you don’t scrape down the bowl enough. Solution: Always use room temperature cream cheese and stop the mixer several times to scrape down the bowl thoroughly. If you do end up with small lumps, pass the batter through a fine-mesh sieve before pouring into the pan.
Mistake #2: Cracked top Cracks occur due to several factors: oven temperature too high, overbaking, too much air incorporated into the batter, or cooling too quickly. Solution: Bake at a lower temperature (325°F or even 300°F), use a water bath for humidity, mix on low speed especially after adding eggs, don’t overbake (the center should still jiggle), and cool gradually in the turned-off oven with the door cracked.
Mistake #3: Soggy or undercooked center This usually means the cheesecake needed more baking time or the oven temperature was too low. Solution: Bake until the edges are set but the center still has a 2-3 inch wobble. If you cut into it and find the center is too soft, you can return it to a 325°F oven for another 10-15 minutes, though this rarely works perfectly.
Mistake #4: Overcooked, dry, or dense texture Baking too long or at too high a temperature creates a firm, dry cheesecake that lacks that creamy consistency. Solution: Watch for the wobble test—when the edges are set but the center jiggles, it’s done. Remember that carryover cooking continues after you remove it from the oven.
Mistake #5: Falling or sinking center This dramatic collapse happens when too much air is incorporated (from overmixing) or when the cheesecake experiences a sudden temperature change. Solution: Mix on low speed, especially after adding eggs, and cool gradually in the oven with the door cracked. Never move a hot cheesecake to the refrigerator.
Mistake #6: Water seeping into the crust If using a water bath, water can leak through the springform pan seams. Solution: Wrap the outside of your pan with two layers of heavy-duty aluminum foil, covering the bottom and coming up the sides. Some bakers place the springform pan inside a slightly larger oven-safe bag for extra protection.
Mistake #7: Difficult slicing If your cheesecake tears or sticks to the knife, your slicing technique needs adjustment. Solution: Use a sharp knife warmed in hot water and wiped dry. Make one smooth, decisive cut rather than sawing motions. Clean and warm the knife between each slice.
Mistake #8: Stuck to the pan If your cheesecake won’t release from the springform pan, you didn’t grease the pan enough or you forgot to run a knife around the edge. Solution: Always grease your pan even if using parchment paper. Run a thin knife around the edge while the cheesecake is still slightly warm. If it’s stuck when cold, wrap a warm towel around the sides for a minute.
By understanding these common issues with cheesecake recipes, you’ll be able to troubleshoot problems and consistently produce beautiful results.
Serving & Final Touches: Elevating Your Cheesecake Recipes
Creative Presentation Ideas
The way you present your cheesecake recipes can transform them from simple desserts into show-stopping centerpieces. Let’s explore various presentation techniques that range from elegantly simple to impressively elaborate.
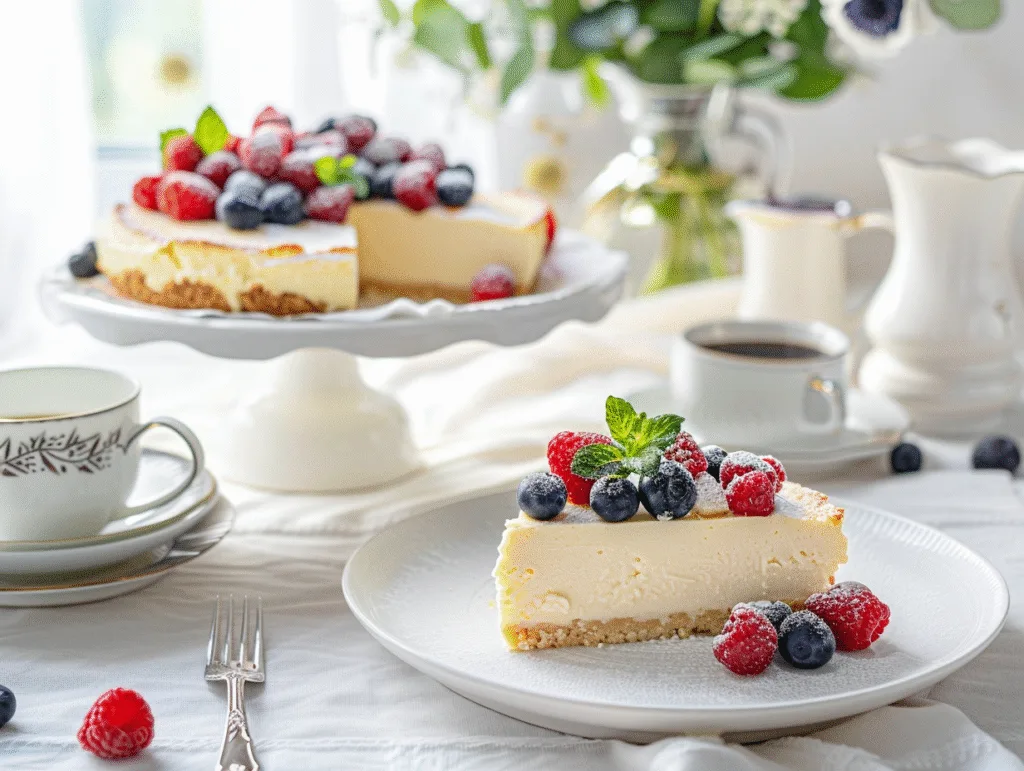
Classic elegance never goes out of style. A pristine, unadorned cheesecake on a beautiful cake stand speaks to the dessert’s inherent beauty. Transfer your cheesecake to a serving platter or cake stand using two large, wide spatulas to lift it from the springform base. Dust the top lightly with powdered sugar through a fine-mesh sieve for a subtle, sophisticated touch. A few fresh mint leaves or edible flowers arranged at the base add a pop of color without overwhelming the dessert.
Fruit toppings are perhaps the most popular way to dress up cheesecake recipes. For a fresh fruit topping, arrange sliced strawberries, blueberries, raspberries, or kiwi in a beautiful pattern over the top—concentric circles, a spiral, or a random scattered look all work beautifully. Brush the fruit with a thin layer of warmed apricot jam to give it a professional, glossy finish. For a cooked fruit topping, simmer fresh or frozen berries with sugar and a splash of lemon juice until thickened, then cool completely before spooning over the cheesecake. Cherry pie filling, while not homemade, is a classic topping that’s always crowd-pleasing.
Chocolate lovers will appreciate these additions to cheesecake recipes. Drizzle melted chocolate (dark, milk, or white) in decorative patterns across the top—use a squeeze bottle or zip-top bag with the corner snipped off for control. Create chocolate shavings by running a vegetable peeler along the edge of a chocolate bar, then sprinkle them over the top. For an ultra-decadent presentation, spread a thin layer of chocolate ganache (equal parts heavy cream and chopped chocolate, heated and stirred until smooth) over the entire top, letting it drip slightly down the sides.
Whipped cream designs add both visual interest and textural contrast to cheesecake recipes. Pipe whipped cream rosettes around the edge of the cheesecake using a piping bag with a star tip. For a more modern look, spread a smooth layer of whipped cream over the entire top and use a spatula to create dramatic swoops and peaks. Stabilized whipped cream (made by adding a bit of cream cheese, mascarpone, or gelatin) holds its shape better if you’re preparing the cheesecake in advance.
Sauce drizzles create restaurant-quality presentation for your cheesecake recipes. Make a simple berry coulis by blending fresh berries with powdered sugar and a squeeze of lemon, then straining out the seeds. Caramel sauce, chocolate sauce, or fruit syrups can be drizzled over individual slices or the entire cheesecake. For an artistic touch, create a “sauce paint” on the serving plate before placing the slice—pool the sauce, then drag a toothpick through it to create hearts, feathers, or abstract designs.
Garnishes are the finishing touch that elevates your cheesecake recipes from homemade to bakery-quality. Candied lemon or orange zest adds sophistication and a pleasant textural contrast. Crushed cookies (Oreos, biscoff, or amaretti) sprinkled around the edge create visual interest and hint at the flavors within. Fresh herbs like mint, basil (especially with strawberry cheesecakes), or lavender add unexpected but delightful aromatic notes. Edible flowers—pansies, roses, violets, or nasturtiums—create a stunning, elegant presentation perfect for special occasions.
Individual servings make cheesecake recipes perfect for parties and allow for more creative presentations. Make cheesecakes in muffin tins lined with paper liners for perfectly portioned, portable treats. Mason jar cheesecakes layer crust, filling, and toppings in clear jars for a charming, rustic presentation. Mini cheesecakes in disposable aluminum cups are ideal for bake sales and potlucks. For an ultra-modern presentation, use cookie cutters to cut a whole cheesecake into shapes—hearts, circles, or squares—then garnish each one individually.
Recommended Side Dishes and Perfect Pairings
While cheesecake recipes are certainly delicious on their own, the right accompaniments can elevate the entire dessert experience and create a memorable conclusion to any meal.
Beverage pairings can complement the richness of cheesecake recipes beautifully. Coffee is perhaps the most classic pairing—the slight bitterness balances the sweet richness perfectly. Serve espresso, cappuccino, or a smooth medium roast coffee alongside your cheesecake. For tea lovers, black teas like English Breakfast or Earl Grey provide a nice contrast, while herbal teas such as chamomile or mint offer a lighter, refreshing option. For special occasions, dessert wines work wonderfully: late harvest Riesling pairs beautifully with fruit-topped cheesecakes, while Port or Madeira complements chocolate versions. A sweet Moscato or Champagne adds celebration to any cheesecake occasion.
Fresh fruit platters provide a refreshing contrast to rich cheesecake recipes. Arrange seasonal berries, sliced peaches, figs, or citrus segments on a platter alongside your cheesecake. The bright, fresh flavors cleanse the palate between bites of creamy richness. Macerated berries (berries tossed with a bit of sugar and allowed to sit until juicy) are especially lovely served in a small bowl alongside plain cheesecake, allowing guests to spoon as much or as little as they like over their slice.
Complementary desserts can create a beautiful dessert spread if you’re entertaining. Cheesecake recipes pair wonderfully with lighter options like fruit sorbets, lemon bars, or delicate butter cookies. This variety allows guests to sample multiple treats or choose based on their preference. If serving a chocolate cheesecake, offer fresh berries or light lemon cookies as an alternative. For a New York-style cheesecake, chocolate truffles or chocolate-dipped strawberries create a lovely contrast.
Textural contrasts make each bite of cheesecake recipes more interesting. Serve crispy biscotti, shortbread cookies, or tuile cookies on the side for a delightful crunch. Caramelized nuts—pecans, almonds, or hazelnuts—add both crunch and complementary flavor. For a fun, interactive element, provide a small selection of toppings—chocolate sauce, caramel sauce, berry coulis, and whipped cream—allowing guests to customize their slices.
Savory balance might seem unusual, but a small cheese plate can actually enhance the cheesecake experience, especially for sophisticated gatherings. A selection of mild cheeses, crackers, and perhaps some grapes or apple slices served before dessert helps transition from the savory meal to the sweet finish. This European approach to dining creates a more leisurely, elevated experience.
For casual family meals, keep it simple. Vanilla ice cream or whipped cream alongside your cheesecake recipes is perfectly appropriate and always welcome. A bowl of mixed berries and a pitcher of cold milk for the kids rounds out a comfortable, homey dessert service.
Storage Tips and Reheating Advice
Properly storing your cheesecake recipes ensures they remain delicious for days and prevents common storage problems like sogginess, drying out, or absorbing refrigerator odors.
Short-term refrigerator storage is how you’ll keep most cheesecakes. Once your cheesecake has completely cooled and been refrigerated for its initial setting period, cover it tightly. The best method is to leave the cheesecake on its base, cover the top with plastic wrap directly touching the surface (this prevents a skin from forming), then wrap the entire cheesecake loosely in aluminum foil or place it in an airtight container. Properly stored, cheesecake recipes will stay fresh in the refrigerator for 5 to 7 days. The texture actually often improves after a day or two as the flavors meld.
Preventing odor absorption is important since cheesecakes readily pick up flavors from other foods in your refrigerator. Always store cheesecakes in airtight containers or wrapped very well. Keep them away from strong-smelling foods like onions, garlic, or fish. Some bakers place an open box of baking soda near their cheesecake to absorb any stray odors in the refrigerator.
Freezing cheesecake recipes works remarkably well and is perfect for making ahead. Once your cheesecake is completely chilled, freeze it unwrapped for about 2 hours until firm. This prevents the wrapping from sticking to the surface. Then wrap the entire cheesecake tightly in plastic wrap, then in aluminum foil, then place it in a freezer-safe container or freezer bag. Properly frozen cheesecakes keep their quality for 2 to 3 months. For convenience, you can slice the cheesecake before freezing, wrapping each slice individually—perfect for enjoying a single serving without thawing the entire cake.
Thawing frozen cheesecake requires patience for the best results. Transfer the wrapped cheesecake to the refrigerator and let it thaw slowly overnight (or for at least 8 hours). Never thaw cheesecake recipes at room temperature or in the microwave, as this can cause the texture to become watery or grainy. If you froze individual slices, they’ll thaw in about 4 hours in the refrigerator or can sit at room temperature for 30-40 minutes if you’re in a hurry.
Storing topped cheesecakes requires special consideration. Cheesecakes with fresh fruit toppings should be eaten within 1-2 days, as the fruit releases moisture and can make the cheesecake surface soggy. If you know you won’t finish it quickly, store the topping separately in a covered container and add it to individual slices as you serve them. Cheesecakes with whipped cream toppings don’t freeze well—add the whipped cream after thawing if you’ve frozen the cheesecake. Chocolate or caramel sauces can be stored on the cheesecake and freeze well.
Room temperature serving brings out the best flavor in cheesecake recipes. While cheesecake must be stored in the refrigerator, it tastes best when allowed to sit at room temperature for 20-30 minutes before serving. This slight warming allows the flavors to bloom and the texture to soften to its optimal creaminess. In warm weather, err on the shorter side to prevent the cheesecake from becoming too soft.
Preventing sogginess is a common concern with cheesecake recipes. The graham cracker crust can absorb moisture from the filling over time. To minimize this, always pre-bake your crust as directed, and consider brushing the cooled crust with a thin layer of melted white chocolate before adding the filling—this creates a moisture barrier. Store the cheesecake properly wrapped as described above.
Signs of spoilage are important to recognize for food safety. Discard cheesecake recipes if you notice any mold growth, an off or sour smell, or if the texture has become watery or separated. When in doubt, throw it out—dairy-based desserts can harbor bacteria if stored too long or at improper temperatures.
 DINNER
 LUNCH
LUNCH Desserts
 BREAKFAST
For more amazing recipes, be sure to check out our other sections to explore a variety of ideas that will enrich your cooking experience. Each section offers its own unique flavors to ensure a delightful culinary journey:
Easy and Quick Recipes: A collection of dishes that guarantee delicious meals with minimal effort and time.
Healthy Recipes: Discover healthy and delicious options that fit your lifestyle.
Desserts: A diverse selection of sweets that will add a special touch of sweetness to your table.
Lunch Recipes: Tasty lunch ideas that you can easily prepare to delight your family.
Dinner Recipes: Delicious and easy-to-make recipes that will make your dinner a memorable occasion.
Frequently Asked Questions About Cheesecake Recipes
Q1: Why did my cheesecake crack, and how can I prevent it in the future?
Cracks in cheesecake recipes happen for several reasons, but they’re all preventable. The most common cause is overbaking—when the cheesecake gets too hot, the proteins tighten up and contract, causing the surface to split. Remove your cheesecake when the edges are set but the center still jiggles like Jell-O (about a 2-3 inch circle in the middle). Sudden temperature changes also cause cracks, so always cool your cheesecake gradually by turning off the oven and leaving the door cracked open for an hour before removing it. Using a water bath creates humidity in the oven, which keeps the surface from drying out. Finally, overmixing incorporates too much air, which expands during baking and can cause cracks—mix on low speed, especially after adding eggs, and fold in the last egg by hand. If you do get cracks, don’t worry! They don’t affect the taste, and you can hide them with toppings like whipped cream, fruit, or chocolate ganache.
Q2: Can I make cheesecake without a springform pan?
Yes, you can make cheesecake recipes without a springform pan, though you’ll need to adjust your approach. A regular 9-inch cake pan works well—line the bottom with parchment paper and grease the sides generously. The challenge is getting the cheesecake out, so you’ll need to either serve it directly from the pan (perfectly acceptable for casual gatherings) or use the parchment paper as a sling to lift it out. For the sling method, cut parchment paper strips that extend over two opposite sides of the pan, creating handles. Another option is to make individual cheesecakes in a muffin tin lined with paper liners—these bake in about 20-25 minutes and are perfectly portioned. You can also use a 9×13-inch baking dish for bar-style cheesecakes that you cut into squares. If you’re using a regular pan instead of a springform, skip the water bath method unless you can ensure no water seeps into the pan. The key is ensuring whatever pan you choose has at least 2-3 inch high sides to accommodate the filling.
Q3: How do I know when my cheesecake is done baking?
Knowing when cheesecake recipes are perfectly baked is more art than science, but there are reliable indicators. The most important test is the “jiggle test”—gently shake the pan, and the edges should be completely set while the center (about a 2-3 inch circle) should wobble like Jell-O but not ripple like liquid. The surface should look slightly puffed and no longer glossy or wet. For a more precise measurement, insert an instant-read thermometer into the center—it should read between 150°F and 155°F. The cheesecake will continue cooking as it cools (carryover cooking), reaching the ideal final temperature of 160°F. The edges might be very slightly golden, but there shouldn’t be any browning on top. If you see browning, your oven is too hot. Remember that underbaking slightly is always better than overbaking—an underbaked cheesecake will firm up as it chills, but an overbaked one will be dry and dense with no way to fix it. Trust the wobble!
Q4: Why is my cheesecake grainy or lumpy instead of smooth and creamy?
A grainy texture in cheesecake recipes typically stems from a few specific issues. The most common culprit is cold cream cheese—when cream cheese isn’t fully softened to room temperature, it forms lumps that don’t blend smoothly no matter how much you mix. Always let your cream cheese sit out for at least an hour (or cut it into cubes for faster softening). Another cause is overbaking, which can cause the proteins to curdle slightly, creating a grainy mouthfeel. Using low-fat or reduced-fat cream cheese can also create graininess because these products have more moisture and less fat, affecting the smooth texture. Additionally, if your eggs are cold when added to the mixture, they can cause the butter in the cream cheese to firm up slightly, creating small lumps. Finally, overmixing at high speed can break down the protein structure. To prevent graininess, bring all ingredients to room temperature, mix on low to medium-low speed, scrape down the bowl frequently, and if you do notice small lumps, pass the batter through a fine-mesh sieve before pouring it into the pan. This extra step catches any remaining lumps and ensures silky-smooth results.
Q5: Can I make cheesecake recipes ahead of time, and how far in advance?
Cheesecake recipes are actually ideal make-ahead desserts, which makes them perfect for entertaining. In fact, cheesecakes often taste better after sitting for a day or two as the flavors meld and develop. You can make your cheesecake up to 3 days ahead—bake it, cool it completely, cover it tightly, and refrigerate until ready to serve. The texture and flavor will be at their peak. For even more advance planning, cheesecakes freeze beautifully for up to 2-3 months. Bake and cool the cheesecake completely, then freeze it unwrapped for about 2 hours until firm. Wrap it tightly in plastic wrap, then aluminum foil, and place it in a freezer container. When you’re ready to serve, transfer it to the refrigerator to thaw slowly overnight—never thaw at room temperature or you’ll get condensation and a watery texture. If you’re adding toppings, wait until after thawing to add fresh fruit, whipped cream, or sauces. For the freshest presentation, you can make the crust and freeze it separately up to a month ahead, then make and bake the filling the day before serving. This make-ahead flexibility is one of the reasons cheesecake recipes are so beloved for holiday gatherings and special occasions.
Conclusion
There’s something deeply satisfying about mastering cheesecake recipes—that moment when you slice into your creation and see the perfect, creamy texture, when your family’s eyes light up at first bite, when friends ask you to bring “that amazing cheesecake” to every gathering. What once seemed intimidating becomes your signature dessert, the recipe you turn to for celebrations, comfort, and everything in between.
The beauty of cheesecake recipes lies not just in their delicious results, but in their versatility. Once you’ve mastered the basic technique—understanding how ingredients work together, learning to recognize when it’s perfectly baked, discovering the patience required for proper cooling—you can create endless variations. Swirl in chocolate, fold in lemon curd, top with seasonal fruits, or experiment with different crusts. Each cheesecake becomes a blank canvas for your creativity.
Remember, even if your first attempt isn’t picture-perfect, it will still taste wonderful. Those cracks you worried about? Cover them with toppings and no one will know. That slightly overbaked edge? It adds a pleasant contrast to the creamy center. Some of my favorite cheesecake memories involve imperfect desserts that were demolished within minutes by grateful family members who couldn’t have cared less about cosmetic flaws.
So gather your ingredients, bring them to room temperature, and take your time with the process. Don’t rush the cooling or the chilling—good things come to those who wait, and cheesecake recipes are definitely worth the wait. Start with a classic version to build your confidence, then branch out into the flavor combinations that excite you.
I’d love to hear about your cheesecake adventures! Try one of these cheesecake recipes this week, and share your results. Did you add your own creative twist? Did you discover a new favorite topping? Did your family declare it the best dessert ever? Connect with fellow baking enthusiasts, share your photos, and keep exploring new variations. After all, the best recipes are the ones we make again and again, each time with a little more confidence and a lot more joy.
Happy baking, and may your cheesecakes always be creamy, your crusts perfectly crisp, and your kitchen filled with the sweet anticipation of that first perfect slice!