Table of Contents
Table of Contents
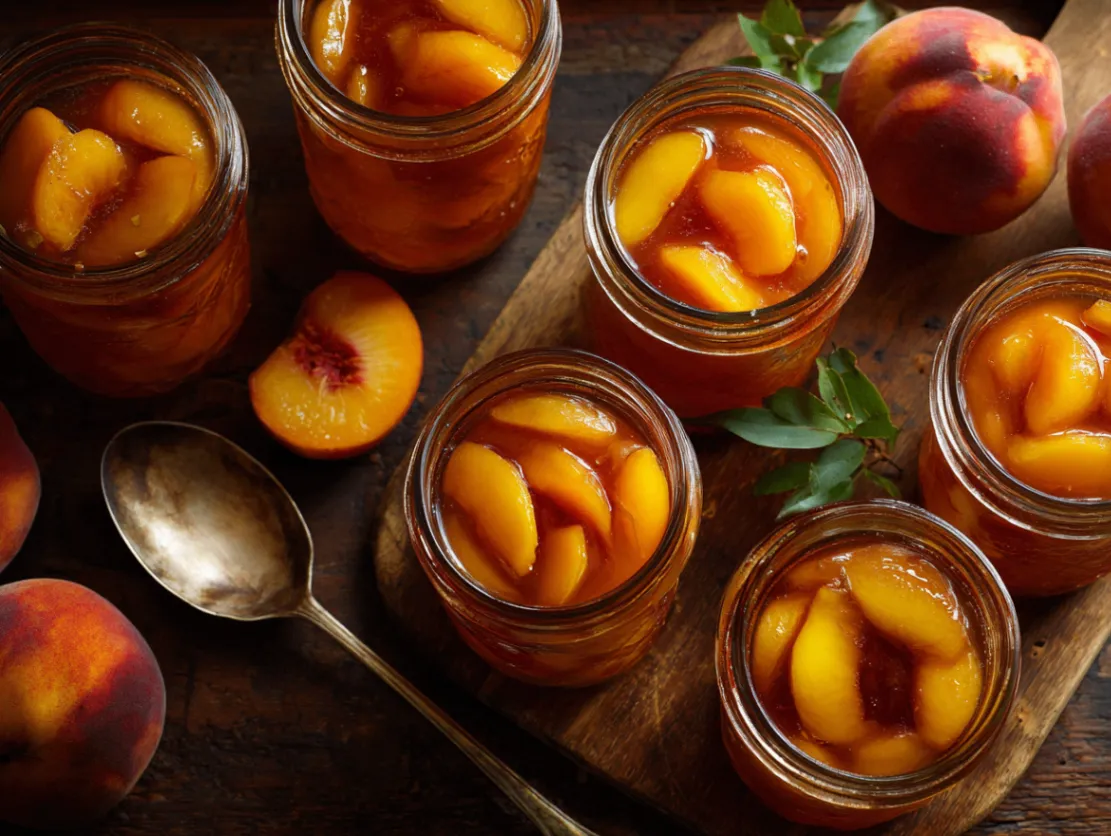
Every summer, when I walk through my local farmer’s market and see those gorgeous, sun-kissed peaches piled high in wooden crates, I can’t help but smile. The sweet aroma fills the air, and I’m instantly transported back to my grandmother’s kitchen, where she taught me the art of canning peaches when I was just twelve years old. That first jar I sealed myself felt like capturing sunshine in a bottle – and honestly, that’s exactly what canning peaches is all about.
Canning peaches has become one of my absolute favorite ways to preserve summer’s bounty, and I’m thrilled to share this beginner-friendly guide with you. Whether you’re new to home canning or looking to perfect your technique, this step-by-step approach will help you create beautiful jars of preserved peaches that taste like summer all year long. There’s something magical about opening a jar of home-canned peaches in the middle of January and being greeted by that perfect peachy sweetness – it’s like having a little bit of sunshine waiting for you in your pantry.
Canning Peaches Made Easy: Step-by-Step Guide for Beginners
Ingredients
Tried this recipe?
Let us know how it was!Essential Ingredients for Perfect Canning Peaches
Understanding Key Ingredients and Their Role
When it comes to canning peaches successfully, each ingredient plays a crucial role in both flavor and food safety. The star of the show is obviously fresh, ripe peaches – but not just any peaches will do. For the best results in canning peaches, you’ll want to select freestone varieties that are ripe but still firm to the touch. Clingstone peaches can work too, but they’re more challenging for beginners since the fruit clings tightly to the pit.
The second essential ingredient is your canning liquid, which can be either a simple sugar syrup, fruit juice, or even plain water for those watching their sugar intake. I personally love using a light sugar syrup made with one part sugar to three parts water – it enhances the natural sweetness of the peaches without overwhelming their delicate flavor. Some folks prefer using apple juice or white grape juice as a healthier alternative, and both work beautifully for canning peaches.
Lemon juice is your third non-negotiable ingredient, and it serves multiple purposes in canning peaches. Not only does it prevent the peaches from browning during preparation, but it also adds the necessary acidity to ensure safe preservation. The citric acid in lemon juice helps maintain the proper pH level, which is essential for preventing harmful bacteria growth in your canned peaches.
Tips for Selecting the Best Quality Ingredients
Choosing the right peaches can make or break your canning peaches experience. When I’m shopping for peaches to can, I look for fruit that yields slightly to gentle pressure but isn’t soft or mushy. The skin should have a creamy yellow background with rosy blush areas, and there should be a sweet, fragrant aroma at the stem end. Avoid peaches with green areas, as these won’t ripen properly after picking.
For the best canning peaches results, try to use your fresh peaches within a day or two of purchasing. If you need to store them briefly, keep ripe peaches in the refrigerator and slightly underripe ones at room temperature until they’re ready. I’ve learned that buying peaches from local orchards or farmer’s markets often gives you the freshest, most flavorful fruit for canning peaches projects.
When selecting your sugar for the syrup, regular granulated white sugar works perfectly for canning peaches. However, you can experiment with other sweeteners like honey or maple syrup, keeping in mind that these will change the flavor profile and may affect the consistency of your syrup. Always use fresh lemon juice rather than bottled when possible – the flavor difference is noticeable, and fresh juice provides better acidity for safe canning peaches.

Smart Substitutions and Alternatives
One of the beautiful things about canning peaches is how adaptable the process can be to different dietary needs and preferences. If you’re looking to reduce sugar in your canning peaches, you can use artificial sweeteners specifically designed for canning, or simply can your peaches in their own juice or plain water. Keep in mind that sugar isn’t just for sweetness – it also helps maintain the texture and color of the fruit, so completely sugar-free versions may have a slightly different result.
For those following special diets, canning peaches in apple juice or white grape juice creates a naturally sweet preservation liquid without added refined sugar. I’ve also had success using a combination of honey and water, though you’ll need to use about 25% less honey than you would sugar since it’s sweeter. When using honey for canning peaches, choose a mild variety like clover or wildflower that won’t overpower the delicate peach flavor.
If fresh lemon juice isn’t available, you can substitute with bottled lemon juice in the same quantities, though I always recommend fresh when possible. Some canners like to add a small amount of vanilla extract or cinnamon to their syrup for a flavor twist, but remember that when you’re canning peaches for the first time, it’s best to stick with the basic recipe until you’re comfortable with the process.
Step-by-Step Preparation for Canning Peaches
Initial Prep and Essential Cleaning Tips
Before you begin the actual canning peaches process, proper preparation and cleanliness are absolutely critical for both safety and success. Start by thoroughly washing all your equipment – canning jars, lids, rings, and utensils – in hot, soapy water. I always run my jars through the dishwasher or sterilize them in boiling water for 10 minutes, especially when canning peaches, since any bacteria can spoil your entire batch.
Set up your workspace with everything you’ll need within arm’s reach. For successful canning peaches, you’ll want your large canning pot filled with water and heating up, a separate pot for blanching the peaches, a large bowl filled with ice water, and clean kitchen towels spread out for draining. I’ve learned that having everything organized before you start makes the canning peaches process so much smoother and less stressful.
The key to beautiful canned peaches starts with proper peach preparation. Wash your peaches gently under cool running water, and then prepare an ice bath in a large bowl. Bring a pot of water to a rolling boil – this will be used for blanching the peaches to make peeling easier. The blanching step is crucial for canning peaches because it loosens the skins and makes them slip off effortlessly, resulting in beautiful, smooth peach pieces in your jars.
Detailed Step-by-Step Canning Instructions with Secret Tips
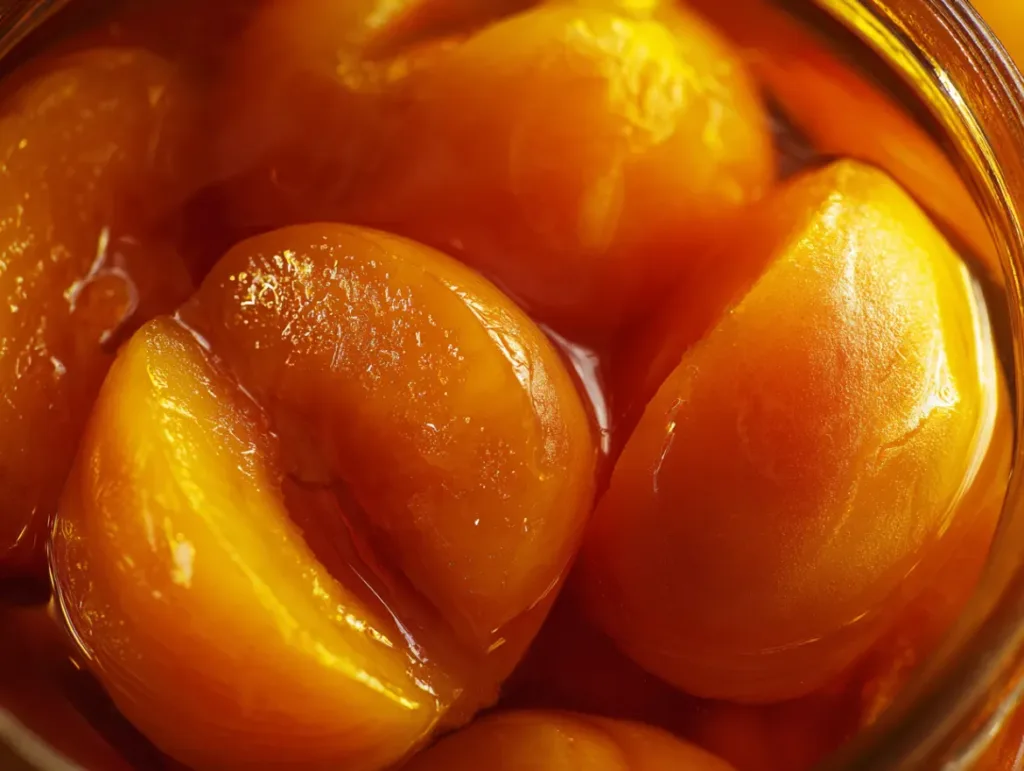
Now comes the fun part – the actual canning peaches process! Start by scoring a small “X” on the bottom of each peach with a sharp knife. This tiny cut makes peeling infinitely easier after blanching. Drop 3-4 peaches at a time into the boiling water for 30-60 seconds (depending on ripeness), then immediately transfer them to the ice bath using a slotted spoon. The skins should slip off easily once they’re cool enough to handle.
Here’s my secret tip for perfect canning peaches: after peeling, cut the peaches into uniform pieces and immediately toss them in a bowl with lemon juice to prevent browning. I use about 2 tablespoons of lemon juice per 6-8 peaches. While you’re preparing the fruit, keep your sugar syrup warm on the stove – hot syrup helps maintain the temperature in your jars and ensures better heat penetration during processing.
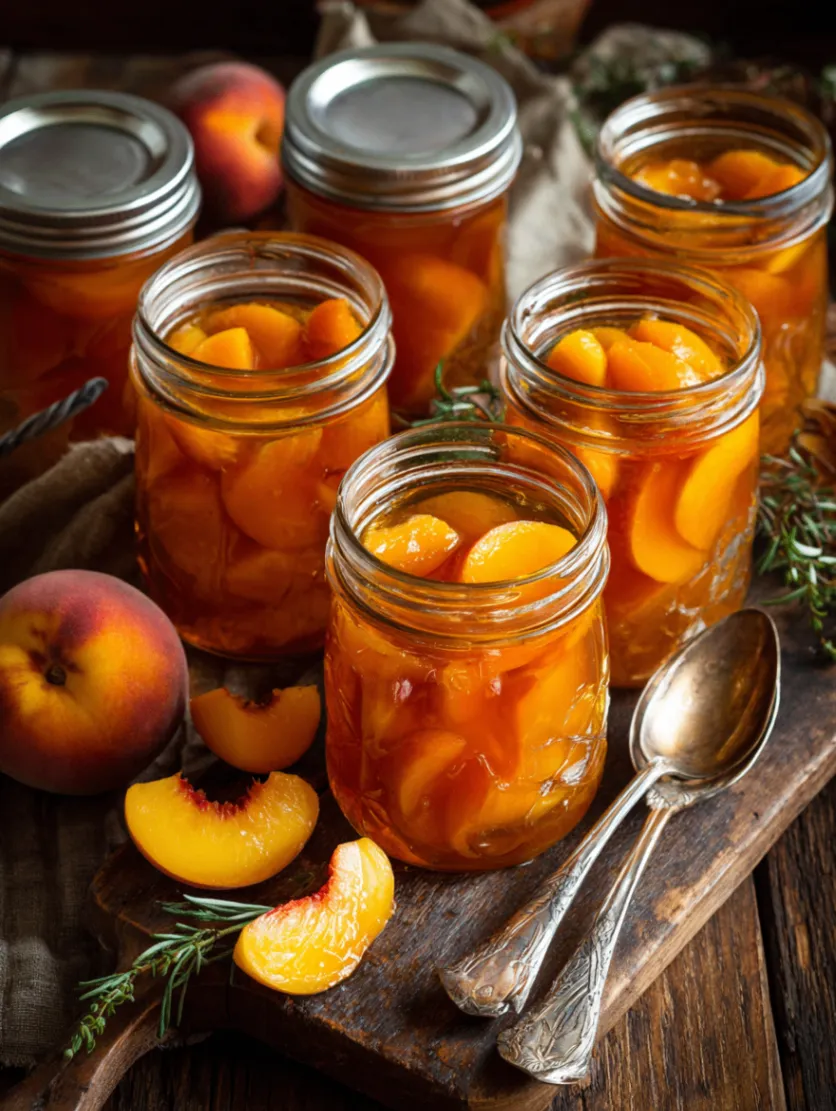
Pack your prepared peaches into hot, sterilized jars, leaving 1/2 inch of headspace at the top. This headspace is crucial for proper canning peaches – too little and the jars may not seal properly, too much and you risk bacterial growth. Ladle the hot syrup over the peaches, making sure to eliminate air bubbles by gently tapping the jars or using a clean plastic spatula to release trapped air. Wipe the jar rims clean with a damp cloth, place the lids, and tighten the rings to fingertip-tight.
Common Mistakes and How to Avoid Them
After years of canning peaches, I’ve seen (and made!) plenty of mistakes that can turn this enjoyable process into a frustrating experience. One of the most common errors I see beginners make is using overripe peaches. While these super-soft peaches might taste amazing fresh, they’ll turn to mush during the canning peaches process. Stick with peaches that are ripe but still hold their shape when gently squeezed.
Another frequent mistake is not processing the jars for the correct amount of time. When canning peaches, processing times vary based on your altitude and jar size. At sea level, pint jars need 20 minutes and quart jars need 25 minutes in a boiling water bath. Don’t start timing until the water returns to a full boil after adding your jars. I always set a timer because it’s easy to lose track of time when you’re excited about your canning peaches project!
Temperature control is where many people stumble when canning peaches. Your filled jars should go into actively boiling water, and the water level should cover the jar tops by at least 1-2 inches. If your water stops boiling when you add the jars, wait for it to return to a boil before starting your timer. After processing, let the jars cool completely undisturbed for 12-24 hours – resist the temptation to check the seals early, as this can prevent proper sealing when canning peaches.
Serving and Enjoying Your Canned Peaches
Creative Presentation Ideas for Maximum Appeal
Once you’ve mastered the basics of canning peaches, the fun really begins when it’s time to serve them! These golden treasures can be transformed into stunning desserts and breakfast treats that will impress family and friends. One of my favorite ways to serve canned peaches is over vanilla ice cream with a drizzle of the sweet syrup from the jar – it’s like summer in a bowl, even in the depths of winter.
For special occasions, try creating a rustic peach galette using your canned peaches as the filling. The fruit holds its shape beautifully, and the concentrated flavors from the canning peaches process create an incredibly rich, sweet filling. You can also use them in upside-down cakes, where the peach slices create a gorgeous caramelized top that looks professionally made. The key is draining the peaches well and reserving that precious syrup for other uses.
Don’t overlook breakfast presentations when showcasing your canning peaches success! Layer the fruit with Greek yogurt and granola for a healthy parfait, or fold them into pancake batter for peachy morning treats. I love serving warm canned peaches over steel-cut oats with a sprinkle of cinnamon – it transforms a simple breakfast into something special and reminds me why I love canning peaches so much.
Perfect Pairings and Complementary Side Dishes
The beauty of canned peaches lies in their versatility – they pair wonderfully with both sweet and savory dishes. When planning meals around your canning peaches, consider how the sweet, tender fruit can complement richer flavors. Canned peaches are absolutely divine alongside pork dishes, where the fruit’s sweetness balances the savory meat beautifully. Try serving them as a side with grilled pork chops or roasted pork tenderloin.
For dessert pairings, canned peaches shine when combined with warm spices like cinnamon, nutmeg, and ginger. Create a simple peach crisp by layering your canned peaches in a baking dish and topping with a mixture of oats, flour, butter, and brown sugar. The result is a comforting dessert that showcases why canning peaches is such a worthwhile endeavor. You can also fold them into bread pudding or use them as a topping for cheesecake.
Cheese boards get an instant upgrade when you add a small bowl of canned peaches to the mix. The fruit pairs particularly well with soft cheeses like brie or goat cheese, creating a delightful contrast of flavors and textures. For wine pairings, the sweetness of canned peaches complements both dessert wines and lighter white wines like Riesling or Moscato.
Storage Tips and Long-Term Enjoyment
Proper storage is the final piece of the canning peaches puzzle, ensuring your hard work pays off for months to come. Once your jars have cooled completely and you’ve confirmed they’re properly sealed (the center of the lid shouldn’t flex when pressed), remove the rings and store the jars in a cool, dark place. A pantry or basement storage area works perfectly for storing your canned peaches – just make sure the temperature stays between 50-70°F.
Label your jars with the date and contents, because even though you think you’ll remember when you made that batch of canned peaches, trust me, you won’t after a few months! Properly processed and stored canned peaches will maintain their quality for 12-18 months, though they’re safe to eat much longer if the seal remains intact. I always try to use my oldest jars first, rotating my stock to ensure nothing goes to waste.
When you’re ready to enjoy your canned peaches, inspect the jar carefully before opening. The lid should still be concave and shouldn’t flex when pressed. If you notice any signs of spoilage – such as an off smell, unusual color, or mold – discard the entire jar immediately. Once opened, treat your canned peaches like fresh fruit and store any leftovers in the refrigerator for up to a week. The syrup from the jar is liquid gold – don’t waste it! Use it to sweeten tea, drizzle over pancakes, or add to smoothies.
 DINNER
 LUNCH
LUNCH Desserts
 BREAKFAST
For more amazing recipes, be sure to check out our other sections to explore a variety of ideas that will enrich your cooking experience. Each section offers its own unique flavors to ensure a delightful culinary journey:
Easy and Quick Recipes: A collection of dishes that guarantee delicious meals with minimal effort and time.
Healthy Recipes: Discover healthy and delicious options that fit your lifestyle.
Desserts: A diverse selection of sweets that will add a special touch of sweetness to your table.
Lunch Recipes: Tasty lunch ideas that you can easily prepare to delight your family.
Dinner Recipes: Delicious and easy-to-make recipes that will make your dinner a memorable occasion.
Frequently Asked Questions About Canning Peaches
Q: Do I need special equipment to start canning peaches? A: While you don’t need fancy equipment for canning peaches, a few essential tools will make the process much easier and safer. You’ll need a large pot that can hold your jars with water covering them by 2 inches, canning jars with new lids, a jar lifter or tongs, and a canning funnel. Many stores sell basic canning starter kits that include everything you need for canning peaches and other fruits.
Q: Can I use frozen peaches for canning peaches? A: While fresh peaches are always preferred for canning peaches, you can use frozen peaches in a pinch. Thaw them completely first and expect a softer texture in the final product. The flavor will still be delicious, but the fruit won’t hold its shape quite as well as when canning peaches from fresh fruit. If using frozen peaches, skip the blanching step since freezing has already broken down the cell walls.
Q: How do I know if my canned peaches sealed properly? A: Proper sealing is crucial for safe canning peaches. After your jars have cooled for 12-24 hours, press the center of each lid. If it doesn’t flex or make a popping sound, you have a good seal. You should also be able to lift the jar by the lid alone (though I don’t recommend this as a regular test!). Any jars that didn’t seal properly should be refrigerated and used within a few days.
Q: What’s the best way to remove peach skins for canning peaches? A: The blanching method I described is the easiest way to remove peach skins when canning peaches. Score an “X” on the bottom, drop in boiling water for 30-60 seconds, then immediately transfer to ice water. The skins should slip off easily. If you’re dealing with very ripe peaches, they might only need 15-20 seconds in the boiling water for canning peaches.
Q: Can I adjust the sugar in the syrup when canning peaches? A: Absolutely! The sugar in canning peaches syrup is primarily for flavor and texture – it’s not necessary for food safety. You can make light syrup (1 cup sugar to 4 cups water), medium syrup (1 cup sugar to 2 cups water), or even can your peaches in their own juice or plain water. Just remember that sugar helps maintain color and texture, so completely sugar-free canning peaches may look and feel slightly different.
Why You Should Start Canning Peaches Today
There’s something deeply satisfying about lining up rows of golden canned peaches on your pantry shelves, knowing you’ve captured the essence of summer to enjoy throughout the year. This traditional preservation method connects us to generations of home cooks who understood the value of putting up the harvest, and canning peaches is one of the most rewarding ways to start your home preservation journey.
Beyond the obvious benefit of having delicious fruit available year-round, canning peaches teaches valuable kitchen skills and gives you complete control over what goes into your food. No mysterious preservatives, no artificial flavors – just pure, sweet peaches preserved at their peak ripeness. Plus, there’s an undeniable pride that comes from serving guests a dessert made with peaches you canned yourself.
I encourage you to give canning peaches a try this summer – start small with just a few jars to build your confidence, and I guarantee you’ll be hooked. Share your results with friends and family, and don’t be surprised if they start asking for your secrets! The joy of canning peaches goes far beyond the final product; it’s about slowing down, connecting with your food, and creating something beautiful with your own hands.