Table of Contents
Table of Contents
Introduction: Making Halloween Healthy and Hauntingly Fun
There’s something truly special about the moment when children approach one of your Halloween veggie tray ideas and their eyes light up with genuine excitement. “Look, Mom! A skeleton made of vegetables!” or “Can I eat the spider?” These aren’t phrases most parents expect to hear, yet thoughtfully designed Halloween veggie tray ideas consistently elicit this wonderful enthusiasm.
The beauty of Halloween veggie tray ideas extends far beyond a single party. You’re creating positive associations with healthy eating, demonstrating that nutritious foods can be creative and fun, and building family traditions around both celebration and wellness. Years from now, your children will remember the Halloween when they helped build monster faces from vegetables or the spooky veggie skeleton that greeted party guests. These Halloween veggie tray ideas become cherished family moments that inspire future creativity.
Don’t let perfectionism prevent you from trying these easy homemade Halloween veggie tray ideas. Your first attempt might not look exactly like Pinterest-perfect photos, and that’s perfectly okay! The slightly crooked olive eyes on your Frankenstein face or the somewhat abstract vegetable skeleton still represent love, effort, and creativity. Children appreciate the thought behind every Halloween veggie tray idea far more than technical perfection.
Start simple if you’re feeling overwhelmed. Choose one beginner-friendly design—perhaps the spider web or mummy-wrapped vegetables—and build your confidence. As you become comfortable with techniques, expand to more elaborate Halloween veggie tray ideas. Every parent creating these festive trays started somewhere, and each Halloween veggie tray idea teaches valuable lessons about what works best for your family and circumstances.
I encourage you to make this Halloween season one where vegetables get their moment in the spotlight. Transform your party table into a colorful, nutritious celebration that kids will remember. Take photos, share your Halloween veggie tray ideas, and most importantly, involve your children in the process. The vegetables they help prepare are the ones they’ll be most excited to eat, especially when they look like fun Halloween veggie tray ideas!
Now it’s your turn. Which Halloween veggie tray idea will you try first? Will you create a friendly Frankenstein, a spooky skeleton, or perhaps design something uniquely your own? Whatever you choose, approach your Halloween veggie tray ideas with playfulness and creativity. Your family favorite recipes don’t have to be complicated—they just need to be made with love.
Share your Halloween veggie tray ideas with friends and family, post photos on social media, and inspire others to make healthy eating part of their Halloween traditions. Every Halloween veggie tray idea created is a small victory in the ongoing effort to show children that nutritious foods deserve celebration alongside traditional treats.
Happy Halloween, and may your celebrations be filled with creativity, health, and plenty of kid-approved vegetables! Don’t forget to share your Halloween veggie tray ideas—I’d love to hear which designs became hits at your parties and whether you discovered new tricks to add to this growing collection of family favorite recipes.
Creepy-Cute Halloween Veggie Tray Ideas Kids Will Love
Ingredients
Tried this recipe?
Let us know how it was!Ingredients – Building Your Spooky Veggie Arsenal
Essential Vegetables and Their Roles in Halloween Veggie Tray Ideas
When it comes to crafting memorable Halloween veggie tray ideas, choosing the right vegetables is like selecting the perfect costume—it can make or break the entire presentation. Let me walk you through the all-star vegetables that work beautifully for these creepy-cute creations.
Orange vegetables are your Halloween MVPs. Baby carrots serve as perfect “fingers” for monster hands, while carrot sticks can become wands, bones, or the structural elements of larger designs. Orange bell peppers work wonderfully as jack-o’-lantern bases—simply cut them in half, remove the seeds, and you have instant pumpkin cups for dip or stuffing with smaller veggies.
Green vegetables add that essential spooky element. Broccoli florets become the perfect “trees” for a haunted forest scene, while cucumber slices can be transformed into Frankenstein faces with just a few strategic cuts. Celery sticks work as “bones” or can be filled with cream cheese and topped with a black olive “spider.” Green bell peppers offer similar versatility to their orange counterparts—use them for monster faces or slice them into “worm” rings.
White and pale vegetables create ghostly elements. Cauliflower florets make excellent ghost bodies, especially when paired with small black olive eyes. White button mushrooms can become adorable toadstools when paired with cherry tomatoes. Jicama sticks provide a crispy, slightly sweet alternative to traditional vegetables and work well as “bones” or “teeth.”
Red vegetables add dramatic pops of color. Cherry and grape tomatoes become everything from spider bodies to eyeballs (when you add an olive slice center). Red bell peppers can be carved into devil faces or sliced into “bloody” accent pieces.
Purple and black vegetables complete your palette. Black olives are indispensable—they become spider bodies, eyes, pupils for monster faces, and decorative accents. Purple cabbage can be hollowed out to create a spectacular serving bowl for dip, adding height and drama to your Halloween veggie tray ideas.
For dips and “glue,” you’ll want cream cheese (for attaching decorations), ranch dressing, hummus (green hummus is especially fun for Halloween), guacamole, and even a black bean dip to continue the spooky color theme.
Tips for Selecting the Best Quality Ingredients
The success of your Halloween veggie tray ideas depends heavily on choosing vegetables at peak freshness. Here’s what I’ve learned from years of creating these delightful displays—and a few costly mistakes!
Shop 1-2 days before your event. Vegetables are crispest when fresh, but you also need time to clean, prep, and assemble. I learned this the hard way when I bought everything a week early for my daughter’s classroom party. By Halloween, the celery had gone limp, and the carrots had developed an unappetizing “sweaty” appearance.
Visual inspection is crucial. Look for bell peppers with firm, glossy skin without soft spots or wrinkles. The stem should look fresh and green, not brown and dried out. For broccoli and cauliflower, choose heads with tight, compact florets in vibrant colors—yellow or brown spots indicate age. Cherry tomatoes should be firm to the touch with smooth, unblemished skin and still attached to the vine when possible.
The squeeze test works wonders. Gently squeeze vegetables to check for firmness. Cucumbers should feel solid throughout with no soft or spongy spots. Bell peppers should have a little give but bounce back—too hard means underripe, too soft means overripe.
Color matters more than you think. Brighter colors generally indicate fresher vegetables. Carrots should be a vibrant orange without white “blushing” on the surface. This white coating isn’t harmful but indicates dehydration. If you’re buying baby carrots, avoid packages with significant liquid in the bag—this suggests they’ve been sitting too long.
Organic versus conventional—my honest take: For Halloween veggie tray ideas, I prioritize organic for bell peppers, cucumbers, and celery, as these tend to have higher pesticide residues. However, for vegetables you’ll peel (like carrots if not using baby carrots) or those with thick skins you’ll remove, conventional options work fine and help manage costs.
Size considerations: Choose vegetables that fit your design. Baby carrots are more kid-friendly than full-size carrots. Small cherry tomatoes work better as “eyeballs” than larger varieties. Look for mini bell peppers if you’re creating individual servings—they’re perfectly proportioned and incredibly cute!
Substitutions and Alternatives for Picky Eaters
One of the challenges with Halloween veggie tray ideas is accommodating different taste preferences. Not every child loves every vegetable, and that’s perfectly okay! Here are clever substitutions that maintain the visual impact while broadening appeal.
For kids who dislike raw broccoli, try blanching it briefly (30 seconds in boiling water, then immediately into ice water). This softens the texture slightly and reduces the strong flavor while maintaining the bright green color. Alternatively, substitute with snap peas or green beans for a similar color and crunch. Both work wonderfully as “monster fingers” or “witch’s broom bristles.”
If bell peppers are too bitter, sweet mini peppers offer a milder, sweeter taste in adorable proportions. You can also roast bell peppers briefly to mellow their flavor—they’ll still hold their shape for jack-o’-lantern cups but taste significantly sweeter. Another option is using orange or yellow cherry tomatoes for color instead.
For cucumber-averse children, zucchini ribbons (use a vegetable peeler) create similar visual effects with a milder taste. Peeled and seeded cucumber also has less bitter flavor—the skin and seeds contain most of the bitterness that some kids dislike.
Carrot substitutes include sweet potato sticks (lightly steamed and cooled), which offer similar color and sweetness. Butternut squash sticks also work, though they’re slightly softer. For a completely different approach, orange cheddar cheese sticks provide the color while introducing protein.
If black olives aren’t a hit, create “pupils” and decorative elements using raisins, dried cranberries, or small pieces of nori (seaweed sheets used for sushi). While not vegetables, they serve the same visual purpose and many kids actually prefer them.
Ranch dressing alternatives include Greek yogurt-based dips (tangier but similar appearance), white bean dip (creamier texture), or even a mild cheese sauce. For kids with dairy sensitivities, tahini-based dips or cashew cream work beautifully.
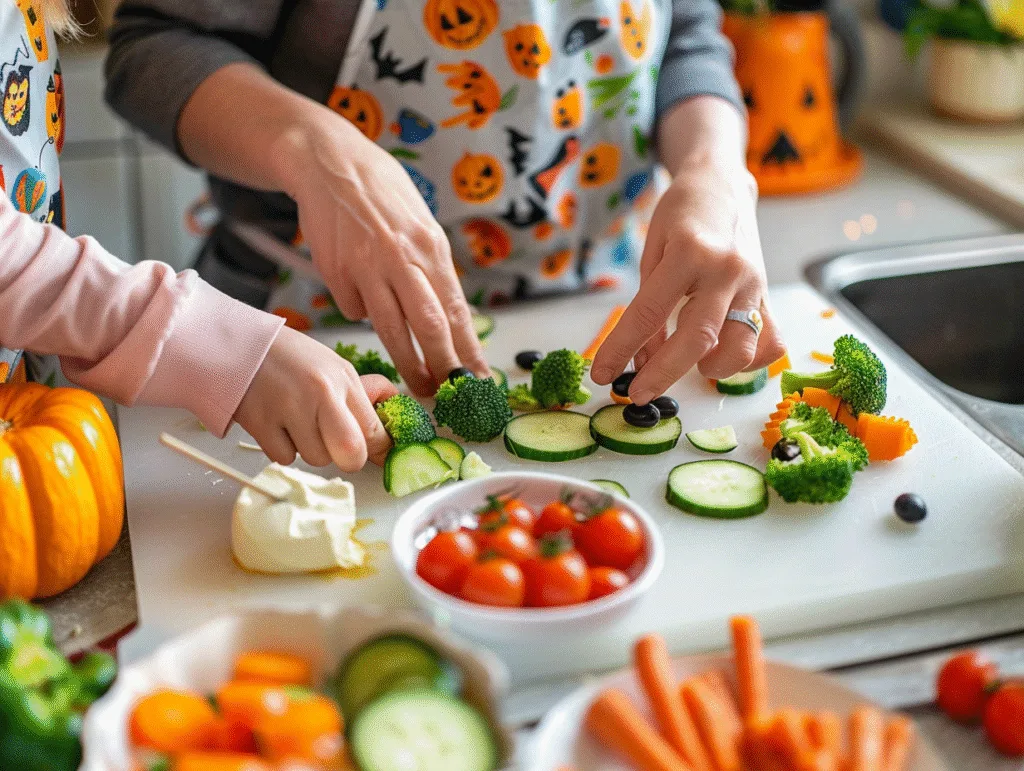
Building a “choose your own” station is my secret weapon for family favorite recipes with multiple kids. Set out all your prepared vegetables in separate containers and let children build their own spooky scenes on individual plates. This approach transforms potential “I don’t like that!” moments into engaged creativity.
Presentation tricks for reluctant veggie eaters: Sometimes it’s not the vegetable but the size. Cut vegetables into smaller, less intimidating pieces. Create “tasting towers” where kids can try one small piece at a time. Pair unfamiliar vegetables with familiar favorites—the comfort of beloved ranch dip makes trying new things less scary.
Preparation Steps – Bringing Your Halloween Veggie Tray Ideas to Life
Initial Prep and Cleaning Tips for Food Safety
Before diving into the creative fun of assembling Halloween veggie tray ideas, proper preparation ensures both food safety and easier assembly. Let me share the systematic approach I’ve developed over years of creating these delicious dishes.
Start with a clean workspace. Sanitize all countertops with a food-safe cleaning solution. I use a mixture of water and white vinegar (1:1 ratio) because it’s effective and doesn’t leave chemical residues. Wash your hands thoroughly with soap and warm water for at least 20 seconds—I know it sounds basic, but when you’re handling food kids will eat, this step is non-negotiable.
The proper vegetable washing technique makes a significant difference. Fill a large bowl or clean sink with cold water. Add a tablespoon of baking soda per gallon of water—this helps remove pesticide residues and dirt more effectively than water alone. Soak vegetables for 2-3 minutes, then use a clean vegetable brush to gently scrub firmer items like carrots, cucumbers, and bell peppers. For delicate items like cherry tomatoes and broccoli, swish gently in the water.
Thorough drying prevents soggy vegetables. Use a salad spinner for smaller items like cherry tomatoes and broccoli florets—the centrifugal force removes water from all the nooks and crannies. For larger vegetables, pat dry with clean kitchen towels or paper towels. Any excess moisture will make vegetables deteriorate faster and make dips watery.
Strategic cutting order saves time. I always start with vegetables that won’t brown or oxidize, then move to those needing lemon juice treatment. Begin with bell peppers, cherry tomatoes, and broccoli. Next, handle cucumbers and celery. Save carrots for last since they’re most forgiving. If working with ingredients that brown (like jicama), keep a bowl of water mixed with lemon juice nearby to prevent discoloration.
The mise en place method transforms chaotic preparation into smooth execution. This French culinary term means “everything in its place,” and it’s a game-changer for Halloween veggie tray ideas. After washing and drying, place each vegetable type in a separate container. Prep all vegetables completely before beginning assembly. This approach prevents cross-contamination and makes the creative process much more enjoyable.
Tool preparation is equally important. Sharpen your knives—dull knives are dangerous and make ragged cuts that brown quickly. Gather small cookie cutters in Halloween shapes (bats, stars, pumpkins), toothpicks for assembly, and small bowls for dips. Have a damp cloth nearby for wiping your cutting board between vegetables.
Temperature considerations: Work in a cool kitchen if possible. Vegetables deteriorate faster in warm environments. If your house is warm, work in batches and return finished vegetables to the refrigerator between steps. For events longer than 2 hours, plan to either keep your display refrigerated until the last possible moment or place the serving tray over a bed of ice.
Step-by-Step Assembly Instructions with Creative Design Secrets
Now comes the exciting part—transforming your prepared vegetables into spectacular Halloween veggie tray ideas that will have everyone reaching for their cameras before their forks!
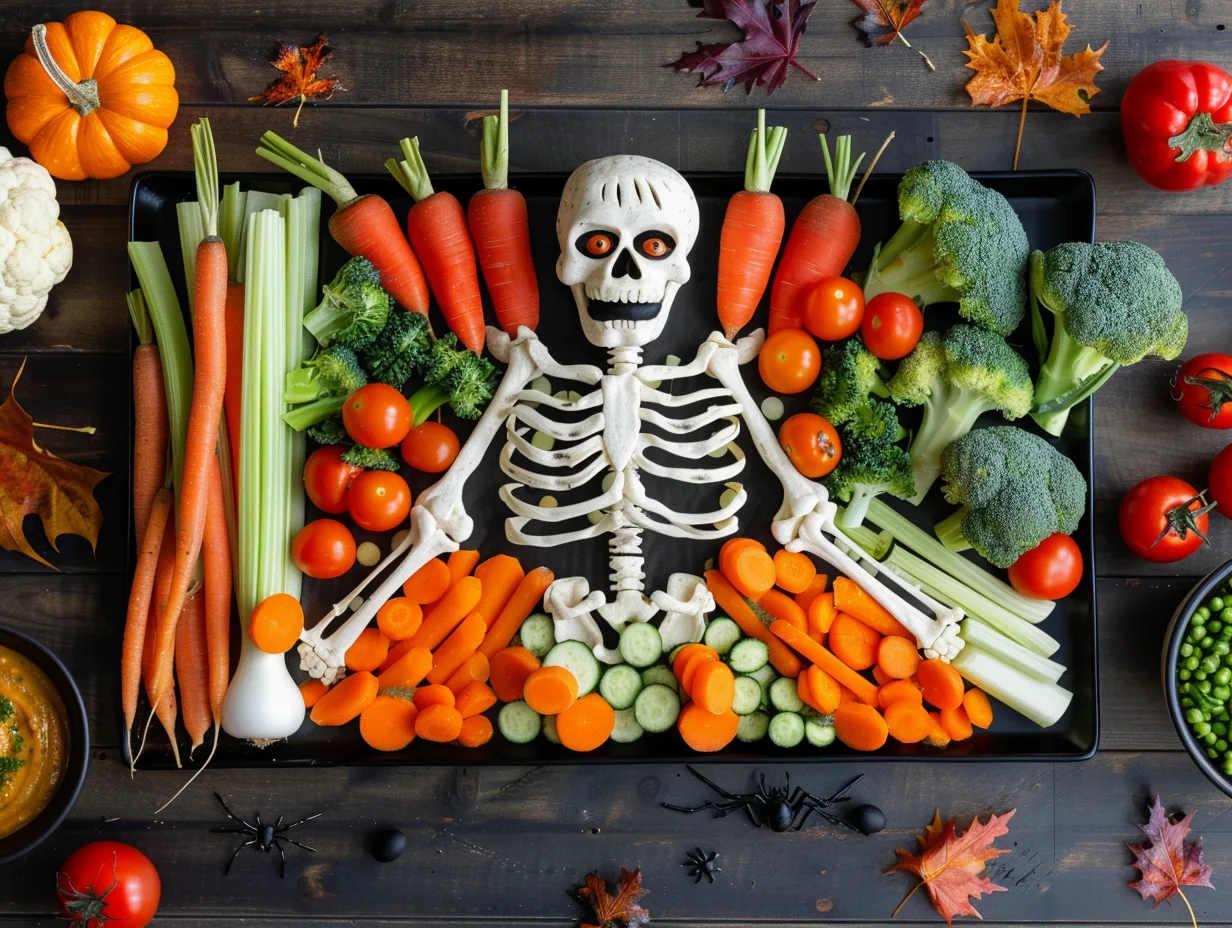
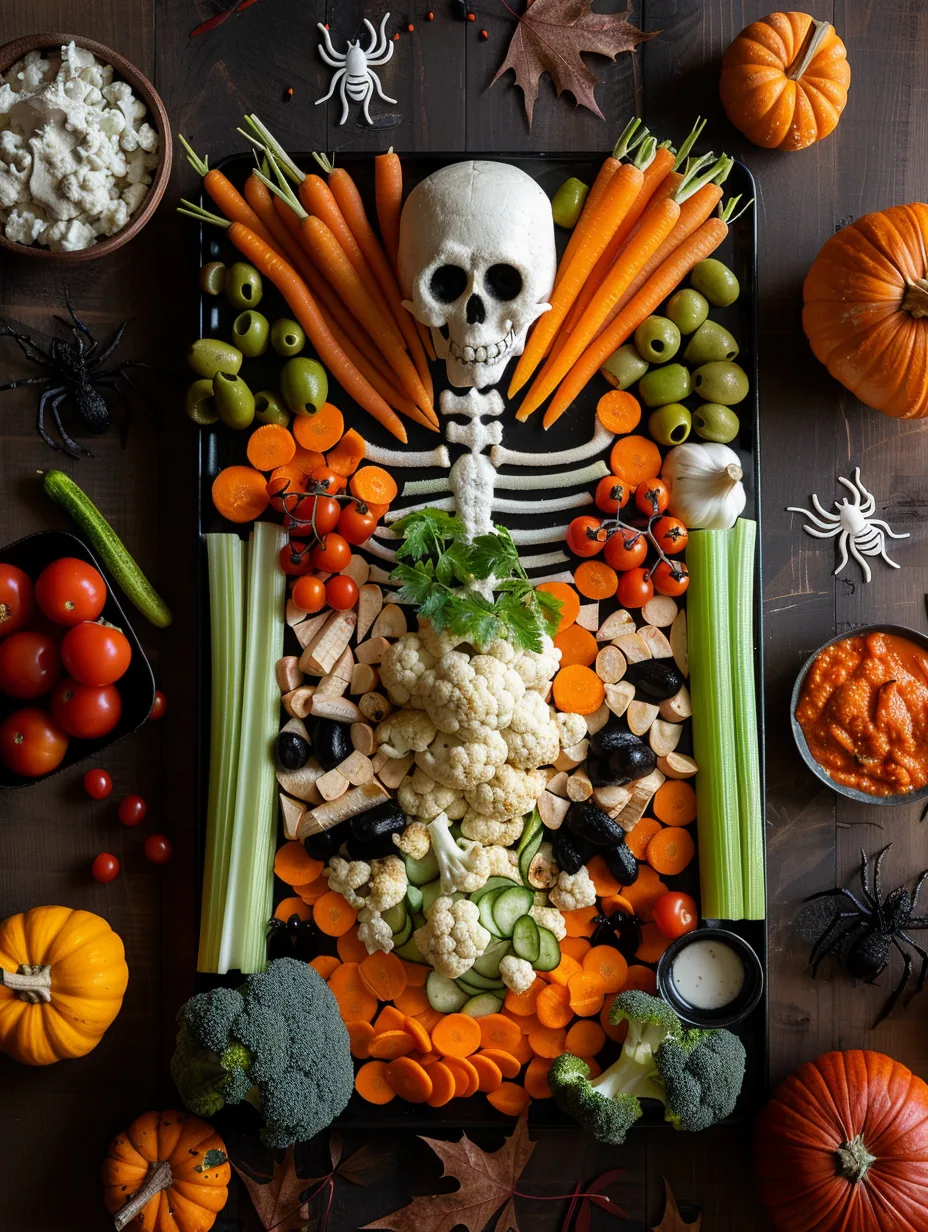
Design 1: The Classic Veggie Skeleton
This show-stopping design always receives the most attention at parties. Start with a large rectangular platter or cutting board. For the skull, use a halved cauliflower head placed at the top center, with black olive eyes and a carrot stick nose. The ribcage comes from horizontally arranged celery sticks (about 5-6 on each side, gradually decreasing in size). Create the spine with vertically placed cucumber rounds down the center. For arms and legs, use carrot sticks with bell pepper “hands” and “feet” (cut pepper strips to resemble fingers and toes).
Secret tip: Attach the olive eyes to the cauliflower using small dabs of cream cheese—it acts like edible glue and prevents sliding. For the joints (elbows and knees), use cherry tomato halves to add pops of color and realistic articulation points.
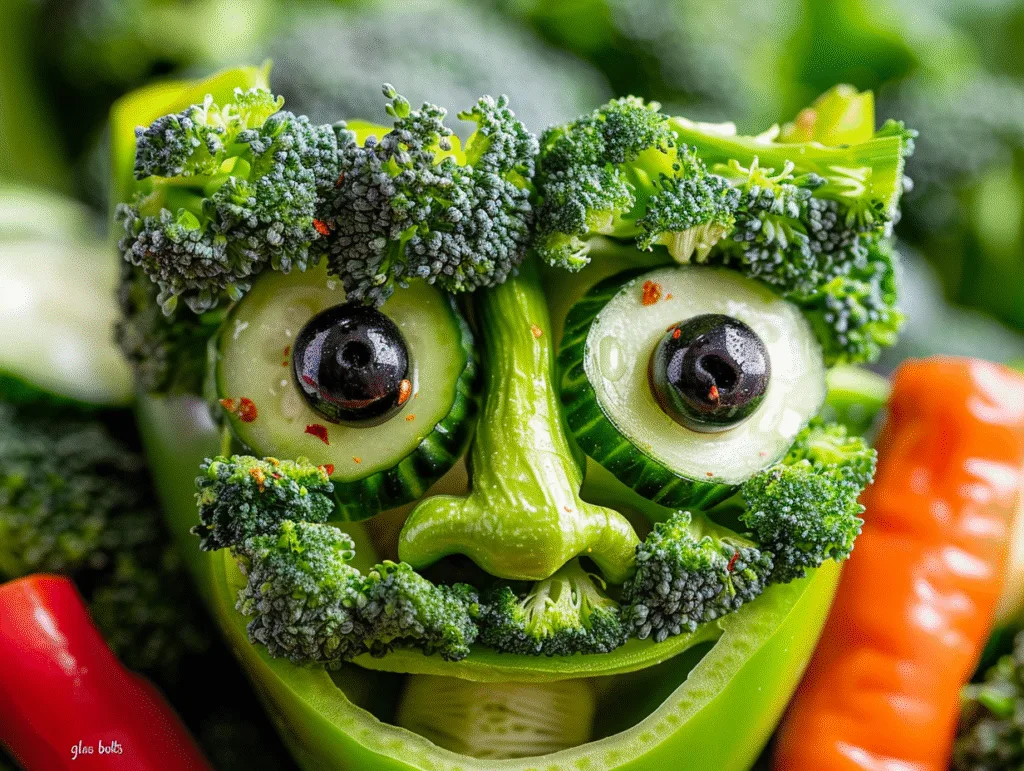
Design 2: Frankenstein’s Monster Face
This friendly monster is perfect for younger children and less intimidating than skeletons. Use a large green bell pepper (cut in half and cleaned) as the face. Create the characteristic flat-top head by trimming the top edge straight. For the hair, insert small broccoli florets along the top using toothpicks or by creating small slits in the pepper. Black olive slices become the eyes, and a small piece of red bell pepper creates the mouth. Cucumber slices form the iconic neck bolts on either side.
Secret tip: Create “stitches” across the forehead using thin strips of black olive or small lines of black bean dip applied with a toothpick. This detail makes the design pop without adding difficulty.
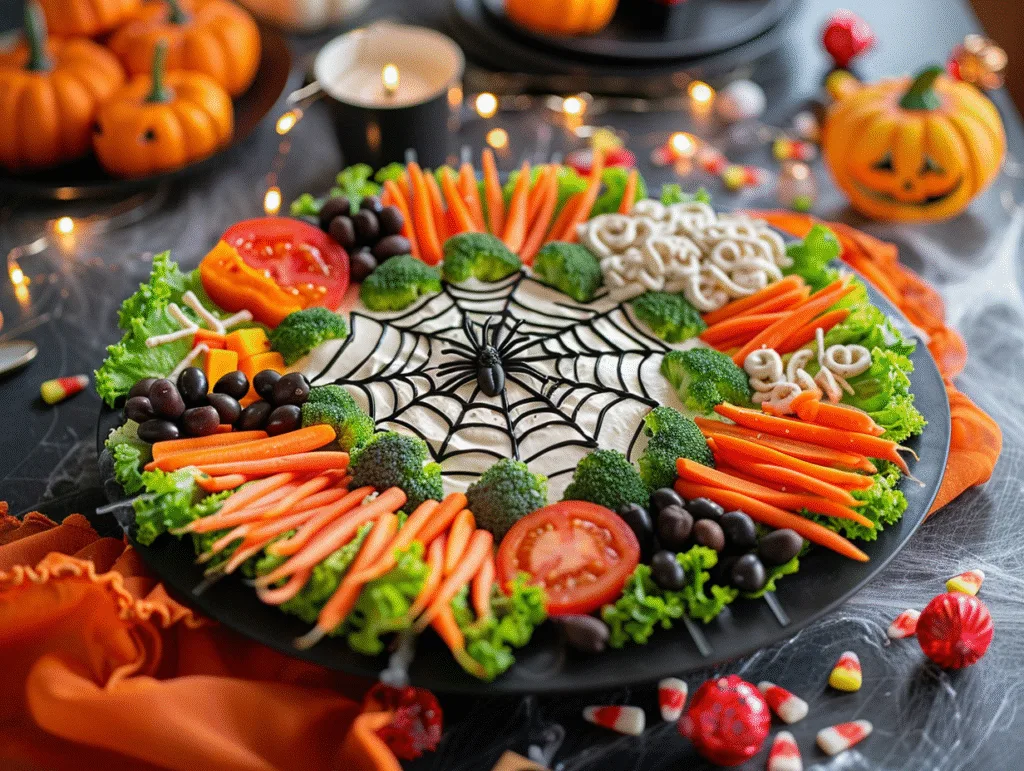
Design 3: Spooky Spider Web
This design works beautifully as a centerpiece for how to make Halloween veggie tray ideas that incorporate dip. Place a bowl of ranch dressing or white bean dip in the center of a round platter. Using sour cream or white hummus in a squeeze bottle (or a ziplock bag with the corner cut off), create concentric circles around the bowl. Drag a toothpick from the center outward through the circles at regular intervals to create the web effect.
For the spider, use a large black olive body with pretzel stick legs (4 on each side). For a vegetable-only version, use thin strips of purple cabbage or black bean-coated cucumber strips as legs. Arrange cherry tomatoes, baby carrots, and broccoli florets around the web in a decorative pattern.
Secret tip: Make the web decoration right before serving—the longer it sits, the more the lines blur together. Keep the squeeze bottle in the refrigerator until ready to decorate.
Design 4: Haunted Vegetable Garden
This three-dimensional Halloween veggie tray idea creates an entire spooky scene. Use a large shallow box or deep platter. Create “dirt” using a thin layer of black bean dip or hummus. Plant broccoli “trees” by inserting florets upright (trim stems to flat bottoms). Create a “fence” using pretzel sticks or celery sticks arranged vertically. Add carrot stick “bones” poking up from the “dirt.”
Make ghost peppers by using small white cheese balls or mini mozzarella balls with black olive slice eyes (attach with cream cheese). Create a vegetable “graveyard” with rectangular cucumber slices standing upright as tombstones—use a toothpick to etch “RIP” into each.
Secret tip: This design benefits from varying heights. Use upside-down small bowls hidden under the display as platforms to create hills and elevation changes that make the scene more dynamic and engaging.
Design 5: Mummy-Wrapped Vegetables
These individual pieces work wonderfully for easy homemade recipes that kids can help prepare. Take celery sticks and wrap them with thin strips of cream cheese or white cheese. Leave a small gap near one end and add two small black olive pieces as eyes peeking through the wrapping. For carrot mummies, spread a thin layer of cream cheese along the carrot and create “bandages” by scoring lines with a fork.
Secret tip: For the easiest application, use softened cream cheese in a piping bag or plastic bag with a small hole cut in the corner. Pipe back and forth across the vegetable in a random pattern—perfect mummy wrapping doesn’t exist, so messier actually looks more authentic!
Assembly timeline for stress-free preparation:
- Two days before: Shop for vegetables
- One day before: Wash and dry all vegetables; store in airtight containers
- Morning of event: Cut vegetables into needed shapes and sizes
- 2-3 hours before event: Assemble designs on serving platters; cover tightly with plastic wrap
- 30 minutes before serving: Add final touches like dips, spider webs, or any elements that might wilt or blur
Common Mistakes and How to Avoid Them
After creating countless Halloween veggie tray ideas for parties, classroom events, and family gatherings, I’ve made every mistake in the book—so you don’t have to! Here are the most common pitfalls and how to sidestep them.
Mistake #1: Cutting vegetables too far in advance
Exposed vegetable surfaces oxidize and dry out, creating unappetizing brown edges and limp textures. The solution is cutting vegetables no more than 24 hours in advance, and storing cut pieces in airtight containers with slightly damp paper towels. For vegetables prone to oxidation (jicama, certain types of squash), submerge in water with a squeeze of lemon juice.
Mistake #2: Using vegetables that don’t hold up at room temperature
I learned this lesson painfully at my son’s outdoor Halloween party. Within an hour, the carefully arranged display had wilted into a sad, soggy mess. Certain vegetables simply don’t tolerate sitting out: cucumber slices curl and become watery, lettuce wilts, and cut avocado browns quickly.
The fix: Choose hardy vegetables like carrots, bell peppers, broccoli, cauliflower, cherry tomatoes, and snap peas for displays that will sit out longer than an hour. If using delicate vegetables, keep the display refrigerated until the last possible moment and plan to refresh it midway through the event. For outdoor parties, place your serving platter over a larger tray filled with ice.
Mistake #3: Overcomplicating the design
In my enthusiasm for creating impressive Halloween veggie tray ideas, I once spent four hours on an elaborate haunted mansion scene complete with vegetable architecture, miniature cheese ghosts, and intricate details. It looked amazing… for about three minutes before hungry kids demolished it. The effort-to-appreciation ratio was way off.
The solution: Choose designs that deliver maximum visual impact with moderate effort. The skeleton, spider web, and Frankenstein face all take 30-45 minutes and photograph beautifully. Save your elaborate efforts for centerpieces at adult parties where the display might actually last!
Mistake #4: Ignoring proper food safety temperatures
Vegetables sitting at room temperature for extended periods can develop bacteria, especially if they’ve been handled extensively during arrangement. The USDA recommends discarding perishable foods left at room temperature for more than 2 hours (1 hour if the temperature is above 90°F).
The fix: Use the two-platter method for longer parties. Create two identical displays. Serve the first for up to 2 hours, then replace it with the fresh one from the refrigerator. This approach also allows you to start with a pristine display for photos!
Mistake #5: Forgetting about cross-contamination
Using the same cutting board and knife for all vegetables without washing between types can transfer flavors (onion-flavored carrots, anyone?) and potentially spread bacteria.
The solution: Either wash your cutting board and knife between different vegetable types or use multiple boards. I have a color-coded system: green for vegetables, red for proteins, and blue for dairy products. It’s a small investment that prevents big problems.
Mistake #6: Making attachments too fragile
Toothpicks that fall out, decorations that slide off, and pieces that won’t stay in place create frustration during assembly and disappointing presentations. Gravity always wins!
The fix: Use cream cheese as edible “glue.” Place a tiny dab where pieces connect—it’s strong enough to hold decorations but completely food-safe. For vertical elements, create small slits or holes in the base vegetable to insert items securely. Test your assemblies by gently tilting the platter—if pieces slide, they need better anchoring.
Mistake #7: Choosing vegetables based only on appearance
Those beautiful purple carrots or rainbow cauliflower might look stunning, but if kids won’t eat them, you’ve wasted money and effort. I once created an entire display with romanesco broccoli because it looked like tiny alien trees—kids were fascinated but refused to taste it because it looked “too weird.”
The solution: Balance visual appeal with familiarity. Include 70% vegetables most kids recognize and enjoy, and 30% interesting or unusual varieties. This approach lets adventurous eaters try new things while ensuring picky eaters still have options.
Serving & Final Touches – Making Your Halloween Veggie Tray Ideas Irresistible
H3: Creative Presentation Ideas That Make Vegetables Exciting
The difference between a veggie tray kids tolerate and Halloween veggie tray ideas kids actually get excited about often comes down to presentation. Let me share strategies that transform healthy vegetables into the stars of your Halloween celebration.
The power of elevation and dimension cannot be overstated. Flat platters are functional but forgettable. Instead, create height using overturned bowls or cups hidden beneath your serving platter or covered with a layer of kale or lettuce. Place your most impressive elements (like a Frankenstein face or spider) on these elevated points. This creates a dramatic, three-dimensional effect that draws the eye and makes everything more photogenic.
Interactive elements increase engagement. Kids love participation, so create a “build your own monster face” station with individual plates and an assortment of vegetable pieces. Provide cucumber round “faces,” various vegetables for features, and cream cheese “glue.” Include example photos for inspiration. This approach works brilliantly for parties because kids spend time creating rather than bouncing off walls from sugar highs!
Lighting creates atmosphere. For evening events, place LED tea lights (never real candles near food!) around your display. Orange and purple LED lights are inexpensive and create spooky ambiance. A black light makes white vegetables like cauliflower and white cheese glow eerily—just ensure any lighting is food-safe and positioned where it won’t heat the vegetables.
Themed serving vessels amplify your theme. Hollow out a small pumpkin to serve as a bowl for dip—it’s functional and decorative! Use a purple or black cabbage as a dip bowl for gothic elegance. Mini cauldrons (available at party stores) work perfectly for individual dip servings. Skull-shaped serving platters or black cutting boards provide perfect backdrops for colorful vegetables.
Labels and signage add whimsy. Create small cards with spooky names for your offerings: “Witch’s Warts” (cherry tomatoes), “Dragon Claws” (baby carrots), “Monster Eyeballs” (olive-stuffed cherry tomatoes), “Vampire Stakes” (celery sticks), or “Mummy Wraps” (cream cheese-wrapped vegetables). Use Halloween-themed cardstock or simply write on orange paper cut into pumpkin shapes. This naming strategy has magically transformed “yuck” vegetables into “can I try the dragon claws?”
Photography setup matters. If you’re sharing your creations on social media or want lovely memories, spend a few minutes on photo setup. Natural lighting near a window works best. Remove clutter from the background. Include Halloween decorations around (but not overwhelming) your display. Take photos before guests arrive and create chaos—you’ll be grateful for those pristine images!
Container gardens create interactive centerpieces. Fill a wide, shallow basket with individual cups of vegetables arranged to look like a garden. Each cup becomes its own mini Halloween veggie tray idea—perhaps different character faces or themes. Guests can grab entire cups, eliminating double-dipping concerns and making portion control easier.
The element of surprise delights everyone. Hide vegetable “worms” (thin cucumber or zucchini strips) inside a bell pepper “pumpkin.” When kids lift the “lid” (the pepper top), they discover the surprise inside. Create “grave dirt” with a thin layer of hummus and have carrot sticks poking out like hands reaching from the grave. These unexpected details create memorable moments.
Recommended Pairings and Complementary Party Foods
While Halloween veggie tray ideas can certainly stand alone as the star attraction, thoughtful pairings enhance the overall spread and ensure guests of all preferences find something satisfying. Here’s how to build a balanced party menu that keeps vegetables front and center while providing variety.
Protein pairings that won’t overshadow your veggie stars: Keep proteins simple and Halloween-themed. Cheese cubes arranged as “dice” with black olive dots, turkey or ham roll-ups tied with chive “ribbons” to look like mummy wraps, hard-boiled eggs with olive slice eyes to become “deviled egg eyeballs,” and mini meatballs with pretzel stick legs to create spiders complement without competing.
Dip variety increases consumption. Beyond standard ranch dressing, offer multiple dip options to encourage vegetable sampling. Create an “orange” lineup with carrot hummus, orange-tinted Greek yogurt dip (use a drop of food coloring), or roasted red pepper dip. Make “green slime” guacamole or avocado ranch. Offer “witch’s brew” spinach dip in a small cauldron. Black bean dip becomes perfectly themed “bat cave spread.”
The secret is providing 3-4 dip options with different flavor profiles: one creamy (ranch-based), one tangy (yogurt-based), one rich (hummus or bean-based), and one unexpected (perhaps a mild salsa or tzatziki). This variety ensures every palate finds something appealing and encourages trying vegetables they might normally refuse.
Complementary carbohydrates provide balance for growing appetites. Serve whole-grain crackers shaped like bats or ghosts (many specialty crackers come in seasonal shapes), pita chips that look like “witches’ hats,” pretzel sticks that double as “wands” or “bones,” or whole-grain breadsticks. For a healthier approach than typical party chips, try baked sweet potato rounds or plantain chips—both offer that satisfying crunch kids crave.
Beverage pairings complete the experience. Create an “orange” drink station with fresh-squeezed orange juice or orange sparkling water garnished with blood orange slices. Make “witch’s brew” with green-tinted lemonade (a drop of natural food coloring) with floating cucumber slices. Offer “vampire’s blood” – cranberry juice sparkler. Avoid overly sugary drinks that compete with any desserts you’re serving.
Fruit as a transitional offering bridges the gap between savory vegetables and sweet treats. Create fruit kabobs with halloween cookie cutters to shape melon into bats and stars. Clementines become “pumpkins” with celery stick stems. Apple slices with peanut butter and mini marshmallow “teeth” create monster mouths. These family favorite recipes keep the healthy momentum going while satisfying sweet cravings moderately.
Strategic table arrangement matters. Place your Halloween veggie tray ideas at the beginning of the food line or in the most accessible location. Hungry guests fill their plates with what they encounter first. Position sweets and treats last or in a slightly less convenient location. This isn’t about deprivation—it’s about giving vegetables prime real estate and first consideration.
Portion control without being obvious: Use smaller plates for the table—research shows people eat less when using smaller dishes because portions look more satisfying. Provide small appetizer plates near vegetables and larger dinner plates near main courses. Kids will naturally load up their small plates with veggies to “fill” them.
Storage Tips and Keeping Halloween Veggie Tray Ideas Fresh
Your beautiful creation deserves to stay fresh and appealing from preparation through serving and potentially beyond. Here’s comprehensive guidance on storage and freshness maintenance.
Pre-assembly storage (prepared but not yet arranged vegetables):
Wash and thoroughly dry vegetables, then store by type in airtight containers lined with paper towels. The paper towels absorb excess moisture that causes premature wilting and decay. Replace damp towels if they become too wet. Harder vegetables (carrots, bell peppers, broccoli) last 3-4 days this way. Softer vegetables (cucumbers, cherry tomatoes) should be used within 2 days. Keep everything refrigerated at 40°F or below.
For cut vegetables prone to oxidation, store submerged in water. Cucumber slices, for instance, stay crisp when covered in water in a sealed container. Change water daily if storing longer than 24 hours. Pat dry thoroughly before using.
Post-assembly, pre-party storage:
Once you’ve arranged your Halloween veggie tray ideas, cover tightly with plastic wrap—don’t just drape it over top, seal it directly against the platter sides to minimize air exposure. Store on a flat refrigerator shelf (not the door, which experiences temperature fluctuations). Remove 15-20 minutes before serving to take the chill off—vegetables taste better at slightly cooler than room temperature than ice-cold.
During the party:
For events longer than 2 hours, the two-platter system is your friend. Keep one display out, one in the fridge. Swap them at the 90-minute mark. This ensures fresh, safe food throughout your event. For outdoor parties or warm environments, place your display platter over a larger tray filled with ice. Replenish ice as it melts.
Post-party leftover management:
This is where things get tricky. Food safety guidelines recommend discarding any food that’s been sitting at room temperature for more than 2 hours (1 hour in hot weather). However, I understand the reluctance to waste perfectly good vegetables.
Here’s my practical approach: Vegetables that have been sitting out longer than recommended can’t be safely saved. However, vegetables that were kept cold or that you kept as backup in the refrigerator are perfectly fine. Remove any pieces with dip on them (dip cannot be safely saved once served). Store vegetables separately by type in clean containers. They’ll last 2-3 more days.
Dip storage requires special attention. Dips that have been sitting out with vegetables dipped directly in them cannot be safely saved—this introduces bacteria. If you used individual dip cups or kept dips separate, they can be refrigerated in airtight containers for 3-5 days for most varieties. Ranch dressing and yogurt-based dips last about 3 days, hummus 5-7 days, guacamole 1-2 days maximum (even with lemon juice to prevent browning).
Repurposing leftover vegetables creatively:
Rather than serving the same veggie tray again tomorrow, transform leftovers into new delicious dishes. Throw vegetables into a stir-fry, blend into a soup, add to omelets or frittatas, mix into pasta primavera, or create a quick vegetable pasta salad. This approach uses every bit while providing variety.
Composting unavoidable waste: For vegetables that must be discarded due to food safety concerns, composting turns waste into garden nutrition. Most raw vegetables compost beautifully. Avoid composting vegetables with dairy-based dips still on them, as these can attract pests.
Planning portions to minimize waste:
The best storage solution is not having excess to store! Plan portions based on your guest count: estimate 3-4 ounces of vegetables per child and 5-6 ounces per adult. For parties with lots of other food, reduce these estimates. It’s better to run slightly low (you can always bring out additional vegetables) than to have massive leftovers.
Freezing considerations:
Most vegetables suitable for Halloween veggie tray ideas don’t freeze well raw because freezing ruptures cell walls, creating mushy textures upon thawing. However, if you vastly overestimated quantities, you can blanch and freeze harder vegetables like carrots, broccoli, and bell peppers for use in cooked dishes later. They won’t work for future vegetable trays but are perfect for soups and stir-fries.
 DINNER
 LUNCH
LUNCH Desserts
 BREAKFAST
For more amazing recipes, be sure to check out our other sections to explore a variety of ideas that will enrich your cooking experience. Each section offers its own unique flavors to ensure a delightful culinary journey:
Easy and Quick Recipes: A collection of dishes that guarantee delicious meals with minimal effort and time.
Healthy Recipes: Discover healthy and delicious options that fit your lifestyle.
Desserts: A diverse selection of sweets that will add a special touch of sweetness to your table.
Lunch Recipes: Tasty lunch ideas that you can easily prepare to delight your family.
Dinner Recipes: Delicious and easy-to-make recipes that will make your dinner a memorable occasion.
FAQ: Your Halloween Veggie Tray Ideas Questions Answered
Q1: How far in advance can I prepare Halloween veggie tray ideas without them getting soggy or wilted?
The sweet spot is preparing vegetables 24 hours in advance. Wash, dry, and cut vegetables the day before, storing each type separately in airtight containers with paper towels to absorb moisture. However, wait until 2-3 hours before your event to assemble your display. Vegetables like cucumbers and celery release moisture over time, and dips can make things soggy if sitting too long.
For optimal freshness, follow this timeline: Shop for vegetables 1-2 days before your event. Wash and dry vegetables the night before. Cut vegetables the morning of your party. Assemble Halloween veggie tray ideas 2-3 hours before guests arrive, keeping them refrigerated. Add final touches like dips, decorative elements, and any pieces that might wilt (like herbs) in the final 30 minutes before serving.
If you absolutely must prepare further in advance, stick with the hardiest vegetables—carrots, broccoli, cauliflower, and bell peppers tolerate longer preparation times better than softer options like cucumbers and tomatoes.
Q2: What are the easiest Halloween veggie tray ideas for beginners with limited time?
The spider web design offers maximum impact with minimal effort! Simply place a bowl of white dip (ranch or white bean) in the center of a round platter. Create concentric circles of sour cream or thinned cream cheese around it, then drag a toothpick through the circles to create a web effect. Arrange vegetables around the edges. Add a simple spider made from a black olive body and pretzel legs. Total time: 20-25 minutes.
Another beginner-friendly option is creating individual “monster faces” on small plates using bell pepper halves as the base, olive eyes, and assorted vegetable features. Kids can even help with this approach! Lastly, the “mummy-wrapped” vegetables are incredibly simple—just wrap celery or carrot sticks with thin cream cheese strips and add olive eyes. These require no special skills or artistic ability.
For truly pressed-for-time situations, arrange vegetables by color in “rainbow” sections ona platter, place a bowl of orange-tinted dip in the center, and call it your “Halloween sunset” or “candy corn colors” display. Sometimes the simplest presentations are just as effective—it’s all in the marketing!
Q3: How can I make Halloween veggie tray ideas appealing to picky eaters who typically refuse vegetables?
The psychology of presentation makes all the difference! First, give vegetables fun, spooky names that create excitement rather than dread. “Witch’s warts” sounds much more intriguing than “cherry tomatoes” to a six-year-old. “Dragon claws,” “vampire stakes,” and “monster eyeballs” transform ordinary vegetables into adventure foods.
Second, create an interactive “build your own” station where kids assemble their own monster faces or spooky scenes using vegetable pieces. Children are significantly more likely to eat foods they’ve “created” themselves. Provide cucumber rounds as bases, various vegetables for features, and cream cheese as edible glue. Include example photos but encourage creativity.
Third, pair unfamiliar or disliked vegetables with beloved dips. Even the most vegetable-resistant child often discovers that ranch dressing makes everything palatable! Offer 3-4 dip options to increase the chances of finding a winning combination.
Fourth, start with vegetables that have naturally mild, slightly sweet flavors—baby carrots, bell peppers (especially orange and yellow varieties), snap peas, and cherry tomatoes. Avoid starting with strong-flavored options like raw broccoli or radishes.
Finally, avoid making a big deal about the vegetables being “healthy.” Instead, emphasize how cool they look, how fun they are to eat, and how they’re part of the Halloween celebration. When vegetables feel like part of the party rather than the “healthy alternative” to fun foods, kids approach them differently.
Q4: What’s the best way to keep Halloween veggie tray ideas fresh during outdoor parties or warm environments?
Temperature control is critical for outdoor events. The two-platter system works beautifully here—prepare two identical displays, serve one while keeping the second refrigerated, then swap them out after 90 minutes to 2 hours. This ensures fresh, safe vegetables throughout your party.
For the active display, place your serving platter on top of a larger, deeper tray filled with ice. The ice bed keeps vegetables cool without directly touching them. Replenish ice as it melts—check every 30-45 minutes during warm weather. Make sure your serving platter has raised edges or sits on small cups/bowls so it doesn’t sit directly in melting ice water, which would make vegetables soggy.
Choose the hardiest vegetables for outdoor displays. Carrots, bell peppers, broccoli, and cauliflower tolerate warmth better than cucumbers, celery, and cherry tomatoes. Avoid delicate items that wilt quickly in heat.
Position your food table in shade whenever possible. Even if the air temperature is moderate, direct sunlight dramatically accelerates vegetable deterioration. A pop-up tent or umbrella can make a significant difference.
For dips, use individual small serving cups rather than one large bowl. This allows you to replace cups as needed rather than exposing a large quantity to warm temperatures. Keep backup dip cups in a cooler with ice packs nearby.
Consider the timing of your party. If possible, schedule outdoor Halloween events for cooler parts of the day—early morning or evening rather than midday. For afternoon parties, accept that your Halloween veggie tray ideas might need to be replenished or refreshed midway through the event.
Q5: Can I prepare Halloween veggie tray ideas the night before and store them assembled in the refrigerator?
Yes, with important caveats! Certain designs hold up beautifully overnight while others become disappointing disasters. The key is understanding which components can be pre-assembled and which need last-minute attention.
What works well assembled the night before:
- Vegetable skeletons, Frankenstein faces, and other designs that use sturdy vegetables (carrots, bell peppers, broccoli, cauliflower) with cream cheese attachments
- Mummy-wrapped vegetables (the cream cheese actually firms up nicely overnight)
- Basic vegetable arrangements without dips or delicate decorative elements
What absolutely needs to be added right before serving:
- Spider web designs created with sour cream or dip—these blur and blend overnight
- Dips of any kind—always add these within an hour of serving to prevent sogginess
- Cherry tomatoes (they release moisture and make surrounding items soggy)
- Cucumber elements (they release water and become limp)
- Any decorative herbs or lettuce garnishes
The best approach is a hybrid: Assemble your main design the night before using hardy vegetables and secure attachments. Cover very tightly with plastic wrap pressed directly against the platter to minimize air exposure. Refrigerate on a flat shelf. The next day, 30-60 minutes before serving, add dips, delicate vegetables, decorative spider webs, and final touches.
Always perform a quality check before serving. If any pieces look wilted, discolored, or dried out, replace them with fresh vegetables. Keep backup vegetables prepped and ready in the refrigerator for quick replacements. This approach combines the convenience of advance preparation with the quality of fresh presentation.
For insurance, take photos of your creation right after assembly. If you need to make replacements before serving, you’ll have a reference image showing exactly how pieces were positioned!
Conclusion: Create Magical Memories with Halloween Veggie Tray Ideas
There’s something truly special about the moment when children approach one of your Halloween veggie tray ideas and their eyes light up with genuine excitement. “Look, Mom! A skeleton made of vegetables!” or “Can I eat the spider?” These aren’t phrases most parents expect to hear, yet thoughtfully designed Halloween veggie tray ideas consistently elicit this wonderful enthusiasm.
The beauty of Halloween veggie tray ideas extends far beyond a single party. You’re creating positive associations with healthy eating, demonstrating that nutritious foods can be creative and fun, and building family traditions around both celebration and wellness. Years from now, your children will remember the Halloween when they helped build monster faces from vegetables or the spooky veggie skeleton that greeted party guests. These Halloween veggie tray ideas become cherished family moments.
Don’t let perfectionism prevent you from trying these easy homemade Halloween veggie tray ideas. Your first attempt might not look exactly like Pinterest-perfect photos, and that’s perfectly okay! The slightly crooked olive eyes on your Frankenstein face or the somewhat abstract vegetable skeleton still represent love, effort, and creativity. Children appreciate the thought behind every Halloween veggie tray idea far more than technical perfection.
Start simple if you’re feeling overwhelmed. Choose one beginner-friendly design—perhaps the spider web or mummy-wrapped vegetables—and build your confidence. As you become comfortable with techniques, expand to more elaborate Halloween veggie tray ideas. Every parent creating these festive trays started somewhere, and each Halloween veggie tray idea teaches valuable lessons about what works best for your family and circumstances.
I encourage you to make this Halloween season one where vegetables get their moment in the spotlight. Transform your party table into a colorful, nutritious celebration that kids will remember. Take photos, share your Halloween veggie tray ideas, and most importantly, involve your children in the process. The vegetables they help prepare are the ones they’ll be most excited to eat!
Now it’s your turn. Which Halloween veggie tray idea will you try first? Will you create a friendly Frankenstein, a spooky skeleton, or perhaps design something uniquely your own? Whatever you choose, approach your Halloween veggie tray ideas with playfulness and creativity. Your family favorite recipes don’t have to be complicated—they just need to be made with love.
Share your Halloween veggie tray ideas with friends and family, post photos on social media, and inspire others to make healthy eating part of their Halloween traditions. Every Halloween veggie tray idea created is a small victory in the ongoing effort to show children that nutritious foods deserve celebration alongside traditional treats.
Happy Halloween, and may your celebrations be filled with creativity, health, and plenty of kid-approved vegetables! Don’t forget to share your Halloween veggie tray ideas—I’d love to hear which designs became hits at your parties and whether you discovered new tricks to add to this growing collection of family favorite recipes.