Table of Contents
Table of Contents
Let me tell you a little secret that changed my kitchen forever. Three years ago, I was standing in the dairy aisle, staring at the price tags on Greek yogurt containers, when I had what I can only call my “lightbulb moment.” At $6 for a small tub of quality Greek yogurt, I was spending nearly $50 a month just on this one staple! That’s when I decided to dive headfirst into making my own Greek yogurt at home, and honestly, it’s been one of my best culinary discoveries.
Greek yogurt has become more than just a breakfast staple in my house – it’s the creamy foundation for smoothies, the tangy base for my favorite dips, and the secret ingredient that makes my baked goods incredibly moist. But here’s what I learned: not all Greek yogurt is created equal, and the difference between homemade and store-bought goes far beyond just the price tag.
When I first started making Greek-style yogurt at home, I was amazed by how simple the process actually is. With just two ingredients and a little patience, I was creating something that tasted infinitely better than anything I could buy at the store. The texture was silkier, the flavor was more complex, and I had complete control over every aspect of the final product.
This journey into homemade Greek-style yogurt has taught me so much about the art of fermentation, the importance of quality ingredients, and how small changes in technique can create dramatically different results. Today, I want to share everything I’ve learned with you – from selecting the perfect milk to achieving that signature thick consistency that makes Greek-style yogurt so irresistible.
Homemade Greek Yogurt
Ingredients
Tried this recipe?
Let us know how it was!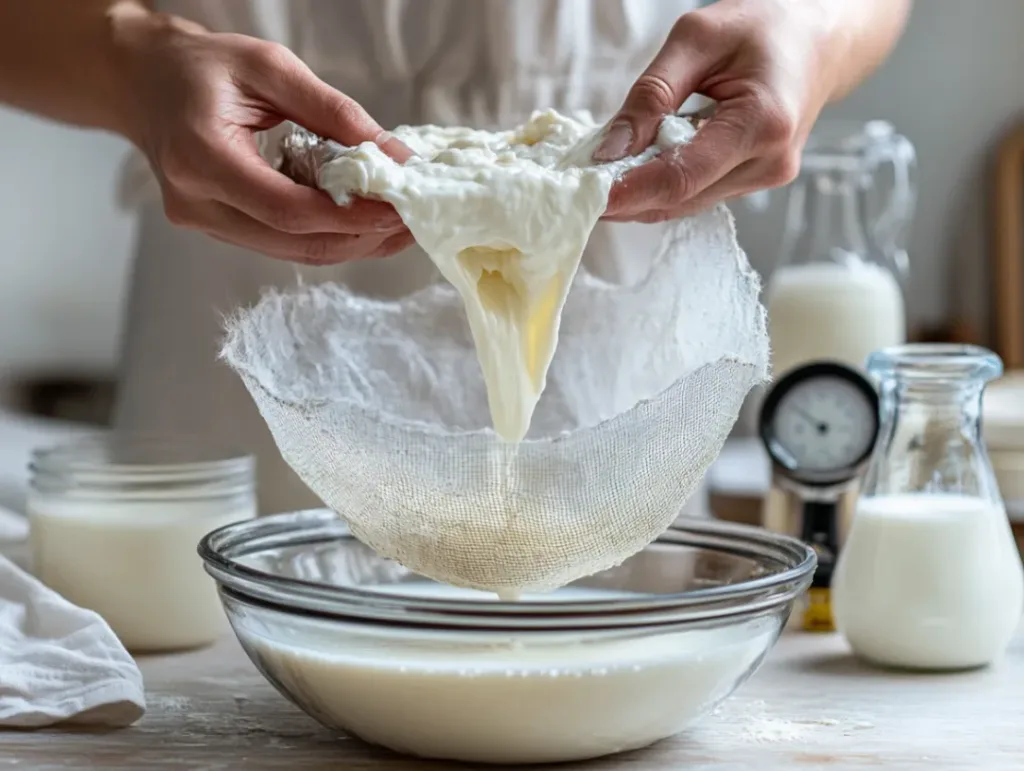
Understanding the Ingredients: What Makes Greek Yogurt Special
The Foundation: Milk Selection and Its Impact on Your Greek Yogurt
The heart of exceptional Greek yogurt lies in choosing the right milk, and this decision will make or break your final product. When I first started making Greek yogurt at home, I made the mistake of grabbing whatever milk was cheapest at the store. The result? A thin, somewhat bland yogurt that barely resembled the rich, creamy Greek yogurt I was hoping to create.
Whole milk is my go-to choice for homemade Greek-style yogurt because the fat content contributes significantly to both texture and flavor. The higher fat content creates a naturally creamier consistency and provides that satisfying richness that makes Greek yogurt so indulgent. However, I’ve experimented with 2% milk when I want a lighter version, and while it requires a bit more straining time, it still produces excellent results.
The quality of your milk matters tremendously. I always opt for milk from grass-fed cows when possible, as it tends to have a more complex flavor profile and better nutritional content. Local dairy farms often provide the freshest milk, and I’ve found that fresher milk creates a more vibrant, tangy yogurt with better consistency.
One crucial tip I’ve learned through trial and error: avoid ultra-pasteurized milk at all costs. The high-heat treatment used in ultra-pasteurization damages the proteins in ways that prevent proper yogurt formation. I learned this the hard way after several failed batches early in my yogurt making journey.
The Magic of Starter Culture: Choosing the Right Yogurt Base
The starter culture is where the magic happens in Greek yogurt making, and your choice here can dramatically impact the final flavor and texture. I’ve tried everything from expensive specialty cultures to simple store-bought yogurt as starters, and I’ve discovered some fascinating insights along the way.
When using store-bought yogurt as a starter, I always choose a high-quality Greek yogurt with live active cultures. The label should clearly state “contains live and active cultures,” and I look for brands that list specific strains like Lactobacillus bulgaricus and Streptococcus thermophilus. These are the traditional cultures used in authentic Greek yogurt production.
My personal favorite approach is to use a small amount of my previous batch as the starter for my new Greek yogurt. This creates a continuous cycle and allows the flavors to develop and mature over time. I’ve been maintaining the same yogurt culture for over two years now, and the flavor has become increasingly complex and delicious.
The amount of starter culture you use affects both the fermentation time and the final tanginess of your Greek yogurt. I typically use about 2 tablespoons of starter per quart of milk, but I’ve learned to adjust this based on the temperature of my kitchen and how quickly I want the yogurt to be ready.
Optional Enhancers: Taking Your Greek Yogurt to the Next Level
While traditional Greek yogurt requires only milk and starter culture, I’ve discovered several optional ingredients that can enhance both the nutritional value and texture of your homemade yogurt. These additions have become part of my signature approach to creating the perfect Greek yogurt.
Powdered milk is my secret weapon for achieving ultra-thick Protein-rich yogurt without extended straining time. Adding 1/4 cup of non-fat dry milk powder per quart of liquid milk increases the protein content significantly and creates a naturally thicker consistency. This technique is particularly helpful when I’m making large batches for meal prep.
A tablespoon of heavy cream added to each quart of milk creates an incredibly rich and luxurious Protein-rich yogurt that rivals the most expensive store-bought varieties. This addition is perfect when I’m planning to use the yogurt for dessert applications or when I want an extra-indulgent breakfast.
I’ve also experimented with adding a small amount of gelatin to create an even more stable texture. While not traditional, this technique can be helpful if you’re struggling with whey separation or want a yogurt that holds its shape perfectly for presentations.
Mastering the Preparation: From Milk to Creamy Greek Yogurt
Initial Setup and Temperature Control: The Foundation of Success
The preparation phase is where precision meets patience in Greek yogurt making, and getting these initial steps right sets the stage for yogurt perfection. Temperature control is absolutely crucial – I learned this lesson after several batches that turned out more like expensive milk than the thick, tangy yogurt I was aiming for.
I start by gently heating my milk to 180°F (82°C), stirring occasionally to prevent scorching. This step serves multiple purposes: it concentrates the milk slightly through evaporation, denatures the whey proteins to create a thicker final product, and eliminates any competing bacteria that might interfere with the Protein-rich yogurt cultures. I use a heavy-bottomed saucepan to ensure even heat distribution and prevent hot spots that could curdle the milk.
The cooling phase requires just as much attention as the heating. I cool the milk to exactly 110°F (43°C) before adding my starter culture. This temperature is crucial because it’s warm enough to activate the yogurt cultures but not so hot that it kills them. I’ve found that using an ice bath speeds up the cooling process and gives me better control over reaching the target temperature.
My kitchen setup includes a reliable thermometer, a whisk for gentle stirring, and clean towels for insulation. I’ve learned that consistency in setup leads to consistency in results, and having everything prepared before I start makes the process much smoother and more enjoyable.
Step-by-Step Fermentation: Where Greek Yogurt Comes to Life
The fermentation process is where your heated milk transforms into the tangy, creamy yogurt we all love, and this stage requires both patience and the right environment. After adding my starter culture to the cooled milk, I whisk gently to distribute the cultures evenly throughout the mixture. This step is crucial for consistent fermentation and prevents any pockets of unfermented milk in the final product.
Creating the perfect fermentation environment has been key to my Protein-rich yogurt success. I maintain a consistent temperature between 108-112°F (42-44°C) for 4-8 hours, depending on how tangy I want the final product. In summer, I can simply wrap the container in towels and place it in a warm spot. In winter, I use my oven with just the light on, or I’ve even used a heating pad on low setting wrapped around the container.
During fermentation, I resist the urge to disturb the Protein-rich yogurt. Moving or stirring the mixture can break the delicate protein networks that are forming, resulting in a thinner final product. The yogurt is ready when it has a custard-like consistency and a pleasant tangy aroma. A properly fermented batch will have a clean, bright acidity without any off-flavors.
I’ve learned to taste-test my Protein-rich yogurt during the fermentation process to achieve my preferred level of tanginess. The longer the fermentation, the more pronounced the sour notes become. For a mild Greek yogurt perfect for breakfast bowls, I stop at 4-5 hours. For a tangier version ideal for savory applications, I let it go for 6-8 hours.
The Straining Process: Achieving That Signature Greek Yogurt Thickness
The straining process is what transforms regular yogurt into authentic Protein-rich yogurt, and mastering this technique has been crucial to creating that signature thick, luxurious texture that makes Greek yogurt so special. I use a fine-mesh strainer lined with cheesecloth or a clean kitchen towel, suspended over a large bowl to catch the whey.
The length of straining time dramatically affects the final consistency of your Greek yogurt. For a moderately thick consistency similar to store-bought Greek yogurt, I strain for 2-4 hours. For an ultra-thick, almost cheese-like consistency perfect for spreads and dips, I strain overnight in the refrigerator. The longer straining time concentrates the flavors and creates an incredibly rich, dense Protein-rich yogurt.
I’ve discovered that the temperature during straining affects both the speed and final texture. Straining at room temperature works faster but requires careful monitoring to prevent over-straining. Refrigerator straining takes longer but gives me more control over the final consistency and prevents any risk of spoilage.
The whey that drains from your Greek yogurt is liquid gold in the kitchen. I save this protein-rich liquid for use in smoothies, bread making, or even as a base for homemade ricotta cheese. This byproduct adds incredible value to the homemade Greek yogurt process and reduces waste significantly.
Serving and Enjoying Your Homemade Greek Yogurt
Creative Presentation Ideas: Making Your Greek Yogurt Instagram-Worthy
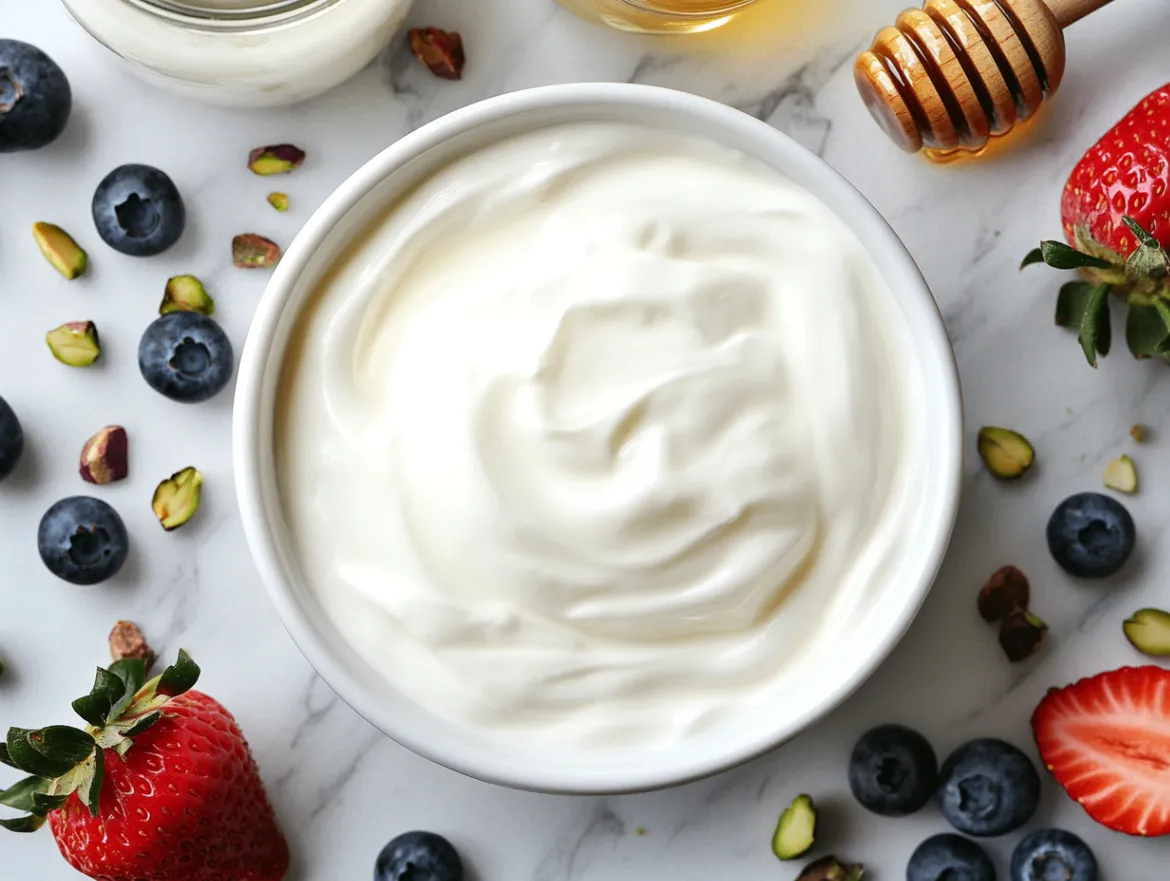
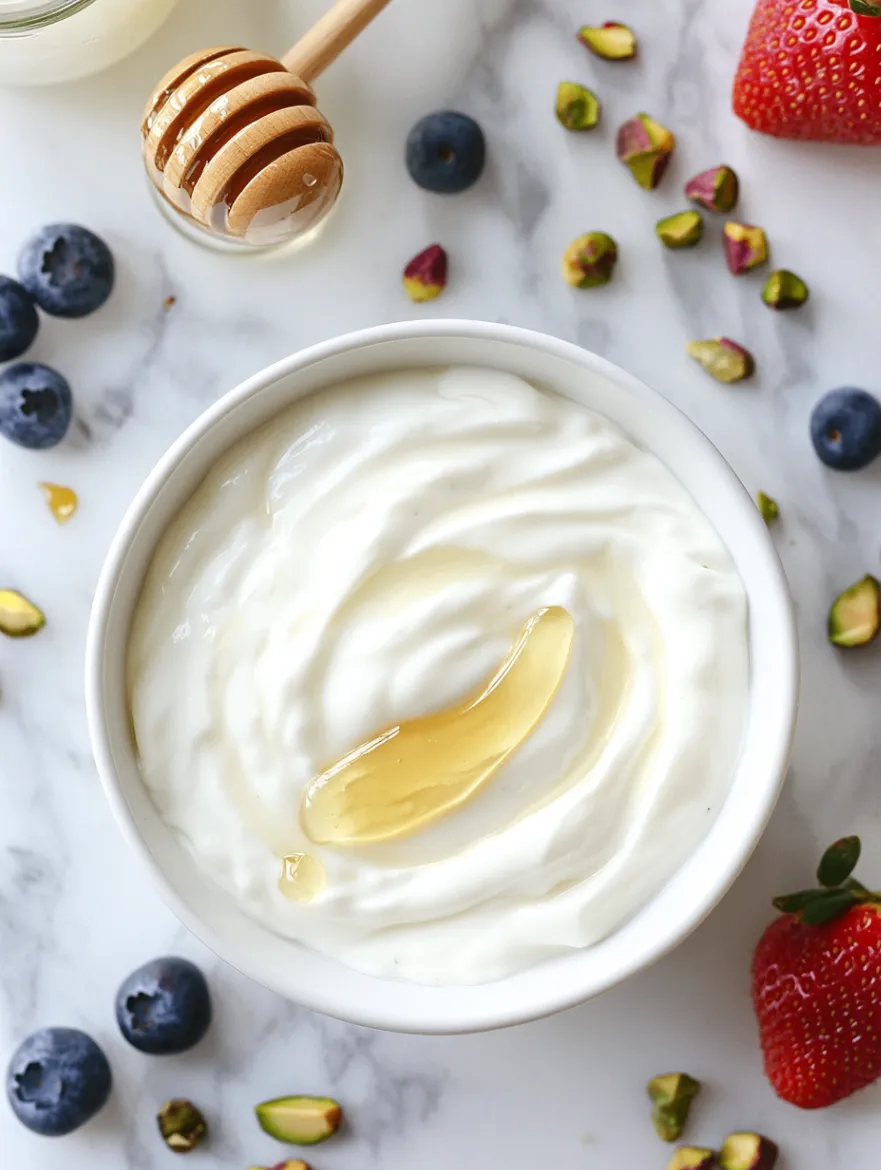
Presenting your homemade Greek-style yogurt beautifully elevates it from a simple breakfast to a culinary experience that rivals any restaurant dessert. I’ve developed several signature presentation techniques that showcase the creamy, luxurious texture of homemade Greek yogurt while highlighting its versatility as both a healthy option and an indulgent treat.
My favorite presentation is the Greek-style yogurt parfait bowl, where I layer thick, creamy yogurt with seasonal fruits, homemade granola, and a drizzle of local honey. The contrast between the pure white yogurt and colorful fruits creates a stunning visual impact. I use clear glass bowls to show off the beautiful layers, and I’ve found that slightly warming the honey makes it drizzle more elegantly over the Greek-style yogurt.
For more elegant occasions, I serve Greek yogurt in individual ramekins topped with fresh berries and a sprinkle of chopped pistachios or almonds. This presentation works beautifully for dinner parties, and guests are always impressed when I mention that the Greek yogurt is homemade. The key is using high-quality garnishes that complement rather than compete with the clean, tangy flavor of the yogurt.
I’ve also mastered the art of the Greek yogurt smoothie bowl, where I blend frozen fruits with my thick homemade yogurt to create a sorbet-like consistency. Topped with fresh fruits, nuts, and seeds arranged in beautiful patterns, these bowls are both nutritious and visually stunning. The extra-thick consistency of homemade Greek yogurt makes these bowls hold their shape perfectly for photos.
Perfect Pairings: Complementary Flavors for Greek Yogurt
Understanding which flavors complement Greek yogurt has transformed how I use this versatile ingredient in my cooking and entertaining. The natural tanginess of Greek yogurt pairs beautifully with both sweet and savory elements, making it incredibly versatile for different meals and occasions.
For sweet applications, I love pairing Greek yogurt with Mediterranean flavors like honey, figs, and pistachios. This combination creates an authentic Greek experience and highlights the yogurt’s natural affinity for these traditional ingredients. Fresh berries, especially blueberries and strawberries, provide beautiful color contrast and complement the yogurt’s acidity with their natural sweetness.
In savory applications, Greek yogurt becomes an incredibly versatile ingredient. I use it as a base for Mediterranean-inspired dips, mixing it with cucumber, garlic, and fresh herbs to create a homemade tzatziki that’s far superior to any store-bought version. The thick consistency of homemade Greek yogurt holds up beautifully to bold flavors and doesn’t become watery when mixed with vegetables.
I’ve discovered that Greek yogurt makes an excellent substitute for sour cream in many recipes, providing the same richness and tanginess with added protein and probiotics. It works beautifully in both hot and cold preparations, though I’m careful not to boil it in hot dishes to prevent curdling.
Storage and Longevity: Keeping Your Greek Yogurt Fresh
Proper storage is crucial for maintaining the quality and safety of your homemade yogurt, and I’ve learned several techniques that extend its shelf life while preserving its optimal texture and flavor. Unlike store-bought varieties with preservatives, homemade Greek yogurt requires more careful handling to ensure it stays fresh and delicious.
I store my Greek yogurt in clean, airtight glass containers in the refrigerator, where it typically stays fresh for 7-10 days. Glass containers are superior to plastic because they don’t absorb odors or flavors, and they’re easier to clean thoroughly between batches. I always use clean utensils when removing yogurt from the container to prevent introducing bacteria that could spoil the batch.
The surface of Greek yogurt sometimes develops a layer of whey, which is completely normal and safe. I simply stir this back into the yogurt, though some people prefer to drain it off. If you notice any mold, off-odors, or unusual colors, it’s time to discard the batch and start fresh.
For longer storage, I’ve successfully frozen Greek yogurt in ice cube trays, then transferred the frozen cubes to freezer bags. While the texture changes slightly after freezing, these cubes work perfectly in smoothies and provide a convenient way to always have Greek yogurt on hand. Frozen homemade Greek yogurt maintains its nutritional value and probiotics when properly stored.
 DINNER
 LUNCH
LUNCH Desserts
 BREAKFAST
For more amazing recipes, be sure to check out our other sections to explore a variety of ideas that will enrich your cooking experience. Each section offers its own unique flavors to ensure a delightful culinary journey:
Easy and Quick Recipes: A collection of dishes that guarantee delicious meals with minimal effort and time.
Healthy Recipes: Discover healthy and delicious options that fit your lifestyle.
Desserts: A diverse selection of sweets that will add a special touch of sweetness to your table.
Lunch Recipes: Tasty lunch ideas that you can easily prepare to delight your family.
Dinner Recipes: Delicious and easy-to-make recipes that will make your dinner a memorable occasion.

Frequently Asked Questions About Greek Yogurt
1. How long does it take to make homemade Greek yogurt from start to finish?
Making Greek yogurt at home is definitely a time investment, but most of it is hands-off waiting time. The active preparation takes about 30 minutes – heating the milk, cooling it, and adding the starter culture. The fermentation process takes 4-8 hours depending on your desired tanginess, and straining takes another 2-4 hours for regular thickness or overnight for ultra-thick consistency. So while the total time is 8-20 hours, you’re only actively working for about 30 minutes. I usually start a batch in the evening, let it ferment overnight, and strain it the next morning.
2. Can I use non-dairy milk to make Greek yogurt?
While traditional Greek yogurt is made with dairy milk, you can experiment with non-dairy alternatives, though the results will be different. Coconut milk produces the richest, most yogurt-like consistency, especially if you use full-fat canned coconut milk. Soy milk also works well due to its protein content. However, almond, oat, and rice milk typically don’t thicken as well and may require additional thickeners like agar or tapioca starch. The fermentation process is similar, but you’ll need to use a non-dairy starter culture or a probiotic capsule to introduce the necessary bacteria.
3. Why is my homemade Greek yogurt not as thick as store-bought versions?
Several factors can affect the thickness of your Greek yogurt. The most common issue is insufficient straining time – store-bought Greek yogurt is often strained for 12+ hours to achieve that ultra-thick consistency. The type of milk you use also matters; whole milk produces thicker yogurt than low-fat varieties. Adding powdered milk during preparation can help create a thicker base. Temperature control during fermentation is crucial too – if the temperature gets too high or low, it can affect the protein structure and final thickness. Finally, some commercial producers add thickeners like pectin or gelatin, which isn’t necessary for homemade versions but explains the difference in texture.
4. How much money can I save by making Greek yogurt at home?
The cost savings of making Greek yogurt at home are substantial. A gallon of quality milk costs around $4-6 and produces about 2-3 cups of thick Greek yogurt, depending on how long you strain it. Compare this to store-bought Greek yogurt at $4-6 for a single 32-ounce container, and you’re saving 60-70% by making it yourself. If your family goes through a lot of Greek yogurt like mine does, this can add up to $200-300 in annual savings. Plus, you get the added benefits of controlling the ingredients, customizing the thickness and tanginess, and having fresh yogurt whenever you want it.
5. What should I do with all the whey that’s left over from straining?
The whey from Greek yogurt making is incredibly valuable and shouldn’t be wasted! It’s packed with protein and probiotics, making it perfect for smoothies – just substitute it for some of the liquid in your favorite smoothie recipe. I use whey in bread making, where it adds protein and creates a lovely tangy flavor. It’s also excellent for making homemade ricotta cheese by heating it and adding an acid like lemon juice. Some people use whey as a natural fertilizer for plants, as it’s rich in nutrients. You can also drink it straight, though it’s quite tart. Whey keeps in the refrigerator for about a week, so you have time to find creative uses for it.
The Journey to Perfect Greek Yogurt: Your Next Delicious Adventure
Making your own Greek yogurt at home isn’t just about saving money or avoiding additives – it’s about connecting with a traditional process that has nourished families for thousands of years. Every batch you make will teach you something new about fermentation, flavor development, and the incredible transformation that happens when simple ingredients are treated with care and patience.
I encourage you to start your Greek yogurt journey today. Begin with a small batch using the techniques I’ve shared, and don’t be discouraged if your first attempt isn’t perfect. Like any skill worth developing, making exceptional Greek yogurt takes practice, but the rewards are so worth it. The pride you’ll feel serving homemade Greek yogurt to your family and friends, knowing exactly what went into every creamy spoonful, is incomparable.
Remember that every kitchen is different, and you may need to adjust temperatures, timing, or techniques to work with your specific environment. Keep notes on what works best for you, and don’t be afraid to experiment with different milk types, fermentation times, and straining methods until you find your perfect Greek yogurt formula.
I’d love to hear about your Greek yogurt adventures! Share your successes, challenges, and creative variations. There’s something magical about this ancient food that continues to bring people together, and I’m excited for you to experience the satisfaction of creating something so nourishing and delicious with your own hands.